
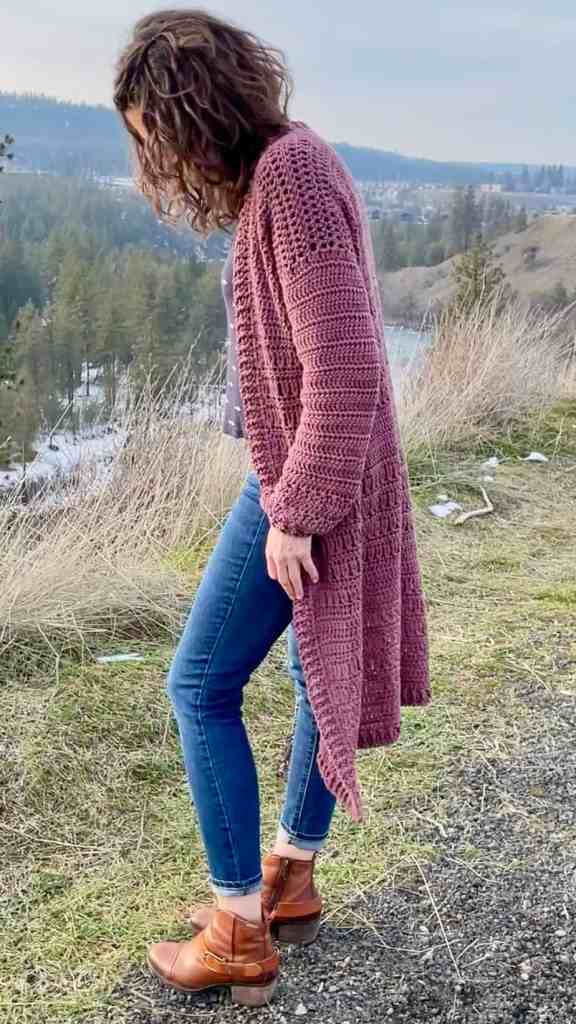
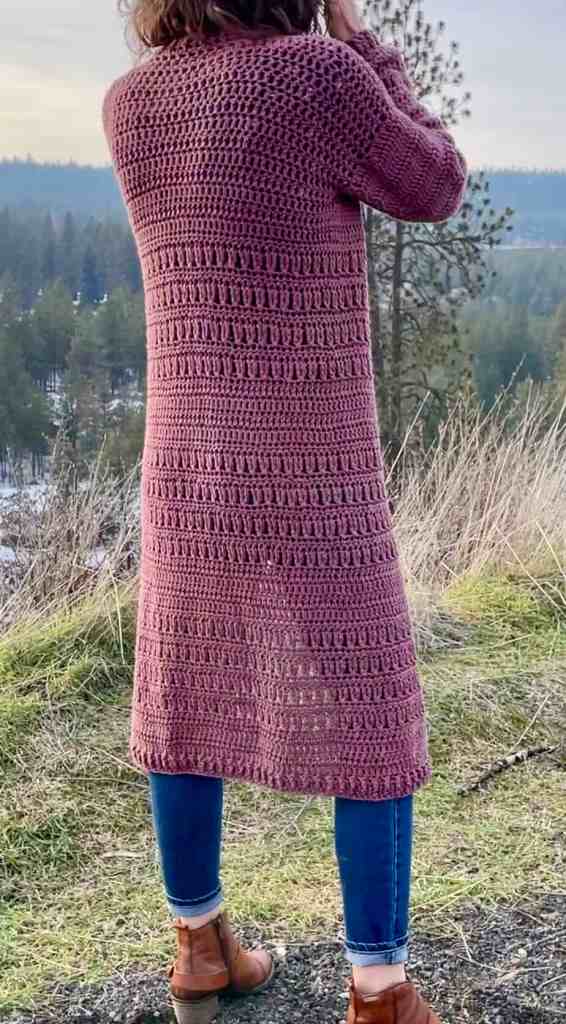
My favorite thing about this duster cardigan is the drape. Even though I use worsted weight yarn, I’ve increased the standard “recommended” hook size and used a long stitch pattern to create a really loose and delicious drape. The duster provides cover and warmth, but is much lighter than a jacket. In fact, the duster is made up with 100% cotton which not only makes it machine washable but makes it breathable and super soft. It is named Arkose after a sandstone with a similar color as the yarn I used, but you can choose your favorite color for your version of this duster cardigan free crochet pattern!

This free pattern is supported by ads on my blog. You can also purchase the ad-free, printable pattern from my Etsy shop.
The 10-page PDF printable pattern includes lots of helpful in-the-making photos as well as a size chart that includes measurements and stitch counts for all the different sizes. The size chart and related tips show you how to customize the sizes to fit you perfectly. Whether you want the length longer, the sleeves shorter, the body wider – it’s all there!
Otherwise, let’s get to the Arkose Duster Cardigan free crochet pattern right here and now!

Gauge:
4�x4� = 13 stitches x 5 rows of double crochet.
I encourage you to make a small rectangle swatch to be sure your gauge is correct. It’s also a good idea to measure now and again and try it on as you go along. This will ensure your duster will fit right when it’s done! This cardigan has a lot of drape and flexibility so gauge is a general guideline.
Sizing:
This pattern is written in size XS with sizes S, M, L, XL, 2XL, 3XL, 4XL & 5XL following in parenthesis like this: XS(S, M, L, XL)(2XL, 3XL, 4XL, 5XL). The size can be easily modified by taking your measurements and adjusting the number of stitches or rows. The model pictured is wearing size XS with height 5’4 and a bust of 33″.
TIP: The written pattern also includes a detail sizing grid with measurements in inches and the number of rows and stitches for each size. Using the sizing grid compared to your measurements will allow you to easily customize the coverup to your exact measurements.
Length Measurement:
XS: 42″
S: 43.2″
M: 45″
L: 46.5″
XL: 48″
2XL: 49.5″
3XL: 51″
4XL: 52.5″
5XL: 54″
Bust Measurement: the bust measurements here are based on the cardigan laying flat and closed. Just remember when you wear it, it will add several inches across the front because it will be worn open (as pictured). So, don’t let these measurements throw you off because they will definitely “look” too tight.
XS: 32″
S: 34″
M: 36″
L: 38″
XL: 40″
2XL: 42″
3XL: 44″
4XL: 46″
5XL: 48″

Materials you will need for the Arkose Duster Cardigan free crochet pattern:
- Lion Brand Yarns Pima Cotton | 100% Cotton | Weight 4 / Worsted
- Colors & Number of skeins:
- ROSE TAUPE – x7(8, 8, 9 ,9)(10, 10, 11, 11)
- Colors & Number of skeins:
- Hook: 7 mm
- Tapestry Needle
- Stitch Markers
- Scissors
- Measuring Tape
Abbreviations used in this pattern:
ch – chain
st – stitch
sk – skip
sl st – slip stitch
fdc – foundation double crochet
hdc – half double crochet
dc – double crochet
tc – treble crochet
[…] – number of stitches in row
(…) x – repeat instructions indicated number of times

The Pattern
Main Body:
NOTES:
- The main body is worked in rows, turning at the end of each row – the number of turning chains will be specified per row and will vary from 2-4
- The turning chain always counts as a stitch
- Wrong side (ws) will be indicated so you can keep track of the outside and inside of the cardi
Row 1 (ws): fdc 96(102, 108, 114, 120)(126, 132, 138, 144), ch 3, turn
Row 2: (fpdc in next st, bpdc in next st) x across, ch 3, turn
Row 3: (bpdc in next st, fpdc in next st) x across, ch 3, turn
Row 4-7: sk next st, dc across, ch 4, turn
Row 8: sk next 2, tc in next, tc in last skipped st, (sk next st, tc in next st, tc in last sk st) x across, ending with tc in turning ch), ch 2, turn
Row 9: sk next st, hdc across, ch 4, turn
Row 10-15: repeat rows 8-9 (ending with the hdc row)
Row 16-19: repeat rows 4-7
Row 20-27: repeat rows 8-15
Row 28-31: repeat rows 4-7
Row 32-39: rep rows 8-15, ending with a ch 3 rather than a ch 4, turn
At this point, the rest of the body of the cardigan is worked using dc rows. Soon, you will divide the rectangle into 3 section – 1 for the back and 2 for the front panels. You can easily adjust the length of the cardigan by adding dc rows before you do the dividing as just described.
Row 40-43(45, 46, 48, 49)(51, 52, 54, 55): dc in each st across
Divide work into 3 sections for back & front panels: The back will have 54(58, 60, 64, 66))(70, 72, 76, 78) st, each side panel will have 21(22, 24, 25, 27)(28, 30, 31, 33) st
Panels:
NOTES:
- You will now be working on the 3 panels as divided above
- You will be working turning rows of dc
- chain 3 and turn at the end of every row – the turning chain counts as a stitch
- If you want the cardigan longer, continue to add dc rows to the panels until you find your perfect length
FRONT RIGHT PANEL:
Row 44-53(46-55, 47-57, 49-59, 50-61)(52-63, 53-65, 55-67, 56-69): dc in each st across [21](22, 24, 25, 27)(28, 30, 31, 33)
Fasten off.
BACK PANEL:
Rejoin yarn with a sl st in the next st marker for the back panel. When you make your first dc of row 44, be sure to not forget to dc in the st where you just rejoined the yarn with a sl st.
Row 44-53(46-55, 47-57, 49-59, 50-61)(52-63, 53-65, 55-67, 56-69): dc in each st across [54](58, 60, 64, 66))(70, 72, 76, 78)
Fasten off.
FRONT LEFT PANEL:
Rejoin yarn with a sl st in the next st marker for the front left panel. When you make your first dc of row 44, be sure to not forget to dc in the st where you just rejoined the yarn with a sl st.
Row 44-53(46-55, 47-57, 49-59, 50-61)(52-63, 53-65, 55-67, 56-69): dc in each st across [21](22, 24, 25, 27)(28, 30, 31, 33)
Fasten off and weave in end.
Assembly of the main body:
- Choose the side you want facing out, they will be very similar and it’s just up to you which side you like the look of better! But don’t stress about it, it’ll look great either way!
- Lay the piece flat and fold the front panels inward to lay on top of the back panel, with the right side facing out.
- Using a length of yarn and a tapestry needle, seam across the shoulders from the outside corner into the center using the whip stitch.
- Fasten off and weave in all ends.
Ribbed border / collar:
Rejoin yarn at the front bottom corner (right or left, depending on if you’re right-handed or left-handed).
Row 1: dc* up the front edge, around the neck, and back down the opposite front edge, ch 3, turn *Remember, your panels have rows of hdc, dc AND tc. As you go along, be sure to place 1 dc in the end of the hdc rows, 2 dc in the end of the dc rows and 3 dc in the end of the tc rows.
Row 2: (fpdc in next st, bpdc in next st) around to the start of the other front edge where you began
Row 3: (bpdc in next st, fpdc in next st) around to the start of the other opposite front edge
Fasten off and weave in end. You’re almost there! All you need to do now is add the tapered sleeves to your Arkose Duster Cardigan free crochet pattern and you’ll be modeling it in no time.

Sleeves (Arkose Duster Cardigan free crochet pattern):
NOTES:
- The sleeves are crocheted directly onto the cardigan
- The sleeves are made using turning rounds, slip stitching, chaining 3, and turning after each round unless otherwise specified
- The sleeves should have 40(40, 44, 44, 48)(48, 52, 52, 56) stitches around based on the sleeve opening.
- Check the length of your sleeves as you near the end and add or subtract rows to achieve your desired length.
Rejoin yarn at sleeve opening in the armpit using a sl st and ch 3 which counts as your first dc
Rnd 1: dc in each st around the arm opening, placing 2 dc in the end of each row [40](40, 44, 44, 48)(48, 52, 52, 56)
Rnd 2-3(4, 6, 7, 8)(8, 9, 9, 10): dc in each st around [40](40, 44, 44, 48)(48, 52, 52, 56)
Rnd 4(5, 7, 8, 9)(9, 10, 10, 11): dc2tog in next st, dc in each remaining st around [39](39, 43, 43, 47)(47, 51, 51, 55)
Rnd 5(6, 7, 9, 10)(10, 11, 11, 12): dc in each st around [39](39, 43, 43, 47)(47, 51, 51, 55)
Rnd 6-19(7-20, 8-21, 10-23, 11-24)(11-24, 12-25, 12-25, 13-26): repeat rounds 4 & 5 [32](32, 36, 36, 40)(40, 44, 44, 48)
Rnd 20(21, 22, 24, 25)(25, 26, 26, 27): dc2tog in next st, dc in each remaining st around, ch 2 turn [31](31, 35, 35, 39)(39, 43, 43, 47)
Rnd 21(22, 23, 25, 26)(26, 27, 27, 28): hdc in each st around, ch 4, turn [31](31, 35, 35, 39)(39, 43, 43, 47)
Rnd 22(23, 24, 26, 27)(27, 28, 28, 29): sk next 2, tc in next st, tc in last skipped st, (sk next st, tc in next st, tc in last sk st) x around, ending with a tc in turning ch), ch 2, turn [31](31, 35, 35, 39)(39, 43, 43, 47)
Rnd 23(24, 25, 27, 28)(28, 29, 29, 30): sk next st, hdc around, ch 4, turn [31](31, 35, 35, 39)(39, 43, 43, 47)
Rnd 24-25(25-26, 26-27, 28-29, 29-30)(29-30, 30-31, 30-31, 31-32): repeat rows 22-23, except end with a turning chain of 2 rather than 4 [15](15, 19, 19, 23)(23, 27, 27, 31)
Try on the cardigan and decide how you feel about the length of the sleeves. From here, you’ll be crocheting the cuff which measures 1.5″, regardless of the cardigan size you’re crocheting. If you want the sleeves to be longer, repeat rows XS 24 & 25 (or your corresponding size) until you’re happy with the length, then proceed to the next rnd.
Rnd 26(27, 28, 30, 31)(31, 32, 32, 33): sk 1st st, hdc2tog around, ch 3, turn [16](16, 18, 18, 20)(20, 22, 22, 24)
Rnd 27(28, 29, 31, 32)(32, 33, 33, 34): dc in each st around, ch 3, turn [16](16, 18, 18, 20)(20, 22, 22, 24)
Rnd 28(29, 30, 32, 33)(33, 34, 34, 35): (fpdc in next st, bpdc in next st) x around [16](16, 18, 18, 20)(20, 22, 22, 24)
Rnd 29(30, 31, 33, 34)(34, 35, 35, 36): (bpdc in next st, fpdc in next st) x around [16](16, 18, 18, 20)(20, 22, 22, 24)
Repeat with the other sleeve. Fasten off and weave in ends.
Try on your hard work, and go grab your drink. Well done – enjoy your new Arkose Duster Cardigan!
Please post your pictures on Instagram and tag me @offthebeatenhook!

Want more free crochet patterns? Check these out!
- Rainbow Love Crop Top- Free Crochet Pattern
- Mt Rainier Tweed Sweater – Free Crochet Pattern
- Diamond Ridge Throw Blanket – Free Crochet Pattern
- Seahorse Amigurumi – Free Crochet Pattern
- Milk Carton Amigurumi – Free Crochet Pattern
Leave a Reply