
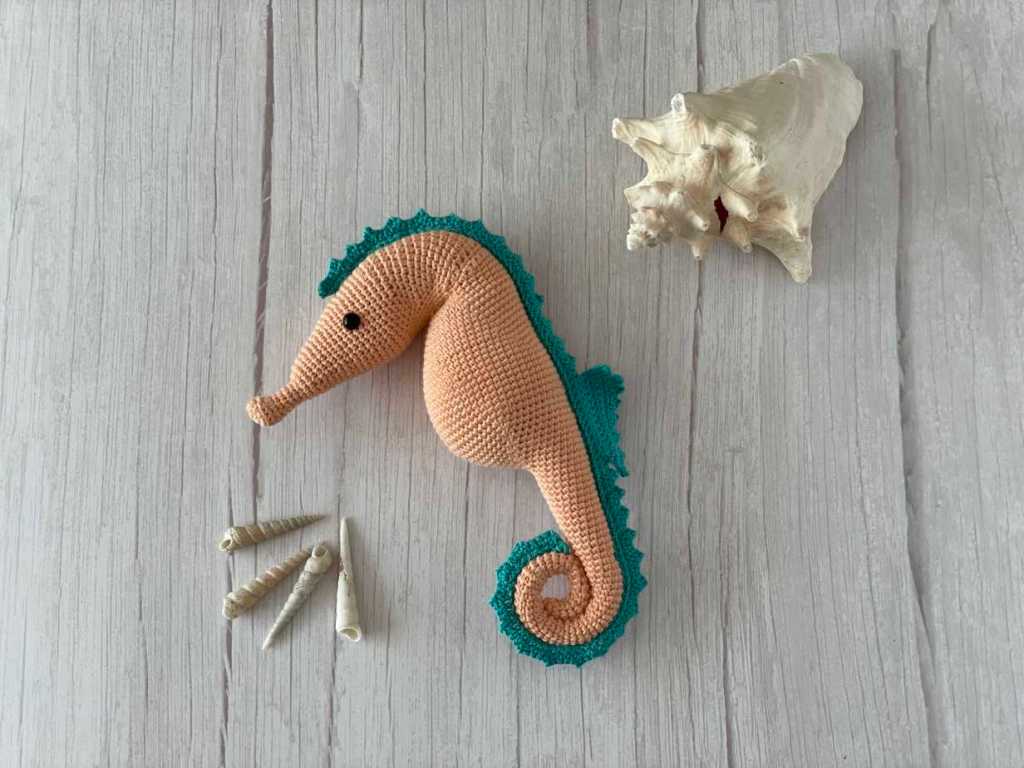
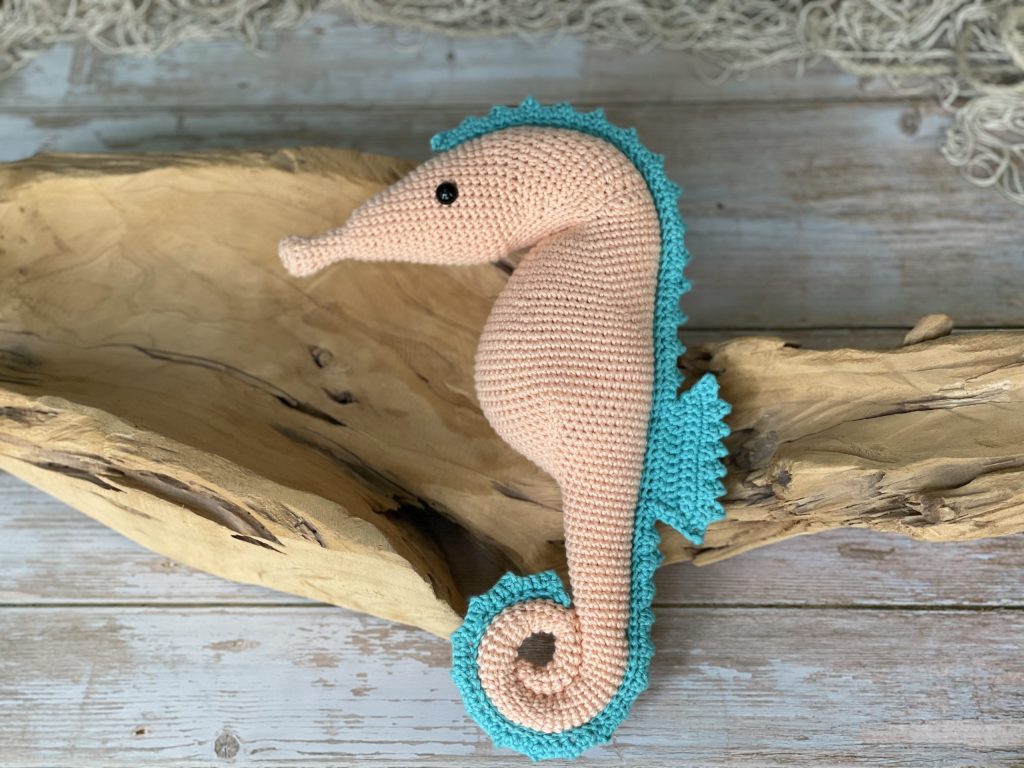
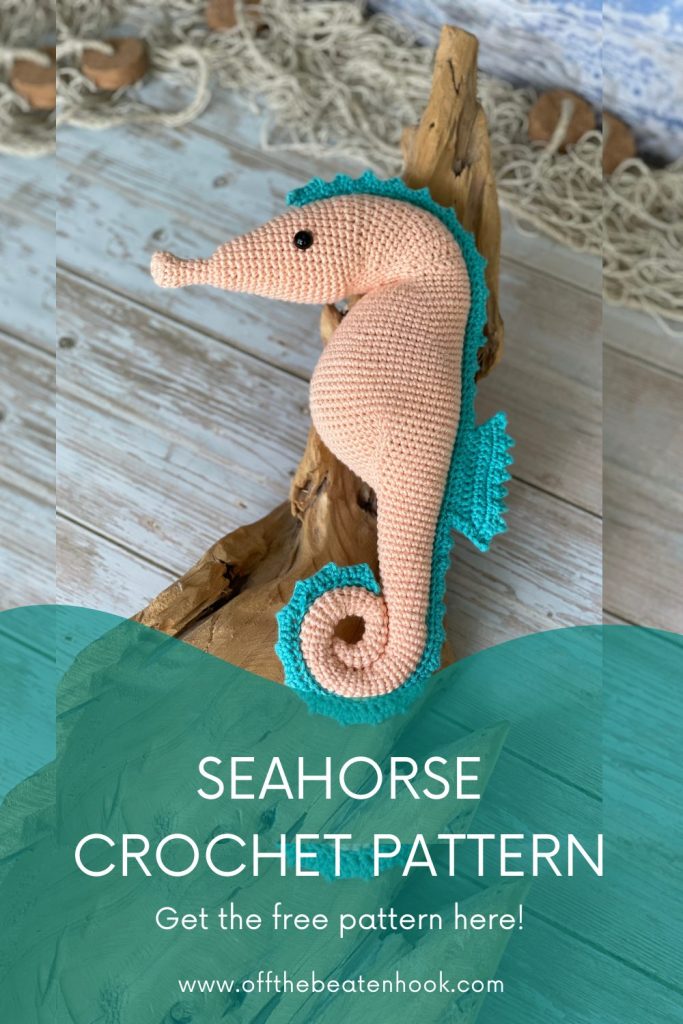
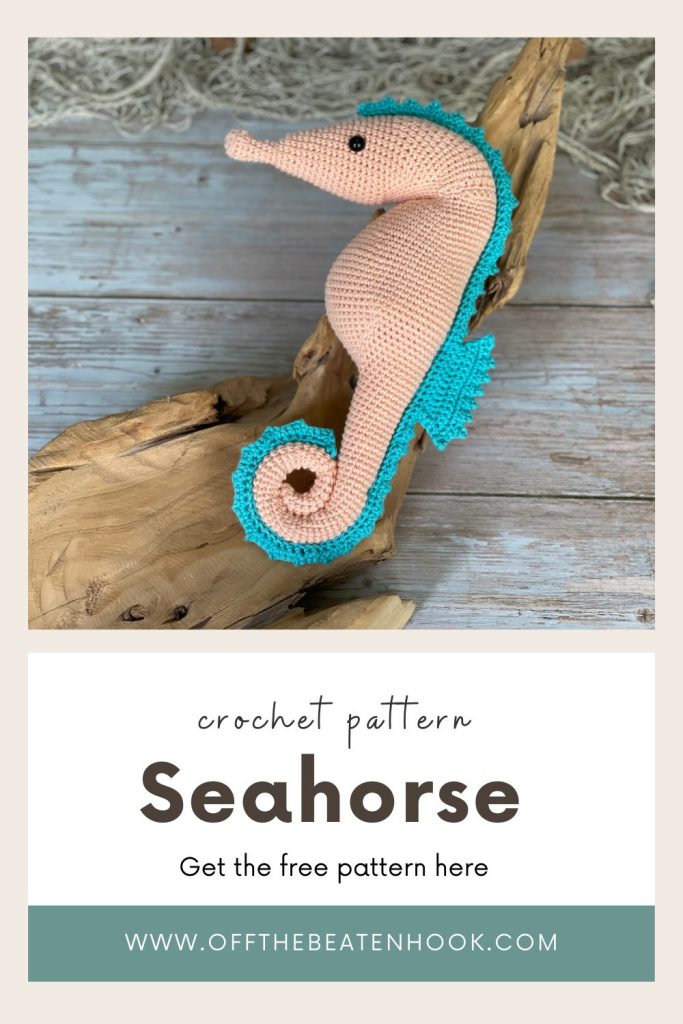
If you love crocheting cute sea creatures, you’re going to adore this seahorse crochet pattern! This beginner-friendly amigurumi pattern shows you how to create a sweet, curly-tailed seahorse that’s perfect for nursery decor, gifts, ocean-themed playsets, or just for fun.
Whether you’re new to amigurumi or a seasoned crocheter looking for a quick and satisfying project, this seahorse works up beautifully with simple stitches and clear shaping.
Best of all — you can follow along with the free written pattern on this page, or grab the ad-free printable PDF to crochet distraction-free. The PDF can be found in my shop here or on Ravelry here.
Jump into the seahorse crochet pattern now, or pin it for later here!

Why You’ll Love the Seahorse Crochet Pattern
This crochet seahorse is designed to be:
✔ Beginner-friendly
✔ Worked in continuous rounds
✔ Perfect for scrap yarn projects
✔ A quick make for gifts or markets
The finished seahorse has a soft, sculpted shape with a curled tail and adorable snout — making it a standout addition to any crochet sea animal collection.
This crochet pattern is reader supported by ads on my blog. If you’d rather print the pattern for some cozy couch crocheting, you can find the ad-free, printable PDF in my shop here
Policies & Disclaimers:
This crochet pattern is for PERSONAL USE ONLY. This pattern or parts of it may not be reproduced, resold, distributed, published, altered, translated, posted or shared without authorization. You can sell your finished items provided that you credit Off the Beaten Hook as the designer using this verbiage, “This pattern was designed by Lindsey Roe and Off the Beaten Hook.” Thank you for your respectfulness!
This post contains affiliate links for materials I use and love. If you purchase something using one of these links I may earn a small commission which in no way affects the cost to you. These partnerships help me support my small business which allows me to provide you with free crochet patterns. Thank you from the bottom of my heart for your support!

🌿 Eco-Friendly Crafting
What makes this crochet pattern eco-friendly and sustainable?
THE YARN: I use only sustainable and eco-friendly yarn that has been ethically grown/raised and processed, putting the people and the planet first. This is why I chose 100% natural yarn for this pattern.
HANDMADE FOR LONGEVITY: Creating your own seahorse plushie promotes mindful consumption. This durable, handmade toy reduces the need for mass-produced alternatives.
THE SLOW YARN MOVEMENT: I’m participating in the Slow Yarn Movement. There’s far too much to talk about here, but please take a few minutes to learn about what this means by reading the article I wrote about the Slow Yarn Movement as part of my 6-part Sustainable Crochet Series.
If you’re interested in learning more about sustainable crochet you can read all about it in the 6-part series I wrote covering everything about Sustainable Crochet and how to implement it into your own crafting starting today!
Meet Yoyo the Seahorse:
Down deep in the sea where the blue waters swayed,
Lived Yoyo the seahorse who drifted and swayed.
She twirled with the tides in a wobbly soft way,
But wished she could zoom like the fish every day.
The dolphins went SPLASH and the tunas went ZOOM,
They darted past coral — vroom vroom vroom vroom!
While Yoyo went wobble… and wiggle… and slow,
“Oh why am I different?” she whispered so low.
“I try and I try but I just can’t be fast,
I’ll always be last while the others zoom past.
If only I swam like the rest of the sea,
Then maybe — just maybe — they’d notice poor me.”
She drooped in the kelp with a heavy, sad sigh,
When Old Turtle drifted slowly drifting on by.
“Dear Yoyo,” he said with a warm gentle grin,
“Why wish to be someone you’ve never been?”
“The sea needs your softness, your curves and your sway,
Your gentle slow dancing brightens each day.
Not everyone’s made for a hurry and race,
Some shine by moving with calm and with grace.”
So Yoyo tried drifting instead of feeling small,
She twirled with the tide like a ribbon in fall.
She floated past coral in loops soft and bright,
And suddenly felt something sparkle inside.
The fish gathered round with a gasp and a cheer,
“Yoyo! You’re beautiful when you drift near!
We love how you move — you glow when you sway!
You make the whole ocean happier each day!”
Yoyo smiled wide from her nose to her tail,
She didn’t need changing to finally prevail.
For being herself was already enough —
And that made her strong… kind… and wonderfully tough.
Not everyone is meant to race —
some of us are meant to dance with the waves. 💙
Seahorse Crochet Pattern Guide:
Size & Gauge:
Size: 14″
Gauge: N/A
Materials you will need:
Yarn:
Paintbox Yarns Cotton DK | 100% Cotton | DK/Light Worsted/3
Colors:
- Peach Orange: 1 ball
- Marine Blue: 1 ball (you’ll use less than 1/4 of the ball)
Other tools and materials needed:
- Crochet Hook Size: 3.00 mm
- Safety Eyes: Size 10mm (SERIOUSLY, these are the ones with the backs that are easier to put on!)
- Tapestry Needle (bent tips make all the difference!)
- Stitch Markers
- Scissors
- Stuffing
Abbreviations used in the Seahorse Crochet Pattern:
This pattern is written in English, using US terms. If needed, you can find a handy term conversion chart right here in my Resource Library.
ch – chain
st – stitch
hk – hook
sk – skip
mc – magic circle/magic ring
sl st – slip stitch
sc – single crochet
hdc – half double crochet
fsc – foundation single crochet
inc – increase
dec – decrease
BLO – back loop only
picot – picot stitch
rep – repeat
(…) x – repeat instructions indicated number of times
[…] – number of stitches in row/round
PH – photo reference number
Yoyo’s ad-free pattern is a beautiful 8-page PDF document with detailed instructions and accompanied by LOTS of clear pictures to help you along the way. Find the Yoyo the Seahorse Amigurumi Crochet Pattern here!
The Seahorse Crochet Pattern
Head, body & tail:
Note: The head, body, and tail will be worked in continuous rounds using the peach yarn.
Rnd 1: st 8 sc in a magic circle [8]
Rnd 2: inc in each st around [16]
Rnd 3: BLO sc in each st around [16]
Rnd 4: (sc in next 2 st, dec in next st) x4 [12]
Rnd 5: sc in next 2 st, dec in next 4 st, sc in next 2 st [8]
Stuff the nose.
Rnd 6-9: sc in each st around [8]
Rnd 10: (sc in next st, inc in next st) x4 [12]
Rnd 11: sc in next 6 st, inc in next 4 st, sc in next 2 st [16]
Rnd 12-13: sc in each st around [16]
Rnd 14: (sc in next 3 st, inc in next st) x4 [20]
Rnd 15-16: sc in each st around [20]
Rnd 17: (sc in next 4 st, inc in next st) x4 [24]
Rnd 18-19: sc in each st around [24]
Rnd 20: (sc in next 5 st, inc in next st) x4 [28]
Rnd 21-22: sc in each st around [28]
Rnd 23: (sc in next 6 st, inc in next st) x4 [32]
Rnd 24-25: sc in each st around [32]
Rnd 26: (sc in next 7 st, inc in next st) x4 [36]
Rnd 27-28: sc in each st around [36]
Rnd 29: sc in next 2, sl st in next 6, sc in next 8, hdc in next 14, sc in next 6 [36]
Rnd 30: sc in next st, sl st in next 8, sc in next 7, hdc in next 14, sc in next 6 [36]
Insert the eyes between rounds 22-23, spaced 15 stitches in between. Stuff.
Rnd 31: sl st in next 10, sc in next 6, hdc in next 14, sc in next 5, sl st in next st [36]
Rnd 32: sl st in next 11, sc in next 6, hdc in next 14, sc in next 5 [36]
Rnd 33-34: sc in next st, sl st in next 11, sc in next 5, hdc in next 14, sc in next 5 [36]
Rnd 35: sc in next st, sl st in next 11, sc in next 6, hdc in next 12, sc in next 6 [36]
Rnd 36-37: sl st in next 14, sc in next 6, hdc in next 12, sc in next 4 [36]
Rnd 38-40: sc in next 3, sl st in next 14, sc in next 5, hdc in next 12, sc in next 2 [36]
Rnd 41: sc in next 3, sl st in next 14, sc in next 5, hdc in next 12, dec in next st [35]
Rnd 42: sc in next 3, sl st in next 14, sc in next 3, dec in next st, hdc in next 12, sc in next 2 [34]
Rnd 43: dec in next st, sc in next st, sl st in next 14, sc in next st, dec in next st, sc in next 12, ch 1, turn, skip next st, sc in next 12, ch 1, turn, skip next st, sc in next 12 st

Rnd 44: sc in next 3, sl st in next 13, sc in next 15 [31]
Rnd 45: sc in each st around [31]
Rnd 46: (sc in next 3 st, inc in next st) x4, sc in next 15 st [35]
Rnd 47: (sc in next 4 st, inc in next st) x4, sc in next 15 st [39]
Rnd 48: (sc in next 5 st, inc in next st) x4, sc in next 15 st [43]
Rnd 49: sc in each st around [43]
Rnd 50: (sc in next 6 st, inc in next st) x4, sc in next 6 st, (dec in next st, sc in next 2 st) x2 [45]
Rnd 51: sc in each st around [45]
Rnd 52: (sc in next 7 st, inc in next st) x4, sc in next 6 st, dec in next st, sc in next 3 st, dec in next st [47]
Rnd 53: sc in each st around [47]
Rnd 54: (sc in next 8 st, inc in next st) x4, sc in next 6 st, dec in next st, sc in next 3 st [50]
Rnd 55: dec in next st, sc in next 48 [49]
Rnd 56: (sc in next 9 st, inc in next st) x4, sc in next 4 st, dec in next st, sc in next 3 st [52]
Rnd 57: dec in next st, sc in next 50 st [51]
Rnd 58: (sc in next 10 st, inc in next st) x4, sc in next 2 st, dec in next st, sc in next 3 st [54]
Rnd 59: dec in next st, sc in next 52 st [53]
Rnd 60: (sc in next 11 st, inc in next st) x4, dec in next st, sc in next 3 st [56]
Rnd 61: dec in next st, sc in next 54 st [55]
Rnd 62-67: sc in each st around [55]
At this point, with a strand of yarn and a tapestry needle, I took a few stitches up and down through the neck to help it curve more dramatically and fastened it off on the inside. Also, at this point, make sure your starting point for each row is centered on the back of the neck. If it’s not centered, give or take a few single crochets at this point to do so.

Rnd 68: sc in next 2, (sc in next 11, dec in next st) x3, sc in next 14 [52]
Rnd 69: sc in next 3, (sc in next 10, dec in next st) x3, sc in next 13 [49]
Rnd 70: sc in next 4, (sc in next 9, dec in next st) x3, sc in next 12 [46]
Rnd 71: sc in next 4, (sc in next 8, dec in next st) x3, sc in next 12 [43]
Rnd 72: sc in next 5, (sc in next 7, dec in next st) x3, sc in next 11 [40]
Rnd 73: sc in next 5, (sc in next 6, dec in next st) x3, sc in next 11 [37]
Rnd 74: sc in next 5, (sc in next 5, dec in next st) x3, sc in next 11 [34]
Rnd 75: sc in next 6, (sc in next 4, dec in next st) x3, sc in next 10 [31]
Rnd 76: sc in next 6, (sc in next 3, dec in next st) x3, sc in next 10 [28]
Rnd 77: sc in next 7, (sc in next 2, dec in next st) x3, sc in next 9 [25]
Rnd 78: sc in next 7, (sc in next st, dec in next st) x3, sc in next 9 [22]
Stuff.
Rnd 79-81: sc in each st around [22]
Rnd 82: sc in next 10 st, dec in next st, sc in next 10 st [21]
Rnd 83: sc in each st around [21]
Rnd 84: sc in next 10 st, dec in next st, sc in next 9 st [20]
Rnd 85: sc in each st around [20]
Rnd 86: sc in next 9 st, dec in next st, sc in next 9 st [19]
Rnd 87: sc in each st around [19]
Rnd 88: sc in next 9 st, dec in next st, sc in next 8 st [18]
Rnd 89: sc in each st around [18]
Rnd 90: sc in next 8 st, dec in next st, sc in next 8 st [17]
Rnd 91: sc in each st around [17]
Rnd 92: sc in next 8 st, dec in next st, sc in next 7 st [16]
Rnd 93: sc in each st around [16]
Rnd 94: sc in next 7 st, dec in next st, sc in next 7 st [15]
Rnd 95: sc in each st around [15]
Rnd 96: sc in next 7 st, dec in next st, sc in next 6 st [14]
Rnd 97: sc in each st around [14]
Rnd 98: sc in next 6 st, dec in next st, sc in next 6 st [13]
Rnd 99: sc in each st around [13]
Rnd 100: sc in next 6 st, dec in next st, sc in next 5 st [12]
Rnd 101: sc in each st around [12]
Rnd 102: sc in next 5 st, dec in next st, sc in next 5 st [11]
Rnd 103: sc in each st around [11]
Rnd 104: sc in next 5 st, dec in next st, sc in next 4 st [10]
Rnd 105-124: sc in each st around [10] Stuff every few rounds.

Rnd 125: sc in next 4 st, dec in next st, sc in next 4 st [9]
Rnd 126-130: sc in each st around [9]
Rnd 131: sc in next 4 st, dec in next st, sc in next 3 st [8]
Rnd 132-136: sc in each st around [8]
Rnd 137: sc in next 4 st, dec in next st, sc in next 3 st [7]
Rnd 138-142: sc in each st around [7]
Rnd 143: sc in next 3 st, dec in next st, sc in next 2 st [6]
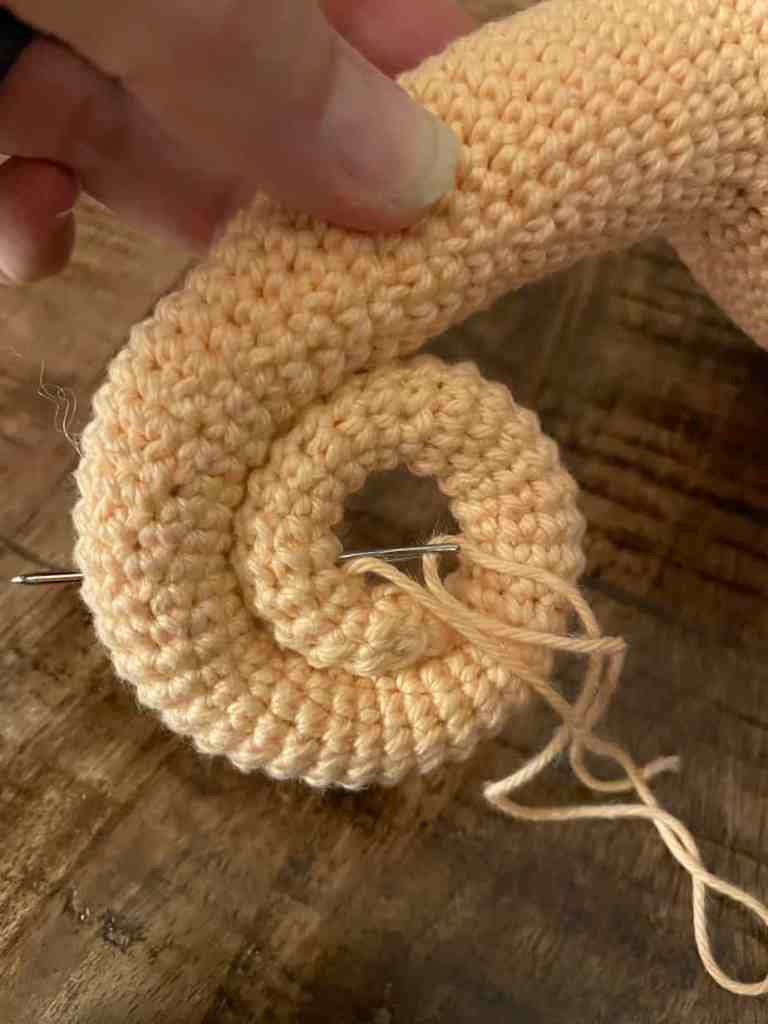
Sl st to fasten off. Cut yarn leaving a 2 ft (24″) tail which will be used for curving the tail. Weave through front loop of remaining 6 stitches and pull tightly to close.
Now, let’s curl the tail on your seahorse crochet pattern: using a tapestry needle and the long yarn tail, weave the yarn behind/under the post stitches up the center front of the tail, weaving your needle behind each of the posts in each row – ending back at about row 107 (36 rows from the tip of the tail) Pull on the yarn tail and watch the tail curve up!
Now, take the needle and push it through the thickness of the tail from inside to outside and back in a couple times to secure the curl. Take a couple stitches on the inside of the curl to secure the end and pull the yarn to the center and cut.
The Fin
TIP – Picot stitch instructions: chain 3, sl st into the back bump of the 3rd chain from the hook
Row 1: fsc 108, ch 1, turn
Row 2: (picot in next st, sc in next 3 st) x15, sc in next 10 st, ch 2, turn
Row 3: inc in next st, dc in next 8 st, 2 dc in next st, ch 1, turn
Row 4: inc in next st, sc in next 10 st, inc in next st, ch 1, turn
Row 5: inc in next st, sc in next 12 st, inc in next st, ch 1, turn
Row 6: (picot in next st, sc in next 2 st) x7, picot in next st, sc in next st, sc down side of fin back to chain, sc in next 3 st along the chain, (picot in next st, sc in next 3 st) x7, (ch 2, sc in same st as current sc, sc in next 3) x10, sl st in final 2 st
Fasten off, leaving a long tail for sewing on the fin.

Assembly
Starting with the end of the fin, start pinning it in place, beginning at the end of the curled tail. Pin fin along the back, keeping it centered and ending on top of the head – just above and between the eyes. Use the long tail yarn and a tapestry needle to sew on fin, weaving it through every stitch on the fin on each round of the body. Be sure to weave it under the POST of the stitch, rather than just the top loops, which will ensure a more secure attachment. When you get to the opposite end of the fin, weave back through 5-6 times. Bring the yarn to the inside of the seahorse and cut.
Show Off Your Work! ✨
I can’t wait to see your beautiful crochet seahorses! Be sure to tag me on social media @offthebeatenhook or use the hashtag #offthebeatenhook so I can admire your makes. ❤️
🔗 More Crochet Ocean Friends To Check Out:
- Jacque the Manta Ray Crochet Pattern
- Ingrid the Octopus Crochet Pattern
- Axel the Squid Crochet Pattern
- Jag the Jellyfish Crochet Pattern
- Clive the Crab Crochet Pattern
- Kalla the Orca Crochet Pattern
Pin This Seahorse Crochet Pattern Here:
Leave a Reply