
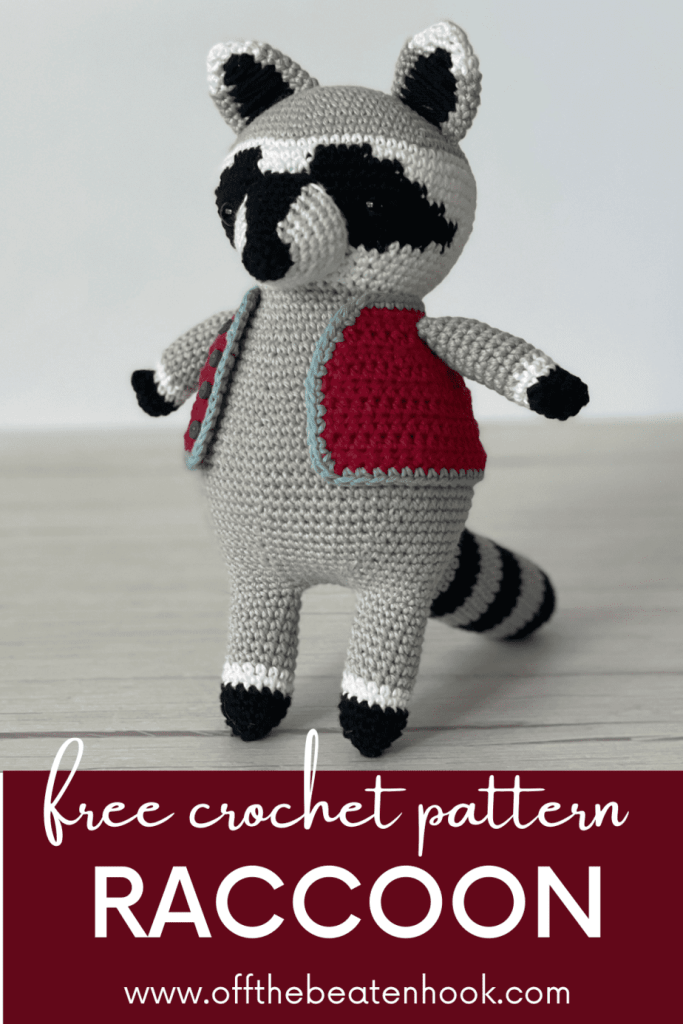
When my family and I were enjoying our 5-week stay in Costa Rica, we rented an open-air house for two weeks in Puerto Viejo on the Caribbean. Among other critters of the jungle, the raccoons would pay us a visit every night. Usually, my husband and I were still up playing cards and we would see their cute little heads peeking in under the thatch of the roof checking to see if we were still around. Often we would wake up in the middle of the night to their nocturnal shenanigans and would be welcomed in the morning by some sort of raccoon wreckage in the kitchen. They’re cute, but dang, they’re clever. In fact, did you know that raccoons are ranked just beneath humans and monkeys for their IQ? Well, I hope I do them justice with Esteban the Raccoon Crochet Pattern!
The markings on his face took a while to get just right (or at least what looks right to me) but in the end it was worth it.
This free pattern is supported by ads on my blog. You can find the printable, ad-free pattern of Esteban the raccoon crochet pattern with lots of in-the-making photos and added tips in my Etsy shop here.

This raccoon crochet pattern is written in US terms. If needed, you can find a handy term conversion chart in the Resource Library here. I recommend giving the raccoon crochet pattern a read-through before beginning so you can visualize the big picture and consider any specific notes for helping you along the way and making this an enjoyable, successful project.
Yarn & Tools Needed:
- Stylecraft Naturals Organic Cotton: 100% Organic Cotton | DK/Light Worsted
- Colors & Numbers of Balls:
- DOVE GRAY – x1
- IRON BLACK – x1 (you’ll use less than a full ball)
- GYPSUM WHITE – x1 (you’ll use less than 1/4 ball)
- POPPY RED – x1 (you’ll use less than 1/4 ball)
- DEEP SEA BLUE – x1 (barely any for the border of the vest) or leftover scraps from something else
- Colors & Numbers of Balls:
- Crochet Hook Size: 3.00 mm
- Safety eyes: 8 mm
- Tapestry Needle
- Stuffing
- Stitch Markers
- Scissors
- Optional: tiny buttons for vest
Abbreviations used in this raccoon crochet pattern:
ch – chain
st – stitch
sl st – slip stitch
hk – hook
sc – single crochet
hdc – half double crochet
inc – increase
dec – decrease
[…] – number of stitches in row/round
(…) x – repeat instructions indicated number of times
Size & Gauge:
I am a firm believer that gauge doesn’t matter with toys. Call me naive or whatever you want, but I’ll take it to the bank! People crochet toys in all different yarn weights and hook sizes. Use yarn and colors that make you happy! This is why we crochet! I don’t want you to stress about gauge. If you use the yarn and hook I recommend, Esteban will end up being about 10″ tall.
The Raccoon Crochet Pattern:
Notes:
- Esteban and his body parts are crocheted in continuous rounds. Do not slip stitch and chain one to join rounds – just keep on going!
- The snout and ears require color changing. Remember to properly change your colors by introducing the new color during the final loop of the previous color
- Color abbreviations: w=white, b=black, g=gray and will be indicated in each row after the method is explained. For example, Rnd 4 involves increasing in each st around: w4, b2, w3 means: inc in white 4 times, increase in black 2 times, increase in white 3 times.
Snout:
Begin with black yarn
Rnd 1: st 9 into a magic circle [9]
Rnd 2-3: sc in each st around [9]
Introduce white in rnd 4
Rnd 4: inc in each st around: w4, b2, w3 [18]
Rnd 5: sc in each stitch around: w8, b4, w6 [18]
Rnd 6: w(sc in next 3 st, inc in next st) x2, b sc in next 3 st, inc in next st, w sc in next 3 st, inc in next st, sc in next 2 st [22]
Rnd 7: sc in each st around: w10, b5, w7 [22]
Rnd 8: w (sc in next 4, inc in next st), switch to black in the final st of the previous increase, b sc in next 4 st, inc in next st, sc in next 2 st [26]
Rnd 9: sc in each st around: w12, b6, w8 [26]
Fasten off, leaving a long tail of white and black for sewing on. Stuff.
Ears – make 2:
Begin with white yarn
Rnd 1: sc 6 into a magic circle [6]
Rnd 2: sc in each st around [6]
Rnd 3: inc in each st around [12]
Rnd 4: (sc in next st, inc in next st) x6 [18]
Switch to gray yarn
Rnd 5-10: sc in each st around [18]
Flatten ears and visualize embroidery. Embroider black inner ears on one side of the flattened ear (not through both layers) by taking a long strand of black yarn and doubling it up through a tapestry needle. Pass the tapestry needle several times horizontally back and forth under/over one side of the ear. Tie off the end inside the ear. Flatten ears.

Head:
Notes:
- Color changing: rounds 14-23 involve color changing 2-4 times in one round. Remember to introduce your new color during the final loop of the previous color
- Color abbreviations are: b=black, w=white
- Color changing for rounds 14-17 do not involve decreasing or increasing – only sc around the entire round:The pattern will indicate the color followed by the number of sc stitches to be made with that color. For example (Rnd 17): w22, b27, w22 means sc 22 white, sc 27 black, sc 22 white
- The pattern will indicate the color followed by the number of sc stitches to be made with that color. For example (Rnd 17): w22, b27, w22 means sc 22 white, sc 27 black, sc 22 white
- Color changing for rounds 18-23 involve decreasing, but you’ll never have to decrease DURING a color change (whew!)
- For rounds 18-23, the method for the entire row is provided and immediately beneath that, I’ve detailed out exactly which color and stitches to perform as you go around.
Begin with gray yarn
Rnd 1: st 6 into a magic circle [6]
Rnd 2: inc in each st around [12]
Rnd 3: (sc in next st, inc in next st) x6 [18]
Rnd 4: (sc in next 2 st, inc in next st) x6 [24]
Rnd 5: (sc in next 3 st, inc in next st) x6 [30]
Rnd 6: (sc in next 4 st, inc in next st) x6 [36]
Rnd 7: (sc in next 5 st, inc in next st) x6 [42]
Rnd 8: (sc in next 6 st, inc in next st) x6 [48]
Rnd 9: (sc in next 7 st, inc in next st) x6 [54]
Rnd 10: (sc in next 8 st, inc in next st) x6 [60]
Rnd 11: (sc in next 9 st, inc in next st) x6 [66]
Rnd 12: (sc in next 10 st, inc in next st) x6 [72]
Switch to white yarn
Rnd 13: sc in each st around [72]
Rnd 14: sc in each st around with color changes: w28, b5, w5, b5, w28 [72]
Rnd 15: sc in each st around with color changes: w25, b8, w5, b8, w25 [72]
Rnd 16: sc in each st around with color changes: w22, b27, w22 [72]
Rnd 17: sc in each st around with color changes: w19, b33, w19 [72]
Rnd 18: (sc in next 10 st, dec in next st) x6 with color changes:
w15 as follows: sc 10, dec, sc 4,
b36 as follows: sc 6, dec, (sc 10, dec) x2, sc 7,
w15 as follows: sc 3, dec, sc 10, dec [66]
Rnd 19: (sc in next 9 st, dec in next st) x6 with color changes:
w14 as follows: sc 9, dec, sc 4,
b33 as follows: sc 5, dec, (sc 9, dec) x2, sc 7
w13 as follows: sc 2, dec, sc 9, dec [60]
Rnd 20: (sc in next 8 st, dec in next st) x6 with color changes:
w16 as follows: sc 8, dec, sc 7,
b26 as follows: sc 1, dec, (sc 8, dec) x2, sc 6
w12 as follows: sc 2, dec, sc 8, dec, [54]
Rnd 21: (sc in next 7 st, dec in next st) x6
w16 as follows: (sc 7, dec) x2
b16 as follows: (sc 7, dec) x2
w16 as follows: (sc 7, dec) x2 [48]
Rnd 22: sc in each st around with color changes: w19, b10, w19 [48]
Rnd 23: (sc in next 6 st, dec in next st) x6
w21 as follows: (sc 6, dec) x3
b2 as follows: sc 2
w19 as follows: sc 4, dec, (sc 6, dec) x2 [42]
Switch to white only
Rnd 24: sc in each st around [42]
Rnd 25: (sc in next 5 st, dec in next st) x6 [36]
Switch to gray
Rnd 26-27: sc in each st around [36]
Place a stitch marker and set your hook aside. Do not fasten off as you will pick up the round again and continue on with the body after you assemble the face/head pieces.
ASSEMBLY OF FACE/HEAD:
- Sew on the snout over rounds 16-26, keeping it nice and round. Pass the needle from the inside of the head to the outside, picking up both loops of the stitch you are sewing on. Stuff the snout firmly before making your final several stitches
- Sew on the ears centered on top of head, over rounds 4-11
- Insert safety eyes between rounds 18 and 19, to the left and right of snout, leaving 2-3 stitches between the snout and the eyes
- Stuff head and take a look at how adorable he is! Esteban the Raccoon crochet pattern is starting to come to life!
Body & Legs
Pick up where you left off after the head…
Rnd 28: (sc in next 5 st, inc in next st) x6 [42]
Rnd 29: (sc in next 6 st, inc in next st) x6 [48]
Rnd 30: sc in each st around [48]
Rnd 31: (sc in next 7 st, inc in next st) x6 [54]
Rnd 32: sc in each st around [54]
Rnd 33: (sc in next 8 st, inc in next st) x6 [60]
Rnd 34-35: sc in each st around [60]
Rnd 36: (sc in next 9 st, inc in next st) x6 [66]
Rnd 37-38: sc in each st around [66]
Rnd 39: (sc in next 10 st, inc in next st) x6 [72]
Rnd 40-45: sc in each st around [72]
Rnd 46: (sc in next 10 st, dec in next st) x6 [66]
Rnd 47: sc in each st around [66]
Rnd 48: (sc in next 9 st, dec in next st) x6 [60]
Rnd 49: sc in each st around[60]
Rnd 50: (sc in next 8 st, dec in next st) x6 [54]
Rnd 51: sc in each st around [54]
Rnd 52: (sc in next 7 st, dec in next st) x6 [48]
Rnd 53: (sc in next 6 st, dec in next st) x6 [42]
Rnd 54-56: sc in each st around [42]
Begin stuffing body
LEGS:
Divide work for the legs. There will be 15 st for each of the legs and 12 st for the gap in between the legs (6 from the front and 6 from the back). Using stitch markers, work out the division per the above number of stitches, making sure the legs are centered on the body in relation to the head
Start with the left leg:
If needed, add or remove a few stitches to get to the point of the back of the left leg. Join the back to the front making a sc.
Rnd 57-63: sc in each st around [15]
Switch to white
Rnd 64-65: sc in each st around [15]
Switch to black
Rnd 66-67: sc in each st around [15]
Rnd 68: (sc in next 3 st, dec in next st) x3 [12]
Stuff leg
Rnd 69: (sc in next 2 st, dec in next st) x3 [8]
Rnd 70: (sc in next st, dec in next st) x3 [5]
Cut yarn leaving a tail. Using a tapestry needle, weave the yarn through the front loop only of the remaining 5 stitches and pull tightly to close. Bring the yarn to the inside and snip off.
Just a quick note at this point…
If you’re struggling, I do provide LOTS (over 20) of photos in the written raccoon crochet pattern that give you close-ups of many of the steps including color changing, sewing-on and dividing stitches for the legs. If you need some help, you can find the pattern here.
Legs continued…
Right leg:
Leaving a long starting tail (to sew the gap closed later), rejoin gray yarn on the back side on the 7th unworked stitch (leaving the first 6 for the gap between the legs).
Rnd 57: sc in the next 15 st, join the back to the front (where you just rejoined the gray yarn), making a sc [15]
Rnd 58-70: repeat pattern as with the first leg
Finish stuffing body through the gap between the legs. Using the long starting tail from the right leg, sew closed the gap between the legs.
Arms – make 2:
Begin with black yarn
Rnd 1: st 6 into a magic circle [6]
Rnd 2: inc in each st around [12]
Rnd 3-4: sc in each st around [12]
Switch to white yarn
Rnd 5-6: sc in each st around [12]
Switch to gray yarn
Rnd 7-16: sc in each st around [12]
Stuff arm. Fasten off, leaving a long tail for sewing. Close the openings of the arms. Sew on arms, 3 rnds below the neck on either side of the body.
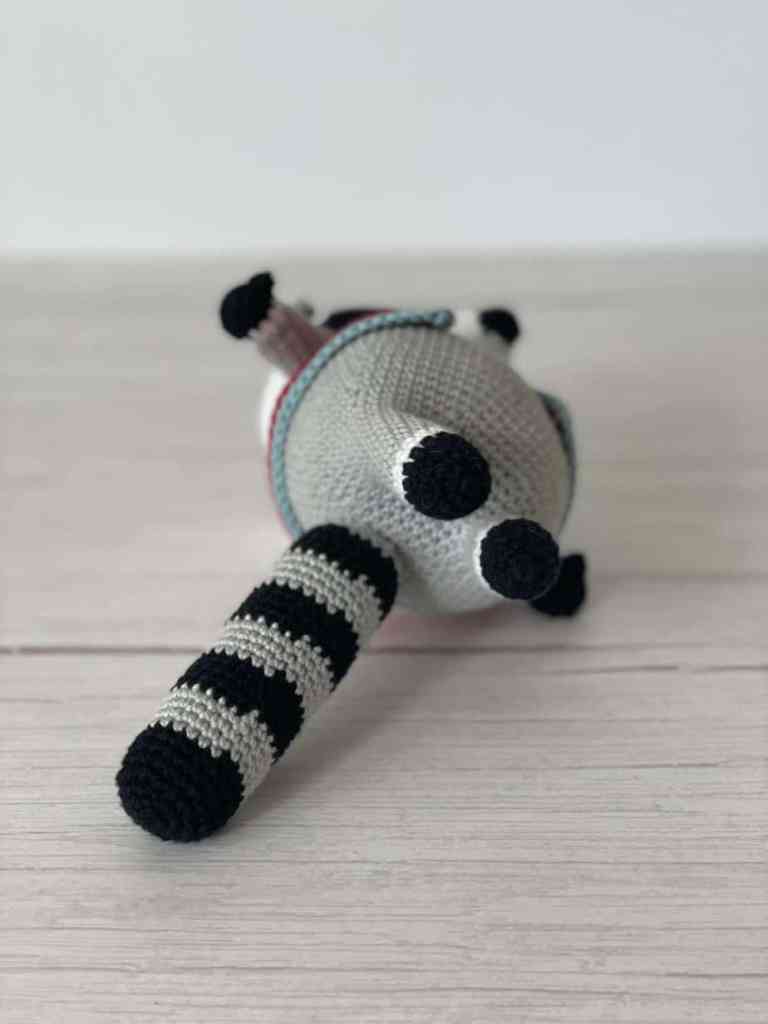
Tail:
Begin with black yarn
Rnd 1: st 6 into a magic circle [6]
Rnd 2: inc in each st around [12]
Rnd 3: (sc in next st, inc in next st) x6 [18]
Rnd 4: (sc in next 2 st, inc in next st) x6 [24]
Rnd 5-7: sc in each st around [24]
Switch to gray yarn
Rnd 8-11: sc in each st around [24]
Switch to black yarn
Rnd 12-15: sc in each st around [24]
Rnd 16-31: repeat rnds 8-15 (creating 4 more alternating stripes) [24]
Switch to gray yarn
Rnd 32: (sc in next 2 st, dec in next st) [18]
Rnd 33-34: sc in each st around [18]
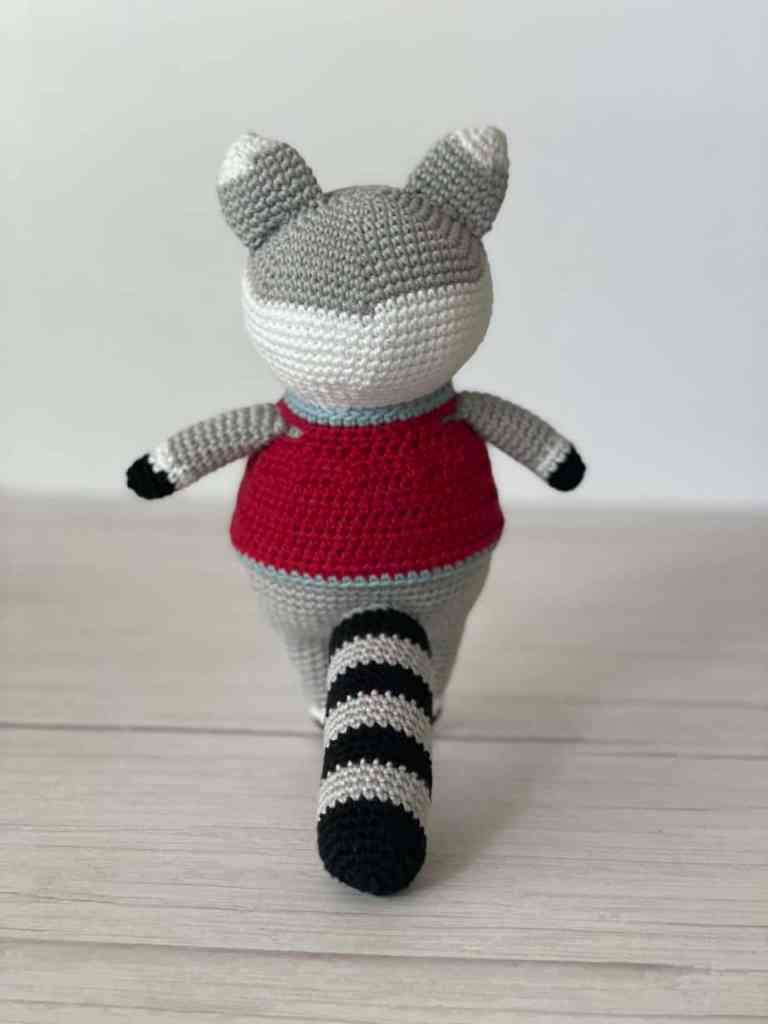
Stuff tail. Fasten off, leaving a long tail for sewing. Sew on tail on the back of Esteban over rounds 45-51.
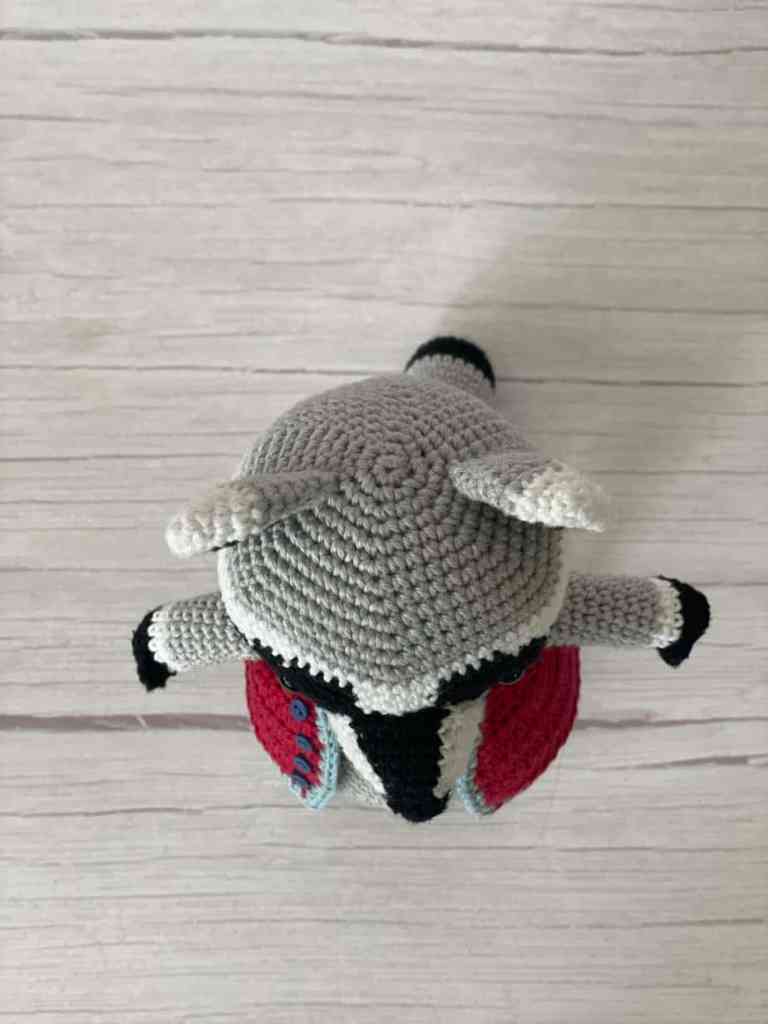
Vest:
The vest is worked in turning rows. Chain 1 and turn at the end of each row.
Begin by making a chain of 51
Row 1: hdc in the 2nd chain from the hook and in each ch thereafter [50]
Row 2-6: hdc in each st across [50]
Row 7: dec in next st, hdc in next 6 st, (dec in next st, hdc in next 6 st) x5, dec in last st [43]
Row 4: dec in next st, hdc in next 4 st, (dec in next st, hdc in next 5 st) x5, dec in last st [36]
Row 5: dec in next st, hdc in next 4, ch 6, sk 6, hdc in next 12, ch 6, sk 6, hdc in next 4, dec in last [34]
Row 6: dec in next st, hdc in next 30 st, dec in last st [32]
Weave in red ends. Using blue yarn, rejoin at the first corner and single crochet a border all the way around. Sl st to first st and fasten off. Weave in ends.
Sew on optional buttons. Put the vest on Esteban – you’ve brought him to life!
I hope you’ve enjoyed making this raccoon crochet pattern as much as I did! If you want to be the first to know about new free patterns, tutorials and resources, you can join the Off the Beaten Hook community by entering your name and email below!

This post contains affiliate links. If you purchase materials using these links I may receive a small commission which in no way affects your cost. These partnerships help me support my small business and allows me to continue providing you with free crochet patterns! Thank you from the bottom of my heart for your support.
Want more free crochet patterns? Check these out!
Leave a Reply