If you’ve made it this far, congratulations! You’re about to crochet your very first stitches. Up until now, we’ve covered the basics—what crochet is, the supplies you’ll need, and how to choose the right hook and yarn. Now it’s time to put everything together by learning how to hold a crochet hook and yarn and then making your first slip knot and chains.
By the end of this lesson, you’ll officially be crocheting! This is a huge milestone in your learning process!
If holding a crochet hook and yarn feels a little awkward at first, don’t worry. Every crocheter starts exactly where you are now. You’re asking your hands to do something completely new, and it takes a little time for those movements to feel natural.
The good news? There’s no single “right” way to hold your hook or yarn. Every crocheter develops their own style over time, and you’ll discover what feels most comfortable for you as you practice.
In this lesson, I’ll show you the two most common crochet hook grips, a simple way to hold your yarn, and then we’ll make your very first slip knot and foundation chain together.
LEARN TO crochet
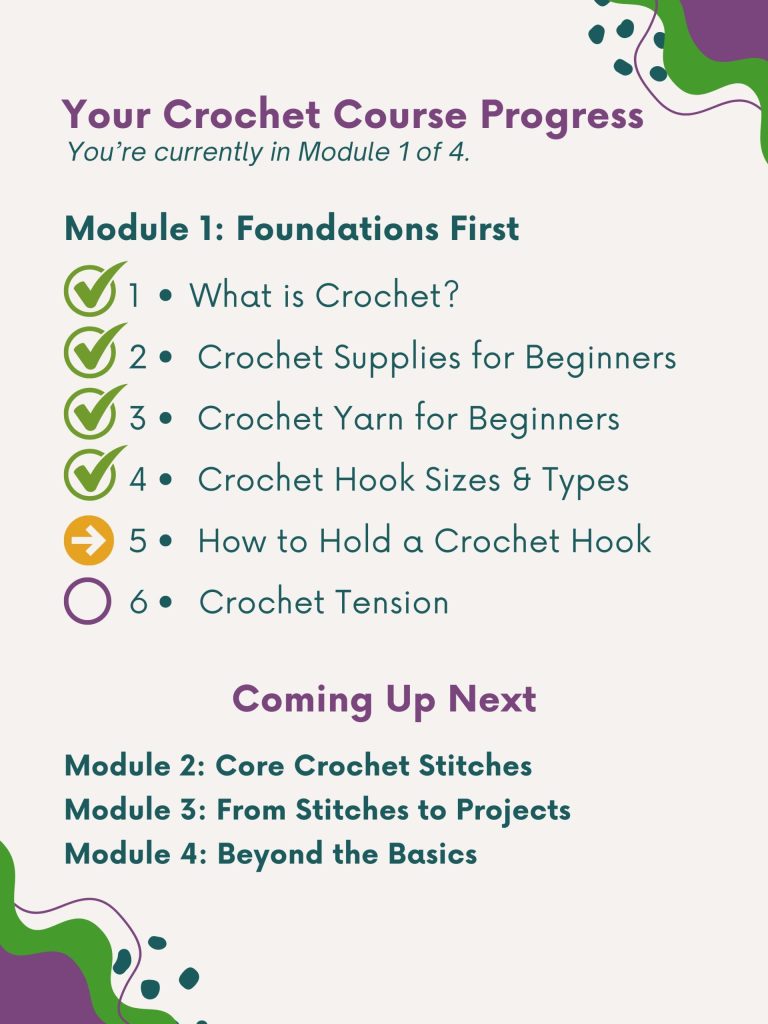
Module 1: Foundations First
Lesson 5: How to Hold a Crochet Hook & Yarn
This lesson is part of my free Learn to Crochet Course designed to take you from your very first stitch to completing your first projects and beyond.
24 step-by-step lessons with videos.

Materials You Will Need For This Lesson
- Worsted (4/Medium) Weight Yarn
- 5.5 mm Crochet Hook (a size 5.0 mm or 6.0 mm will work, if preferred)
Before You Begin
Before we jump in, I want you to hear something that every beginner needs to know:
It is completely normal for crochet to feel awkward at first.
You might feel like your fingers are all thumbs. Your yarn may slip off your hand. Your hook might twist around in ways you didn’t expect.
That’s okay!
Crocheting uses small hand movements that most of us have never practiced before. Just like learning to ride a bike or type on a keyboard, your hands are building new muscle memory.
Every chain you make—even the uneven ones—are helping your hands learn what to do.
So instead of aiming for perfect stitches today, aim for progress. Give yourself permission to learn, experiment, and even laugh at the funny-looking chains that are sure to happen along the way.
Remember, every experienced crocheter once made their very first chain stitch, too.
A Little Help for Your Crochet Basket
Join and get the free Crochet Pro Essentials PDF Pack, plus gentle course reminders and new lessons in your inbox.
Watch the Video Lesson
How to Hold a Crochet Hook
One of the first questions new crocheters ask is:
“Am I holding my hook correctly?”
The answer is probably yes!
There isn’t one universal way to hold a crochet hook. In fact, if you watched a room full of experienced crocheters, you’d notice lots of small differences in how they position their fingers and move their hands.
Almost everyone, however, uses one of two basic grips: the pencil grip or the knife grip.
Let’s look at both so you can decide which feels best for you.
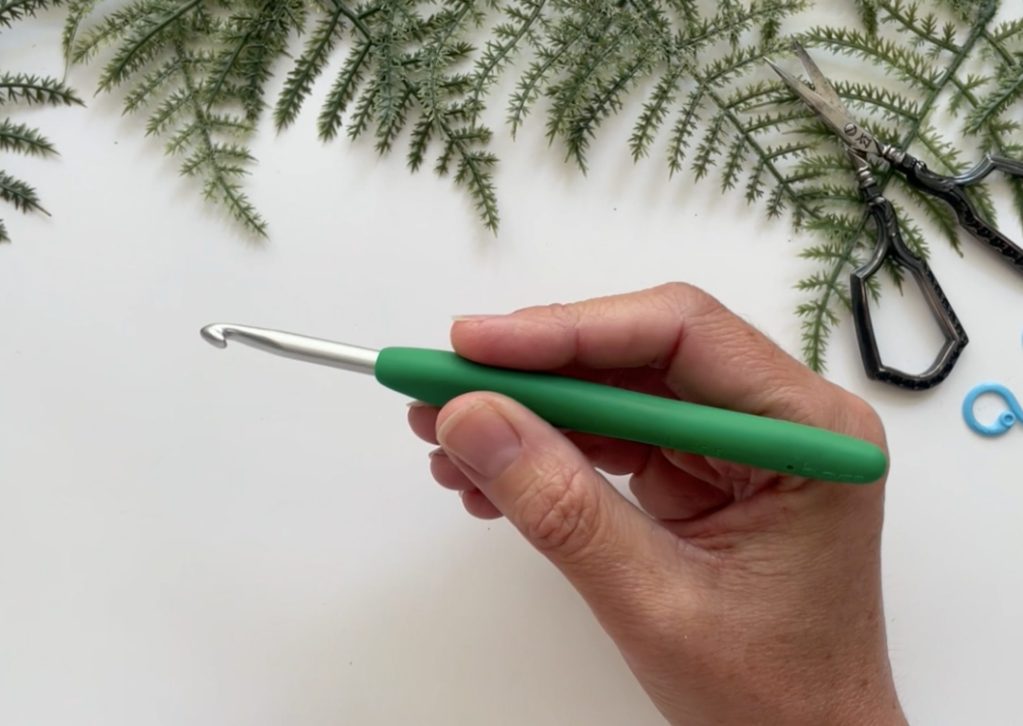
How to Hold a Crochet Hook: The Pencil Grip
As the name suggests, the pencil grip is very similar to the way you would hold a pencil or pen.
Place your thumb and index finger on the flat thumb rest of the crochet hook and allow the handle to rest lightly against your hand (photo above).
Many crocheters like this grip because it offers excellent control for small, detailed movements.
If you’re someone who naturally writes with a relaxed pencil grip, this style may feel comfortable right away.
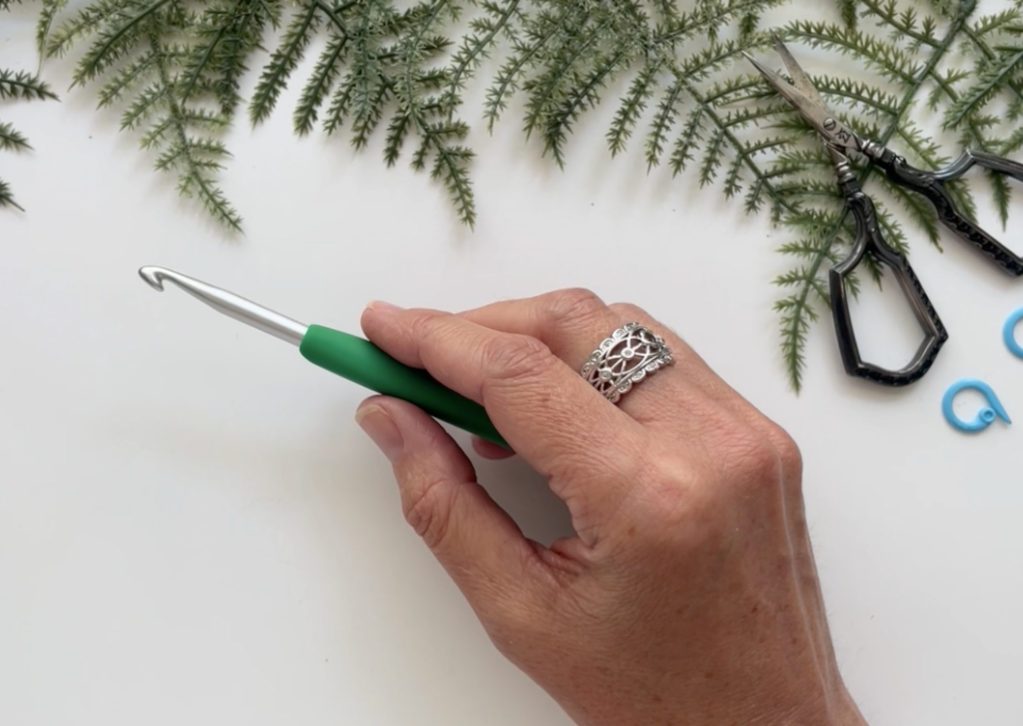
How to Hold a Crochet Hook: The Knife Grip
The knife grip is the other common way to hold a crochet hook.
Instead of holding the hook like a pencil, you’ll wrap your fingers overhand around the handle much like you would hold a dinner knife while cutting food (photo above).
Your thumb and index finger still rest on the thumb grip, but your hand sits over the hook rather than underneath it.
Many crocheters find this grip feels secure and comfortable, especially during longer crochet sessions.
Which Crochet Hook Grip is Best?
The truth is…
Neither one is better than the other.
Some crocheters use the pencil grip for every project they make. Others always use the knife grip. Some even switch between the two depending on what they’re crocheting.
The best grip is simply the one that feels relaxed, comfortable, and gives you good control of your hook.
If you’re not sure which you prefer, try crocheting a few chain stitches with each grip before deciding.
And remember—you can always change your mind later!
How to Hold Your Yarn
Now that your hook is in your dominant hand, it’s time to position your yarn.
This is the part that often feels the strangest to beginners, so don’t be discouraged if it takes a little experimenting.
Your non-dominant hand has two important jobs: feeding the yarn to your hook and helping you control it as you crochet. We’ll dive deeper into crochet tension in the next lesson.
There are many different ways to hold yarn while crocheting, and every crocheter eventually develops a method that works best for them.
For now, let’s keep things simple.
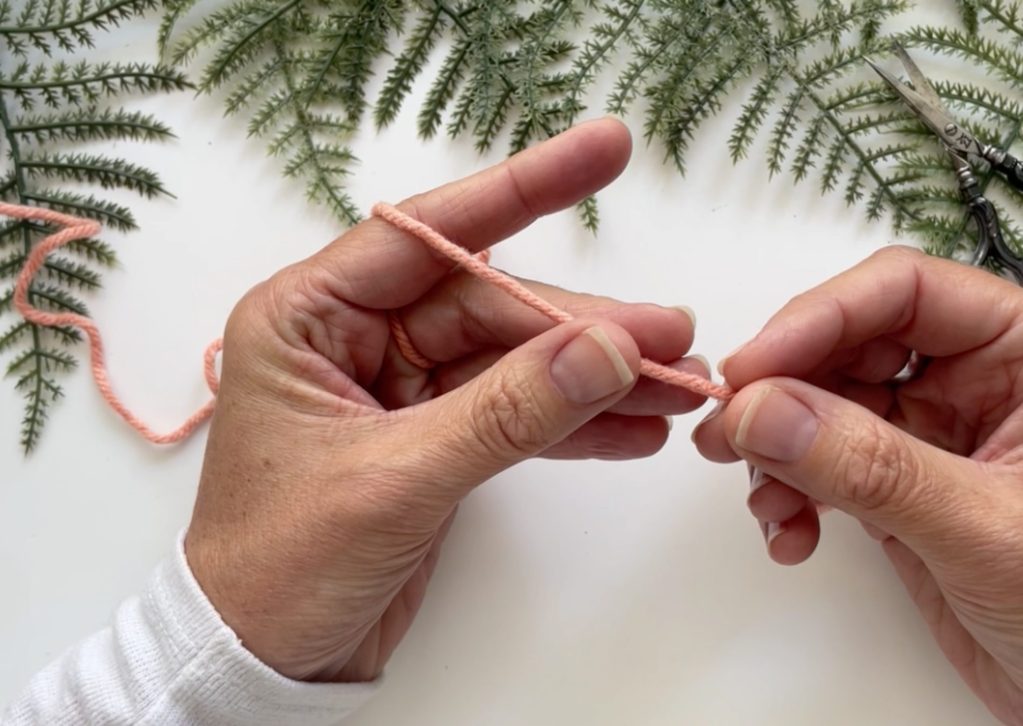
A Beginner-Friendly Yarn Hold
This is how I learned how to hold my yarn and I use it to this day because it allows me to control my tension very easily.
- Start with your non-dominant hand palm facing up and hold the yarn tail end with your other hand.
- Bring the yarn up between your ring finger and middle finger
- Bring the yarn back down between your middle finger and index finger (draping it over your middle finger)
- Rotate your hand back over and allow the yarn to now naturally drape over your index finger
- Grip the yarn between your middle finger and your thumb
Your raised index finger acts as a guide, helping feed the yarn smoothly toward your crochet hook.
There’s no prize for holding your yarn a certain way! As long as you can comfortably guide the yarn toward your hook, you’re doing just fine.
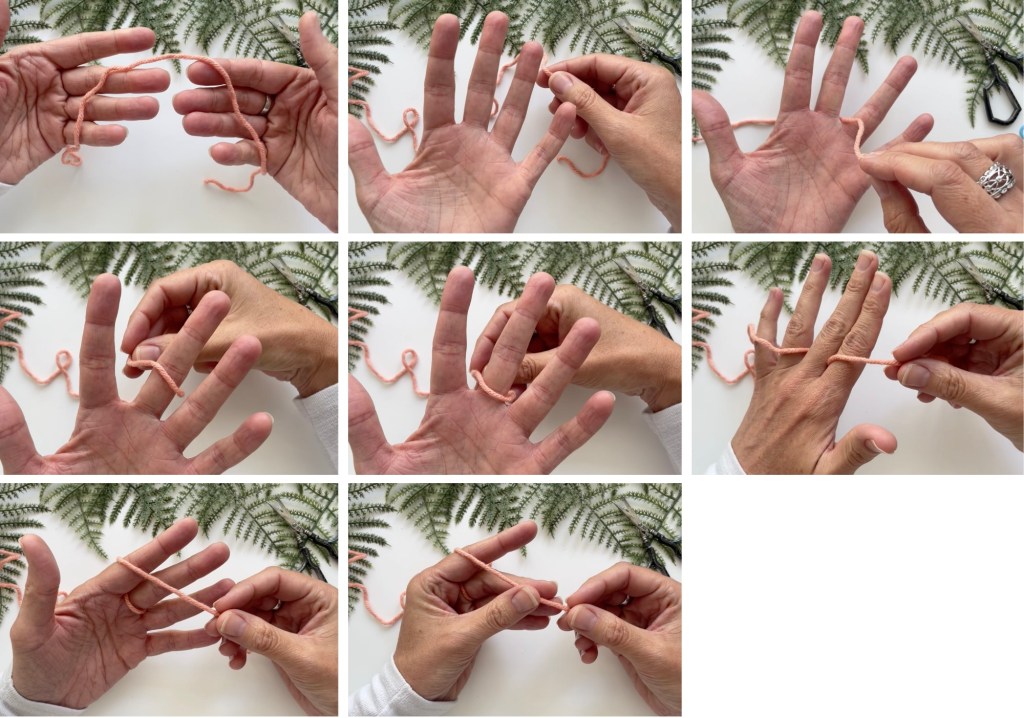
Over the Index Finger Hold
One other very common beginner yarn holds is over the index finger.
Here’s how to do it:
- With your palm facing down, bring your yarn tail up between your middle and index fingers
- Drape the yarn over the top of your index finger
- Rotate your hand to grip the yarn between your thumb and middle finger.
- The yarn feeds to your hook and you tension the yarn between your fingers or by squeezing the yarn underneath against your palm using your ring finger or pinky finger.
A Quick Note Before We Start Crocheting
If you’re finding yourself gripping the hook tightly or feeling a little stiff, try to relax your shoulders and loosen your hands.
Crochet should feel comfortable, not stressful.
You’ll also notice that your yarn sometimes feels tighter or looser as you practice. That’s perfectly normal! In our next lesson, we’ll focus entirely on crochet tension and learn how to create smooth, even stitches.
For now, simply focus on getting comfortable with how to hold a crochet hook and yarn.
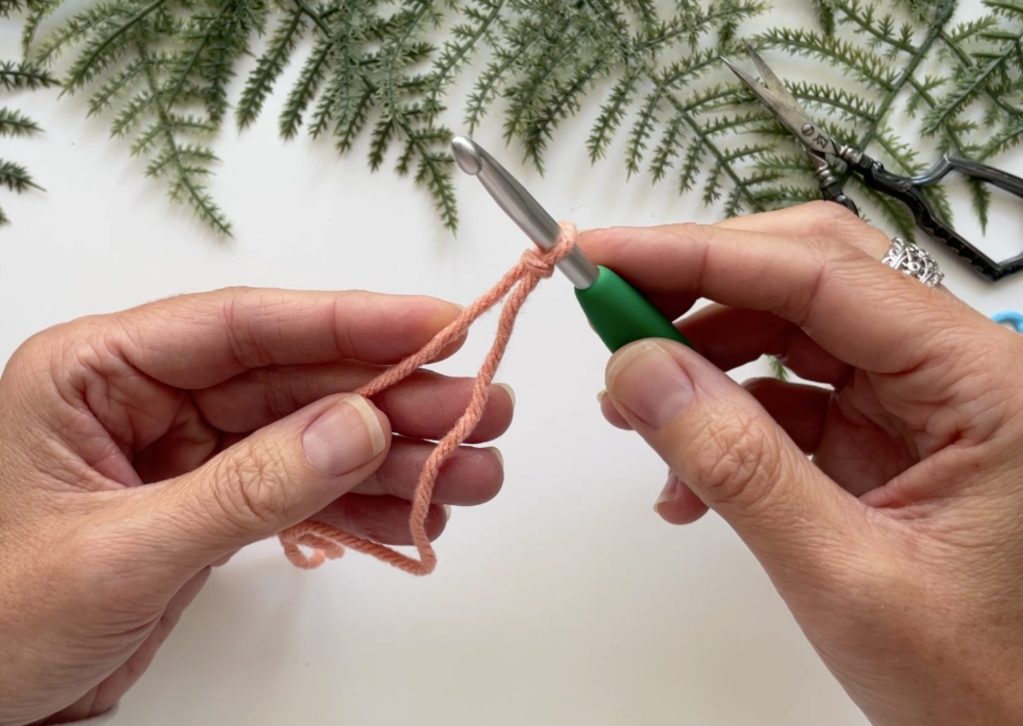
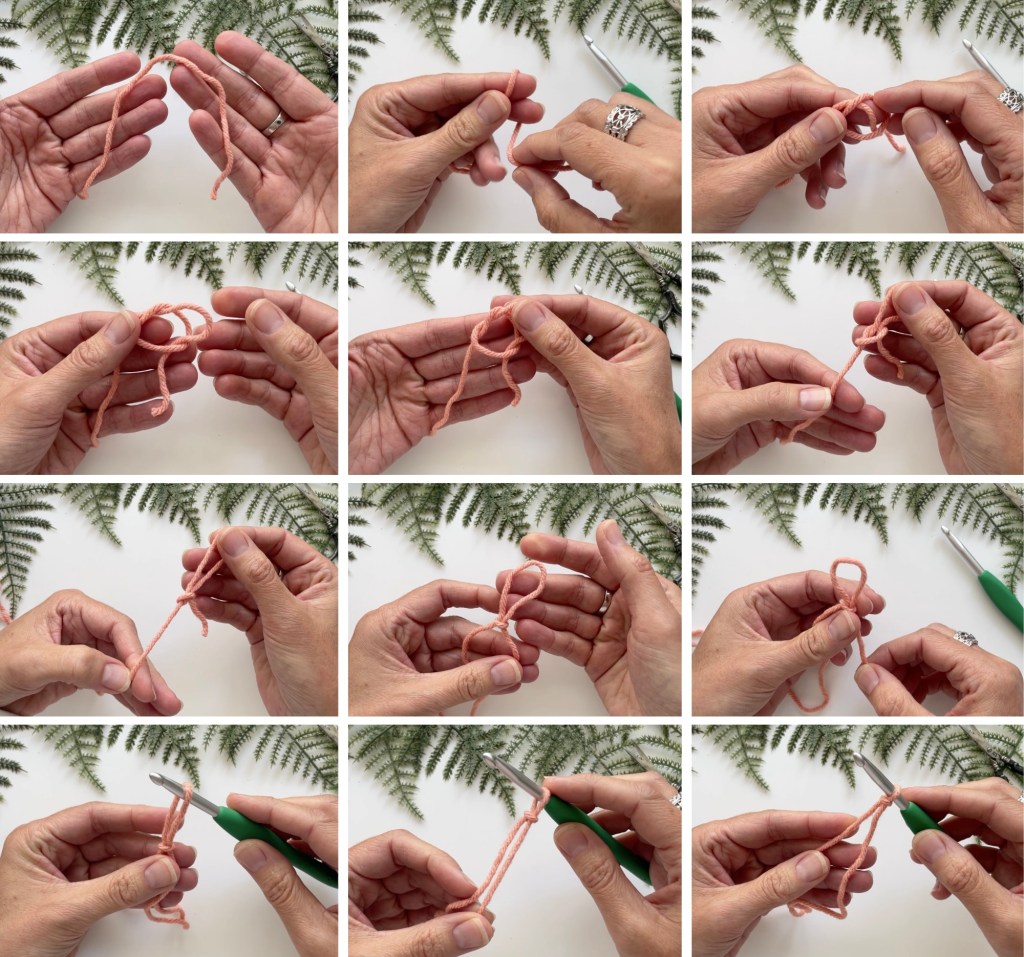
Make Your First Slip Knot
Now it’s time for your very first crochet technique!
Before you can begin crocheting, you’ll need to make something called a slip knot.
A slip knot creates an adjustable loop that slides onto your crochet hook. The slip knot (or later, the magic circle) serves as the starting point for almost every crochet project you’ll ever make.
The best part? If you don’t get it right the first time, simply pull the yarn out and try again. Since the knot tightens and loosens easily, it’s very forgiving and perfect for beginners.
Let’s make one together!
How to Make a Slip Knot
- Leave a Tail
- Make a Loop just like you’re going to make a standard knot
- Begin pulling your yarn tail up through the loop (again, just like you’re making a normal knot), but don’t pull the tail all the way through
- Grip the loop you just pulled through and pull on it while you’re holding the yarn strand that’s coming from the ball (you do not have to pull tightly)
- The slip knot will form
- Place the loop on your hook by sliding your hook through the loop, then pulling on the yarn tail until the loop closes around your hook (again, you don’t want to pull tightly)
The loop should slide easily along the shaft of the hook without falling off. If it feels too tight loosen it, if it’s hanging loosely, tighten it just a bit.
Beginner Tip
Your slip knot does not count as a stitch in your crochet pattern. It’s simply your starting point – a way to secure the yarn onto your hook.
Getting Ready to Crochet
Take a moment to get comfortable before making your first chain.
- Hold your hook using whichever grip feels best.
- Position your yarn in your non-dominant hand.
- Use your thumb and middle finger to gently pinch the slip knot just below the hook.
Don’t worry if you’re adjusting your grip every few seconds – everyone does! As you crochet more, these movements will become second nature.
Make Your First Chain Stitch
Congratulations! You’re about to make your very first crochet stitch.
The chain stitch is one of the most important stitches in crochet because it forms the foundation for countless projects – many patterns begin with a foundation chain before moving on to other stitches.
Once you learn this stitch, you’ll be ready to start creating real crochet fabric.
What Does “Yarn Over” Mean?
Before we make our first chain, there’s one new term you’ll hear often in crochet patterns:
Yarn over, often abbreviated as YO.
A yarn over simply means wrapping the working yarn over your crochet hook from back to front.
You’ll use this movement in almost every crochet stitch you learn from this point forward.
Think of it as picking up the yarn with your hook.
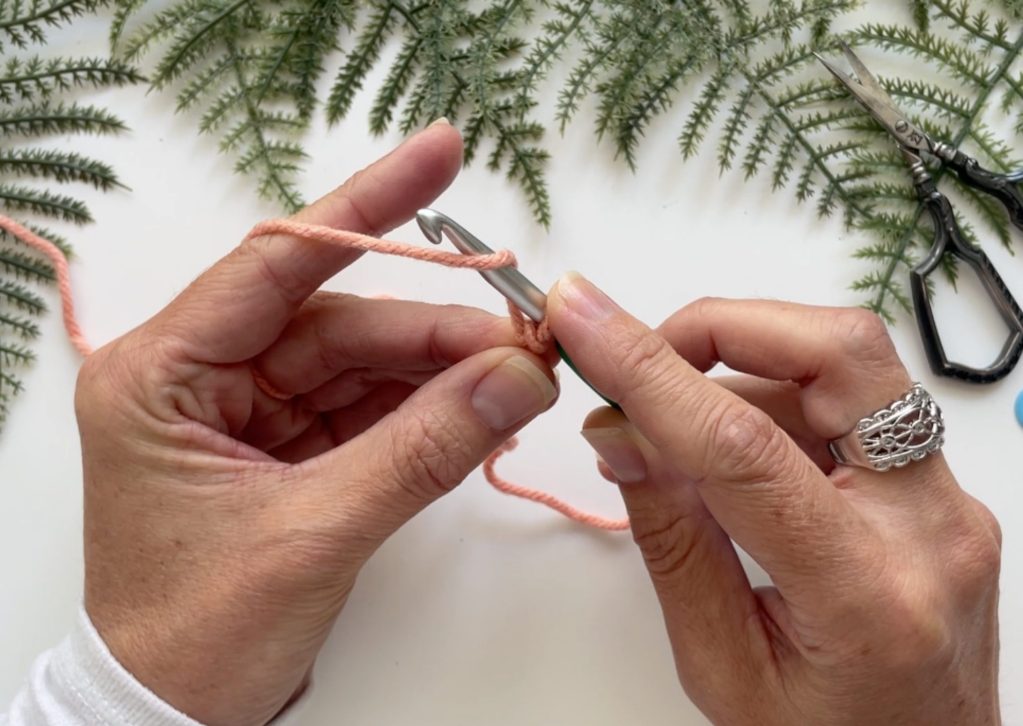
How to Crochet a Chain Stitch
- With your slip knot on your hook, yarn over (the hook should catch the yarn securely)
- Pull the yarn through the loop on your hook (as the yarn slides through, a new chain stitch is formed)
- You’ll still have one remaining loop on your hook, ready for your next chain stitch
- Repeat these 2 simple movements (yarn over, pull through, yarn over, pull through, yarn over, pull through…)
That’s it! Congratulations! That was your first stitch!
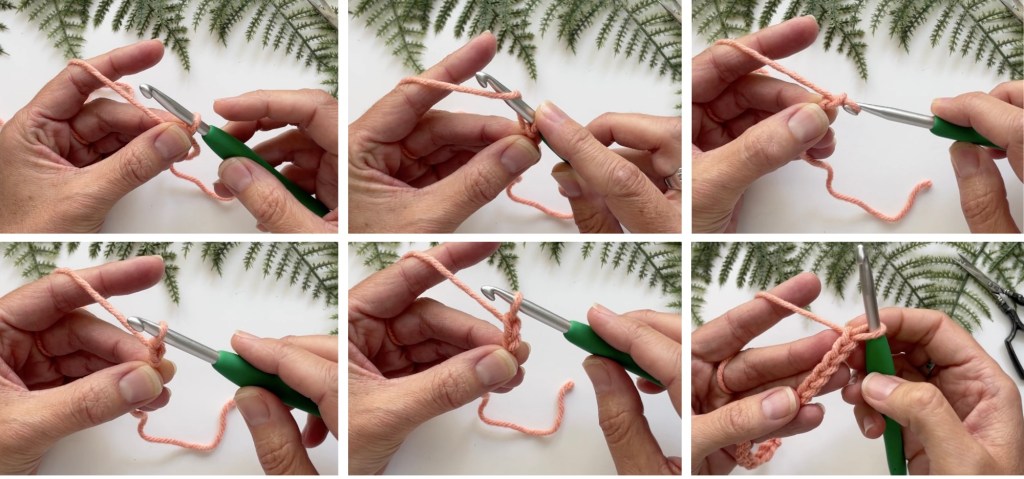
What Should My Foundation Chain Look Like?
Take a close look at your chain. From the front, you should see a row of small V-shaped stitches linked together.
They won’t be perfectly identical—and that’s okay! Your first chain might look a little bumpy, uneven, or twisty. That’s completely normal for a beginner.
The goal right now isn’t perfection, it’s progress.
It’s simply learning the motion. Every chain stitch you make is helping your hands build confidence and muscle memory.
Common Beginner Mistakes (and How to Fix Them)
If your slip knot or chain doesn’t look exactly like mine, that’s completely normal. In fact, there are a few very common “beginner moments” that almost everyone experiences in their first crochet session.
Let’s walk through them so you know exactly what to expect—and how to fix them without frustration.
My Slip Knot Is Too Tight (or Too Loose)
This is one of the most common early hiccups. If your slip knot feels like it’s squeezing the hook, it will be hard to move your stitches later. If it’s too loose, it may slide around or even fall off.
Quick fix:
Gently pull on the working yarn or tail to adjust the loop size until it slides comfortably on your hook. You’re looking for a “just right” fit—snug enough to stay in place, loose enough to move easily.
My Yarn Keeps Slipping Off My Fingers
Totally normal. Your yarn hand is still learning what to do.
Quick fix:
Try slowing down your movements and resetting your grip. If you’re using the beginner hold we covered earlier, lightly pinch your work between your thumb and middle finger to stabilize it while your index finger guides the yarn.
If that still feels tricky, just pause and reset. There’s no rush.
My Chain Looks Uneven
Some stitches are big. Some are small. Some look like they belong in a different project entirely.
That’s expected.
Your hands are still learning the rhythm of:
yarn over → pull through → repeat
Quick fix:
Don’t try to “correct” individual stitches. Instead, focus on repeating the same motion slowly and consistently. Even tension will come later. Right now, repetition is the goal.
My Hook Keeps Falling Out of the Loop
This usually happens when the loop on your hook is too loose—or when your yarn hand isn’t holding the chain steady enough.
Quick fix:
Use your non-dominant hand to gently pinch the base of your work right below the hook while you make each stitch. This gives you control without needing to grip tightly. You’ll want to adjust your grip and choke up on the chain at MOST every 3 chains.
I Lost Count of My Chains
Welcome to crochet. This happens to everyone.
Quick fix:
Count out loud as you go, or move your thumb along each “V” shape as you count. If you lose your place, don’t worry—just pause and recount from the beginning. No harm done. At this stage we’re not worrying about counting stitches anyway, we’re just practicing the motion to build muscle memory.

Your Practice Challenge
Now it’s time to let your hands learn.
Don’t aim for perfect stitches. Aim for repetition as you practice how to hold a crochet hook and yarn, and how to make your first chain stitches.
- Make 5 slip knots (yes, intentionally!)
- Put each one on your hook and adjust the size
- Crochet 10–15 chain stitches
- Pull it out completely
- Repeat 2–3 more times
Yes, pull it out.
This is important.
Crochet is a muscle memory skill. The more you repeat the motions, the faster your hands will understand what to do.
You are training your fingers—not creating a finished project yet.
💛 A Quick Reminder
If everything feels slow, awkward, or slightly messy… you’re exactly where you’re supposed to be.
Every crocheter starts here.
No exceptions.
Even the most beautiful, complex crochet pieces are built from this exact same chain stitch you just learned.
FAQ & Troubleshooting
The very first step in crochet is learning how to hold your crochet hook and yarn comfortably. Once that feels natural, you’ll move on to making a slip knot and then your foundation chain.
This lesson combines all of those steps so you can start actually crocheting right away.
There are two main ways to hold a crochet hook: the pencil grip and the knife grip.
- The pencil grip feels like holding a pen.
- The knife grip feels like holding a dinner knife.
Neither is better than the other. How to hold a crochet hook and yarn does not come with a “right” or “wrong”. The best grip is the one that feels most comfortable and relaxed in your hand.
Most beginners hold yarn in their non-dominant hand by guiding it over one or more fingers while gently controlling tension with their other fingers.
A simple starting method is:
- Let the yarn run over your index finger
- Use your thumb and middle finger to steady your work
However, there is no single correct method—many crocheters adjust their yarn hold over time.
A slip knot is the adjustable loop that sits on your crochet hook when you begin crocheting.
It is not considered a stitch. Instead, it’s the starting point that allows you to begin your foundation chain.
If it feels too tight or too loose, you can easily adjust it by pulling the yarn ends.
Your slip knot should be snug enough to stay on the hook but loose enough to slide easily along it.
If it feels like it’s squeezing the hook, loosen it. If it’s falling off, tighten it slightly.
A chain stitch is one of the most basic crochet stitches and is often the foundation of most crochet projects.
It is created by pulling yarn through a loop on your hook repeatedly, forming a row of connected “V” shaped stitches.
Uneven chain stitches are extremely common for beginners. They happen because your hands are still learning how to coordinate movement and yarn tension.
With practice, your stitches will naturally become more consistent. Right now, focus on repetition—not perfection.
This usually happens because beginners grip the hook or yarn too tightly without realizing it.
Crochet uses small, unfamiliar hand movements, so it takes time for your muscles to relax and adjust.
We’ll focus on this more in the next lesson on crochet tension.
Start with short practice runs of 10–20 chain stitches. Once that feels comfortable, repeat the process several times. Repetition is what builds muscle memory.
Yes. The slip knot becomes the starting point of your foundation chain, but it does not count as a stitch in most crochet patterns.
Your first practice should focus on:
- holding the hook comfortably
- finding a yarn position that feels natural
- making slip knots
- crocheting short chains
- repeating the process multiple times
The goal is comfort and familiarity, not perfect stitches.
Next, you’ll learn about crochet tension—how to control the tightness and consistency of your stitches so your work starts to look smooth and even.
You did it! You made your first chain!
You’ve officially learned:
✔ How to hold a crochet hook and yarn
✔ How to make a slip knot
✔ How to crochet your first chain stitches
That is HUGE. Now we take the next step.
In the next lesson, we’re going to focus on something that will completely change the way your stitches look and feel: Crochet tension.
You’ll learn:
- why your stitches may look uneven right now
- how to make them more consistent
- how to relax your hands while crocheting
- and how to stop fighting your yarn
This is the moment where crochet starts to feel smooth instead of awkward.
← Previous Lesson: Crochet Hook Sizes & Types
SOCIAL MEDIA YOUR THING?
Connect with me on your favorite social network!
Pin This Lesson for Later

Leave a Reply