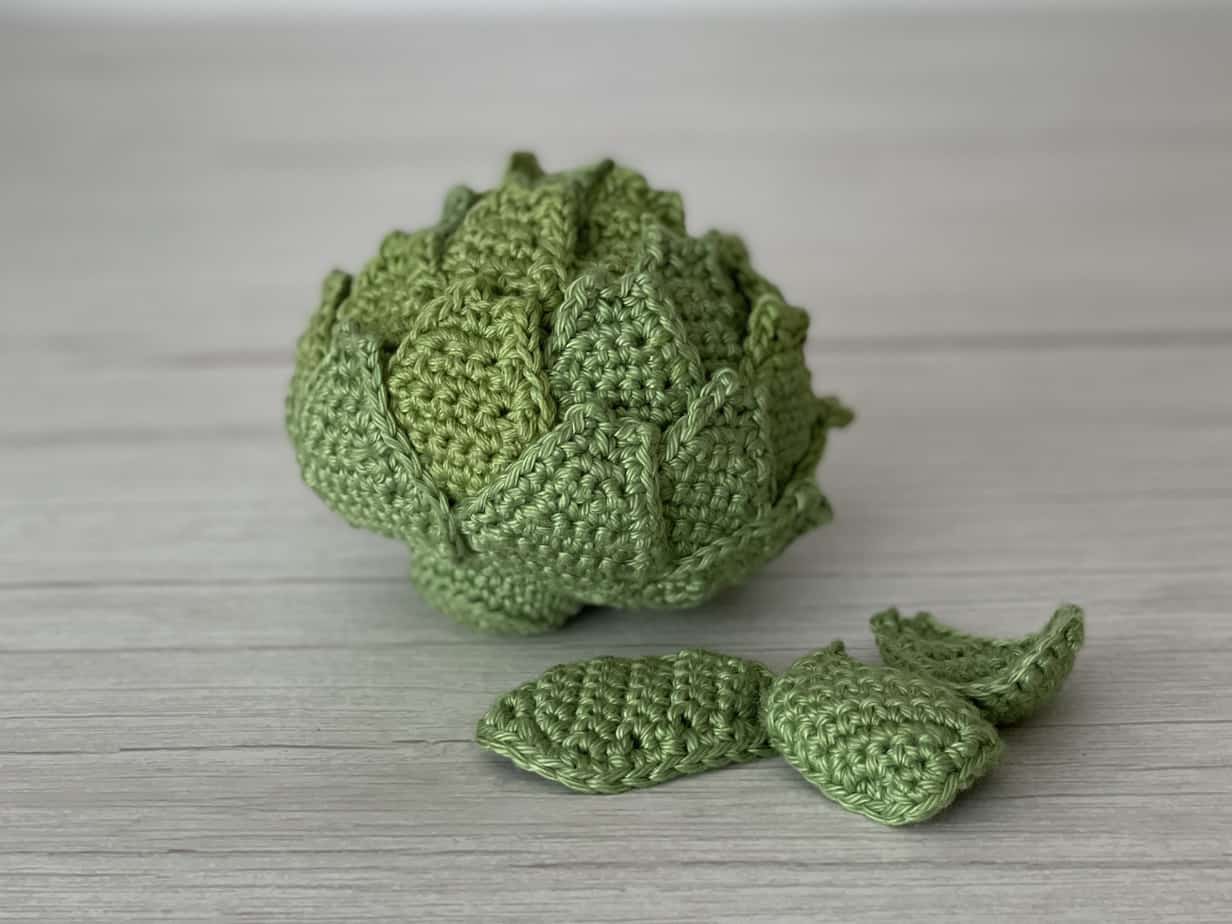
I had a mom-fail moment the other day. It wasn’t like a MOM GUILT producing fail, but it was a fail. I was designing and making this artichoke crochet pattern and I held it up for my son to approve of and he looked at it questioningly. I said, “This is an artichoke!” He replied, “I don’t know what that one tastes like.”
Sh*t.
Artichokes are my mom’s FAVORITE. We had them so often growing up that I was able to perfectly steam an artichoke by the time I was 8 years old. Seriously, they were on a weekly rotation – paired with some perfectly gar-licked melted butter or dipped in some creamy mayo if that’s what sounded good.
And my little guy doesn’t know what an artichoke tastes like? Not just the taste, but the entire artichoke EXPERIENCE! The anticipation of it steaming which takes FOREVER. The pulling and scraping of the leaves – watching them pile up in the communal bowl at the center of the family table. And then, as you reach the center… the dilemma of “how many of the tiny fine leaves can I grab at once without breaching the hairy center?” Finally, the heart. The reward of reaching the artichoke’s heart where you get to graduate from the tiny scrapes of flesh behind your upper teeth to taking a legitimate FORK-FULL of the soft, creamy heart. I actually felt sad that I have deprived him of this extraordinary vegetable experience. I will be rectifying this fail within the week. Okie dokie artichokie?
For this free & easy artichoke crochet pattern, you will need the following materials, tools and skills:
Materials & Tools
- Yarn: DK/Light Worsted | 100% Cotton | Colors: green
- Hook: 3mm
- Tapestry Needle
- Stuffing
- Stitch Markers
- Scissors
Stitches & Abbreviations
- st (stitch)
- ch (chain)
- sc (single crochet)
- BLO (back loop only)
- inc (increase)
- dec (decrease)
- sl st (slip stitch)
The Artichoke Crochet Pattern
Stem & Base Leaves
The stem is worked in a continuous round, the 6 base leaves are crocheted in rows.
Rnd 1: st 6 sc in a magic circle [6]
Rnd 2: inc in each st around [12]
Rnd 3: (sc in next st, inc in next st) x6 [18]
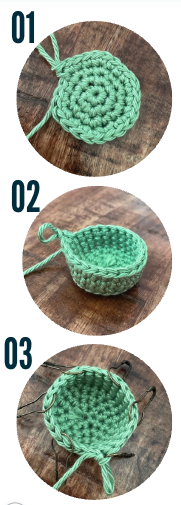
Rnd 4: (sc in next 2 st, inc in next st) x6 [24] photo 01
Rnd 5: BLO sc in each st around [24]
Rnd 6-7: sc in each st around [24] photo 02
Now, you will split the stem into 6 equal sections in order to begin making the 6 leaves that are attached to the stem. Using stitch markers, and beginning at the very next stitch, place a mark every 4th stitch. Each marker represents the last stitch of each Row 1 of a leaf, where you will ch 1 and turn. photo 03.
At the end of each of Rows 1-11, you will chain 1 and turn.
Row 1: sc in next 4 st [4]
Row 2: inc in next st, sc in next 2 st, inc in next st [6]
Row 3: inc in next st, sc in next 4 st, inc in next st [8]
Row 4-5: sc in each st across [8]
Row 6: dec in next st, sc in next 4 st, dec in next st [6]
Row 7: sc in each st across [6]
Row 8: dec in next st, sc in next 2 st, dec in next st [4]
Row 9: sc in each st across [4]
Row 10: sc in next 4 st [4]
Row 11: sc in next st, dec in next st, sc in next st, ch 1, turn [3]
Row 12: sc in each st across, ch 1 (do not turn), continue down the outside of the leaf, making 10 sc back down to the base stem [13] photo 04
Repeat Rows 1-12 to make 5 more leaves (6 altogether). photo 05
You will now crochet one last row across the tops of all the leaves and create the “M” shaped bump on the top of each leaf:
Row 13: make 10 sc up and along the first side of the the first leaf, 1 sc in the 1st of the 3 st on the top of the leaf, ch 2, sc in the 2nd ch back bump from the hook, 1 sc in the 2nd of the 3 st on the top of the leaf, ch 2, sc in the 2nd ch back bump from the hook, 1 sc in the last of the 3 st on the top of the leaf. Make 10 sc down and along the second side of the first leaf.
Repeat Row 13 for each of the 5 remaining leaves (6 altogether). photo 06
Fasten with a sl st. Cut leaving 3 feet of tail which you will use to sew on all the artichoke leaves during assembly.

Leaves – make 26
The leaves are crocheted in rows. For Rows 1-12, chain and turn at the end of each row.
Row 1: ch 4, sc in 2nd back bump from hook and in next 2 st [3]
Row 2: sc in each st across [3]
Row 3: inc in next st, sc in next st, inc in next st [5]
Row 4: inc in next st, sc in next 3 st, inc in next st [7]
Row 5: inc in next st, sc in next 5 st, inc in next st [9]
Row 6-7: sc in each st across [9]
Row 8: dec in next st, sc in next 5 st, dec in next st [7]
Row 9: sc in each st across [7]
Row 10: dec in next st, sc in next 3 st, dec in next st [5]
Row 11: sc in each st across [5]
Row 12: dec in next st, sc in next st, dec in next st [3]
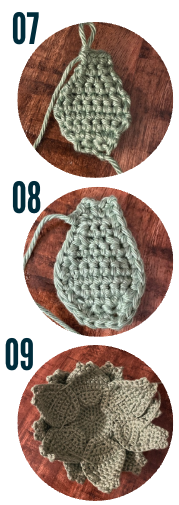
Row 13: sc in each st across, ch 1 [3] photo 07
Row 14: sc around the border of the artichoke leaf, making 11 st along first side, 3 across the bottom, and 11 up the 3rd side.
To finish Row 14, you will crochet across the top of the leaf to create the “M” shaped bump on the top of each leaf:
1 sc in the 1st of the 3 st on the top of the leaf, ch 2, sc in the 2nd ch back bump from the hook, 1 sc in the 2nd of the 3 st on the top of the leaf, ch 2, sc in the 2nd ch back bump from the hook, 1 sc in the last of the 3 st on the top of the leaf. photo 08
Make 26 leaves total (NOT counting the original 6 attached to the stem).
Assembly
Assemble the artichoke one layer of leaves at a time – staggering them between the previous row of leaves. Using a tapestry needle, sew them in place before you move onto the next row. photo 09
In between each row of sewing on the staggering leaves, cup and shape the artichoke into a stout, round shape. photo 10 As you cup and shape the artichoke, fewer and fewer leaves will be used in each layer.
If the artichoke is going to be used as a toy, leave at least 3 leaves loose so as to be able to be removed and interacted with. The 3 leaves will stuff into the top of the artichoke.
Before sewing in the final few leaves, stuff the artichoke firmly. If you’re leaving a few loose leaves (for a toy), draw the tail yarn across the stuffing several times as to hold it down and in, allowing for a gap for the loose leaves to be stuffed into. photo 11
Fasten and draw the yarn tail to the inside.
Leave a Reply