
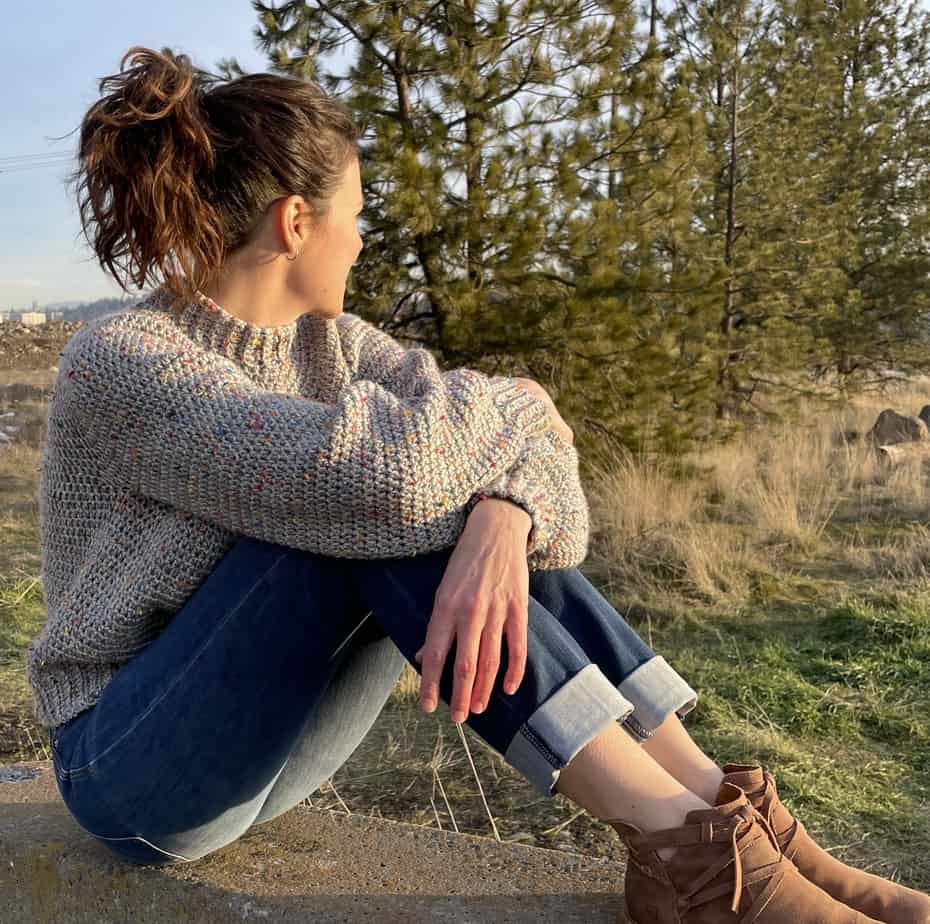
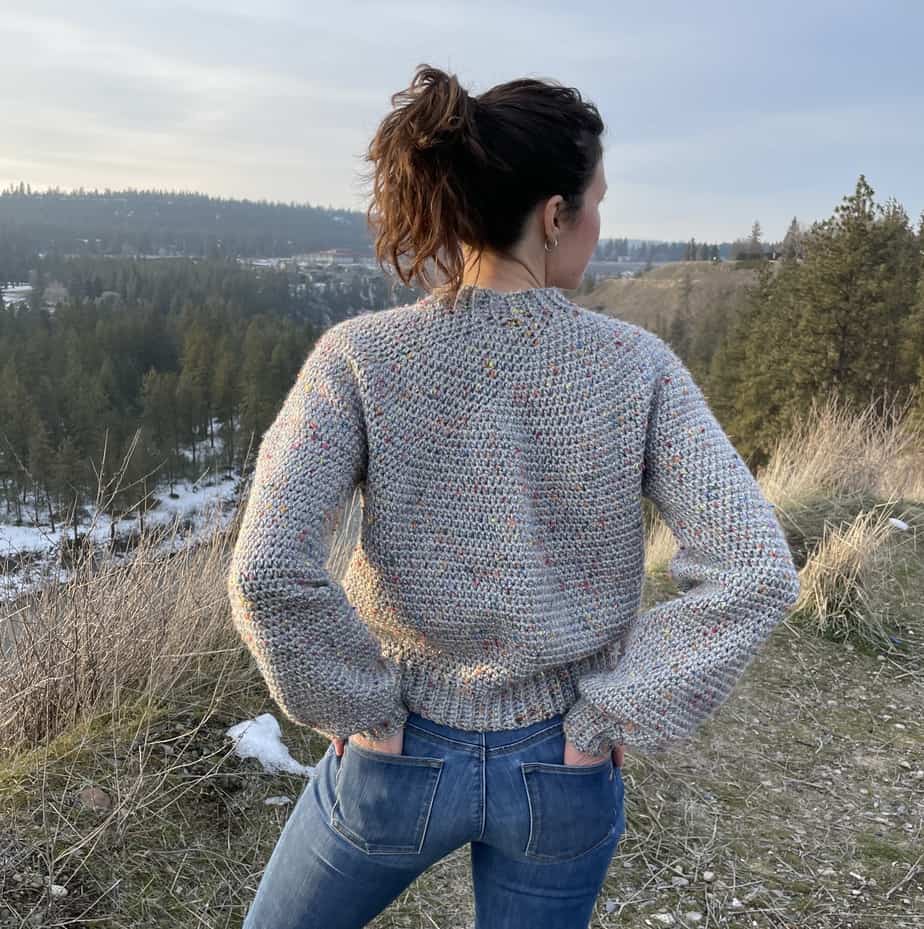
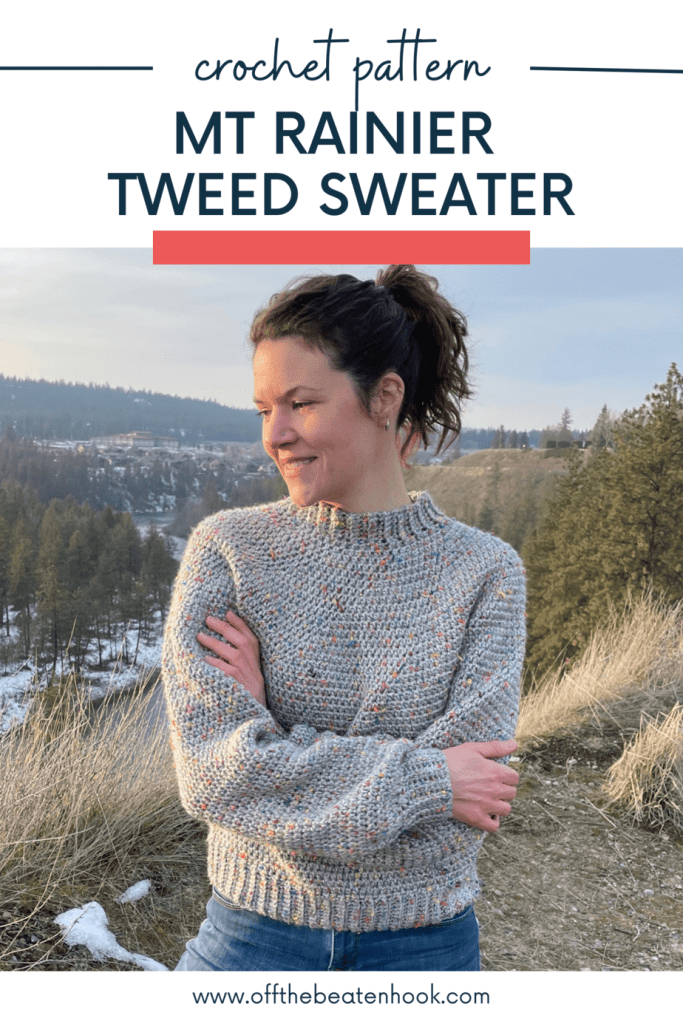
I named this crochet pullover sweater pattern the “Mt Rainier Tweed Sweater” after the color of yarn I used. Am I allowed to do that? It just fit too perfectly. And since the majestic Mt Rainier is just on the other side of this beautiful Washington State from me, I just went with it. Let me know if I’m going to get in trouble and I’ll change it.
This crochet pullover sweater pattern is written for sizes XS through 5XL and is easily adjusted if you want it more cropped, less cropped, longer sleeves, shorter sleeves, totally short sleeves, whatever you fancy. Super easy, super approachable. Absolutely ready for the beginner too! Be sure to watch the video tutorial which will help you with every step along the way!
Jump in now, or pin this crochet pullover sweater pattern here:

My vision for this sweater had the following requirements:
- No seaming
- No turning rounds – only continuous rounds
- Puffed sleeves
- Slightly cropped
NAILED IT!
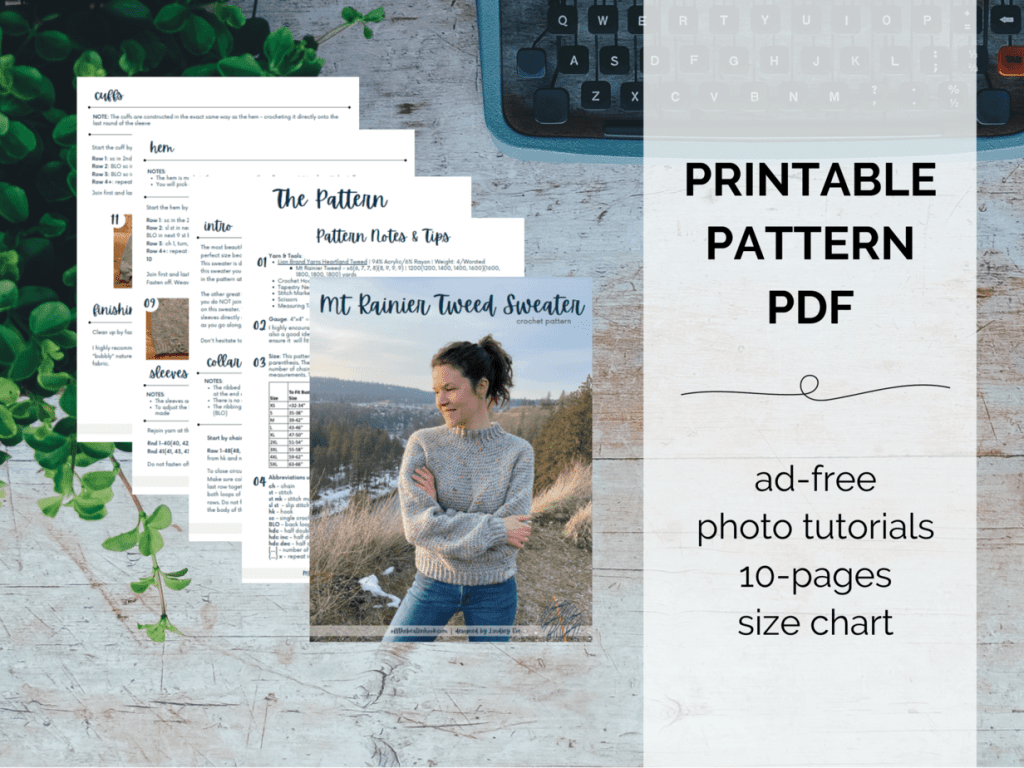
This crochet pullover sweater pattern is reader supported by ads on my blog. You can find the full, printable, ad-free pattern of the Mt Rainier Tweed Sweater with lots of helpful pictures and additional tips in my shop here!
The most beautiful thing about a yoke sweater is how versatile and easy it is to customize it to your perfect size because you can try it on as you go! I highly encourage you to do that with this pattern. This sweater is designed with several inches of positive ease which means it’s roomy and bubbly. With this sweater you can choose how roomy and bubbly you want it to be as you go along! I give you tips in the pattern at the right times to try on and see how it’s fitting.
The other great thing about this sweater is that it is crocheted in CONTINUOUS rounds which means you do NOT join rounds as you complete them… you just keep on going! There is absolutely no seaming on this sweater. You crochet it from the neck down to the hemline and then go back and crochet the sleeves directly on, all the way down to the cuffs. Again, feel free to customize the length of the sleeves as you go along, trying it on now and again to make it just how you envision it!

Materials you will need for this crochet pullover sweater pattern:
Yarn:
I designed and published this pattern before I switched to using only 100% natural, sustainable yarn. Therefore, I originally used Lion Brand Yarns Heartland Tweed which works great for this design. I chose the color Mt Rainier. The sample I crochet in the video tutorial (which came out later) is made using Malabrigo Washted, 100% ethical merino wool yarn. I chose the color Aniversario.
Quantity of skeins needed by size (Lion Brand Yarns Heartland Tweed): 6(6, 7, 7, 8)(8, 9, 9, 9).
Hooks & Other:
- Crochet Hook Size: 6.00 mm
- Crochet Hook Size: 5.00 mm
- Tapestry Needle
- Stitch Markers
- Scissors
- Measuring Tape
Abbreviations used in this crochet pullover sweater pattern:
ch – chain
st – stitch
st mk – stitch marker
sl st – slip stitch
hk – hook
sc – single crochet
hdc – half double crochet
BLO – back loop only
hdc inc – half double crochet increase
hdc dec – half double crochet decrease
[…] – number of stitches in row/round
(…) x – repeat instructions indicated number of times
Policies & Disclaimers:
This pattern is for PERSONAL USE ONLY. This pattern or parts of it may not be reproduced, resold, distributed, published, altered, translated, posted or shared without authorization. You can sell your finished items provided that you credit Off the Beaten Hook as the designer using this verbiage, “This pattern was designed by Lindsey Roe and Off the Beaten Hook. http://www.offthebeatenhook.com” Thank you for your respectfulness!
This post contains affiliate links for materials I use and love. If you purchase something using one of these links I may earn a small commission which in no way affects the cost to you. These partnerships help me support my small business which allows me to provide you with free crochet patterns. Thank you from the bottom of my heart for your support!

Gauge:
4″x4″ = 14 stitches x 10 rows of HDC (gauge provided is after blocking your sweater)
I encourage you to make a square swatch to be sure your gauge is correct. It’s also a good idea to measure now and again and try on the sweater as you go along. This will ensure it will fit right when it’s done!
Sizing:
This pattern is written in size XS with size (S, M, L, XL)(2XL, 3XL, 4XL, 5XL) following in parenthesis. The size can be easily modified by taking your measurements and adjusting the number of chains or rows. Use this sizing grid or the gauge above to determine your custom measurements. The model pictured is wearing size XS with a bust of 33″.
Measurements in inches: BUST / LENGTH (shoulder to hem) / SLEEVE LENGTH (armpit to cuff) / SLEEVE CIRCUMFERENCE / NECK OPENING
XS: 37″ / 20″ / 16″ / 13.5″ / 8″
S: 41″ / 21″ / 16″ / 13.5″ / 8″
M: 45″ / 23″ / 16.75″ / 14.5″ / 8″
L: 49″ / 23″ / 16.75″ / 14.5″ / 9.5″
XL: 53″ / 24″ / 17.5″ / 15.5″ / 9.5″
2XL: 57″ / 25″ / 17.5″ / 15.5″ / 9.5″
3XL: 61″ / 25″ / 18.25″ / 16.5″ / 11″
4XL: 65″ / 26″ / 18.25″ / 16.5″ / 11″
5XL: 69″ / 27″ / 19″ / 17″ / 11″
I also include a detailed sizing chart for this crochet pullover sweater pattern in the ad-free printable PDF.
The Crochet Pullover Sweater Pattern
START HERE:
Grab a snack and/or drink and give yourself 30 minutes to watch the video tutorial all the way through. If you do this, you probably won’t even have to reference it again as you work your way through this pattern! You can find it by clicking here (copy/paste: https://youtu.be/EQ_JAfc2HMI) or by visiting my YouTube Channel by searching “Off the Beaten Hook”.
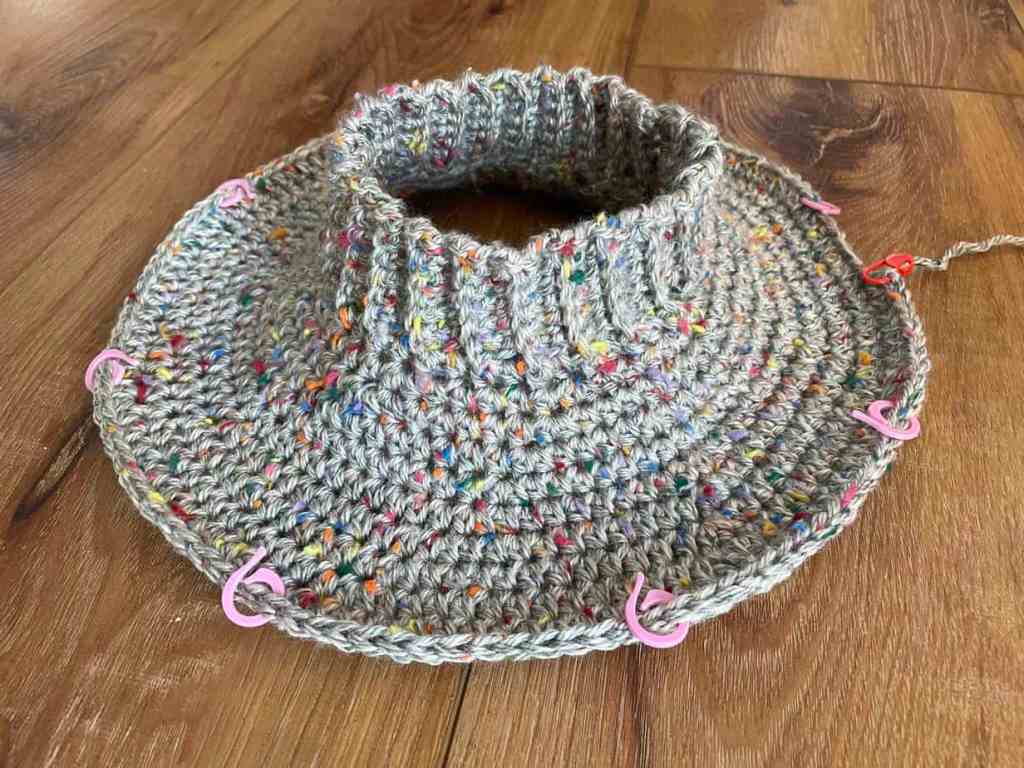
COLLAR:
- The ribbed collar is worked in rows, chaining 1 and turning at the end of each row
- There is no right or wrong side
- The ribbing is made by crocheting in the back loop only (BLO)
Start by chaining 7
Row 1: BLO sc in 2nd ch from hk and next 5 ch’s [6]
Row 2-48(48, 48, 52, 52)(52, 56, 56, 56): BLO sc across [6]
SEAM THE COLLAR CLOSED: Make sure collar is not twisted, then, holding the first and last row together, sl st through both loops of last row to both loops of first row, along each of the 6 stitches of the rows. Do not fasten as you will continue straight away with the body of the sweater. Be sure the sl stitches are on the INSIDE before proceeding to the yoke.
YOKE:
NOTES:
- The yoke is worked in continuous rounds – do not turn at the end of each round
- Multiple increases will be made as you work your way around. ALWAYS MARK THE FIRST STITCH OF EACH INCREASE WITH A STITCH MARKER. Each time you come around, an increase will be made where the stitch marker is. With each increase, always move the stitch marker to the first stitch made for each increase. This way, you will not have to count your stitches in each round if you don’t want to!
- EXTRA IMPORTANT: Before proceeding to the yoke, slip the collar over your head and make sure you are happy with the size. If not, adjust up or down a size and then carry on.
- EXTRA IMPORTANT REMINDER: Although you may have already decided what size you’re making, all our beautiful body types are so different. Therefore, I highly encourage you to try the sweater on as you go and stop the yoke when you can comfortably pinch the front and back together under the armpit with 2-3 inches of ease, then continue as that size and easily adjust the length as desired during the body section.
Starting straight away from where you left off on the collar, ch 1
Rnd 1: hdc in each st around [48](48, 48, 52, 52)(52, 56, 56, 56)
Rnd 2: (hdc inc, hdc 3) around [60](60, 60, 65, 65)(65, 70, 70, 70)
Rnd 3: (hdc inc, hdc 4) around [72](72, 72, 78, 78)(78, 84, 84, 84)
Rnd 4: (hdc inc, hdc 5) around [84](84, 84, 91, 91)(91, 98, 98, 98)
Rnd 5: (hdc inc, hdc 6) around [96](96, 96, 104, 104)(104, 112, 112, 112)
Rnd 6: (hdc inc, hdc 7) around [108](108, 108, 117, 117)(117, 126, 126, 126)
Rnd 7: (hdc inc, hdc 8) around [120](120, 120, 130, 130)(130, 140, 140, 140)
Rnd 8: (hdc inc, hdc 9) around [132](132, 132, 143, 143)(143, 154, 154, 154)
Rnd 9: hdc around [st count as rnd 8]
Rnd 10: (hdc inc, hdc 10) around [144](144, 144, 156, 156)(156, 168, 168, 168)
Rnd 11: hdc around [st count as rnd 10]
Rnd 12: (hdc inc, hdc 11) around [156](156, 156, 169, 169)(169, 182, 182, 182)
Rnd 13: hdc around [st count as rnd 12]
Rnd 14: (hdc inc, hdc 12) around [168](168, 168, 182, 182)(182, 196, 196, 196)
Rnd 15: hdc around [st count as rnd 14]
Rnd 16: (hdc inc, hdc 13) around [180](180, 180, 195, 195)(195, 210, 210, 210)
Rnd 17: hdc around [st count as rnd 16]
Rnd 18: (hdc inc, hdc 14) around [192](192, 192, 208, 208)(208, 224, 224, 224)
R
Rnd 19: hdc around [st count as rnd 18]
Rnd 20: (hdc inc, hdc 15) around [204](204, 204, 221, 221)(221, 238, 238, 238)
Rnd 21: hdc around [st count as rnd 20]
Rnd 22: (hdc inc, hdc 16) around [216](216, 216, 234, 234)(234, 252, 252, 252)
Rnd 23: hdc around [st count as rnd 22]
Rnd 24: (hdc inc, hdc 17) around [228](228, 228, 247, 247)(247, 266, 266, 266)
SIZE XS CONTINUE TO “SPLITTING FOR SLEEVES” SECTION
Rnd 25: hdc around [st count as rnd 24]
Rnd 26: (hdc inc, hdc 18) around [X](240, 240, 260, 260)(260, 280, 280, 280)
SIZE S CONTINUE TO “SPLITTING FOR SLEEVES” SECTION
Rnd 27: hdc around [st count as rnd 26]
Rnd 28: (hdc inc, hdc 19) around [X](X, 252, 273, 273)(273, 294, 294, 294)
SIZE M & L CONTINUE TO “SPLITTING FOR SLEEVES” SECTION
Rnd 29: hdc around [st count as rnd 28]
Rnd 30: (hdc inc, hdc 20) around [X](X, X, X, 286)(286, 308, 308, 308)
SIZE XL CONTINUE TO “SPLITTING FOR SLEEVES” SECTION
Rnd 31: hdc around [st count as rnd 30]
Rnd 32: (hdc inc, hdc 21) around [X](X, X, X, X)(299, 322, 322, 322)
SIZE 2XL & 3XL CONTINUE TO “SPLITTING FOR SLEEVES” SECTION
Rnd 33: hdc around [st count as rnd 32]
Rnd 34: (hdc inc, hdc 22) around [X](X, X, X, X)(X, X, 336, 336)
SIZE 4XL CONTINUE TO “SPLITTING FOR SLEEVES” SECTION
Rnd 35: hdc around [st count as rnd 34]
Rnd 36: (hdc inc, hdc 23) around [X](X, X, X, X)(X, X, X, 350)
SIZE 5XL CONTINUE TO “SPLITTING FOR SLEEVES” SECTION
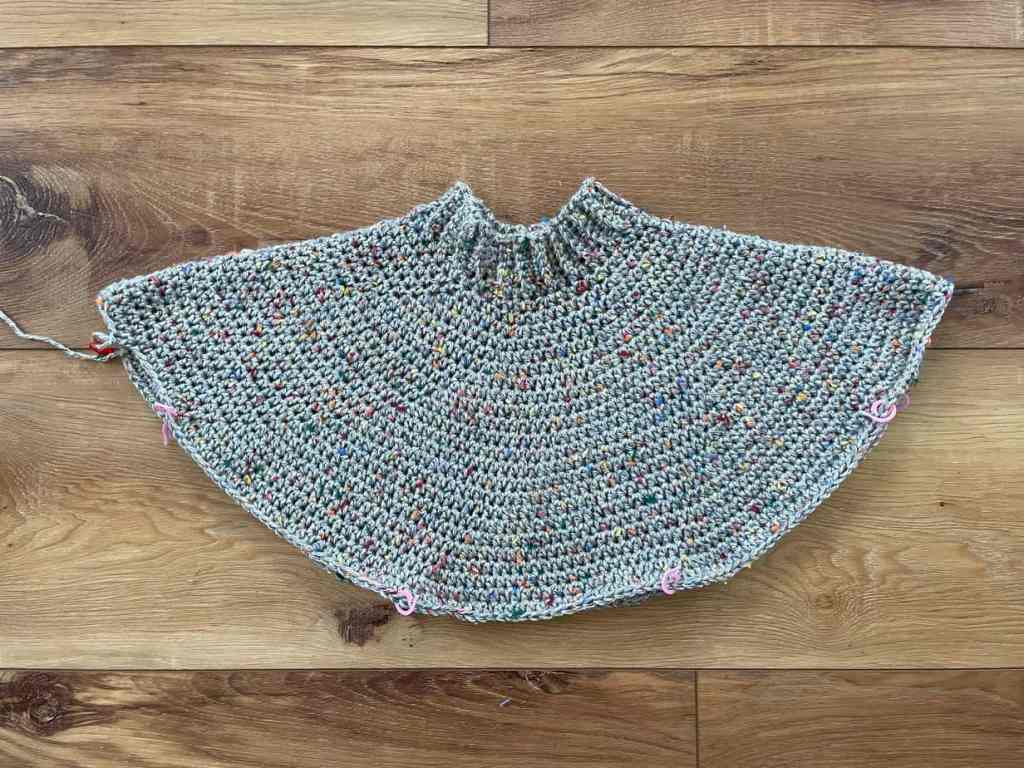
SPLITTING FOR SLEEVES:
You will now split the yoke into the body and the sleeves. You will no longer increase in any stitches.
Lay the yoke out flat. You will now count stitches to split for the sleeves. Make sure where you left off on the yoke is at the armpit of one of the sleeves. For each sleeve, count 48(48, 52, 52, 56)(56, 60, 60, 62) stitches around for each sleeve opening and mark with a stitch marker.
Remember to refer to the video tutorial if you need additional assistance with this.
BODY:
NOTES:
- The body is worked in continuous rounds – there is no increasing from this point forward
- There is no specific front or back side
- Feel free to adjust the length of the body section if you want the sweater longer or more cropped by adding or removing rows. Keep in mind the hem will add 2″ to the length.
Join the body at the armpits: Pick up where you left off on the yoke which should now be located at the first armpit, and hdc your way across the front of the body, to the opposite armpit where you placed your stitch marker for the sleeve opening. Join front and back, making a hdc. Continue on across the back of the body and join the opposite armpit in the same way. This completes Rnd 1 of the body.
Rnd 2-16: hdc around [132](144, 148, 169, 174)(187, 202, 216, 226)
Before you continue, try on the sweater and decide if you want to add or remove rows for the length. For the last several rows you will be decreasing, so now is your last chance to get the length just right! You’ll be decreasing during this section to taper the sweater prior to putting on the hem. Alternatively, if you don’t want the sweater to taper in at the hem, simply crochet several more rounds without decreasing until you’re happy with the length, and then continue with the hem.
Rnd 17: (hdc dec, hdc in next 12 st) repeat around until less than 12 st remain, hdc in remaining st’s until end of row [123](134, 138, 157, 162)(174, 188, 201, 210)
Rnd 18: hdc in each st around [st count as rnd 17]
Rnd 19: (hdc dec, hdc in next 11 st) repeat around until less than 11 st remain, hdc in remaining st’s until end of row [114] (124, 128, 145, 150)(161, 174, 186, 194)
Rnd 20: hdc in each st around [st count as rnd 19]
Rnd 21: (hdc dec, hdc in next 10 st) repeat around until less than 10 st remain, hdc in remaining st’s until end of row [105](114, 118, 133, 138)(148, 160, 171, 178)
Rnd 22: hdc in each st around, sl st in next st to complete the final round [st count as rnd 21]

HEM:
- Use the smaller hook size
- The hem is made in the same manner as the collar, except it is a few stitches taller
- You will pick up right where you left off on the body, without fastening off
Switch to the smaller hook size, and begin the hem by chaining 10
Row 1: sc in the 2nd ch from hk and next 8 st, sl st in next 2 st along the final row of the body, ch 1, turn [9]
Row 2: skipping the ch and both sl st’s, BLO sc in next 8 st, sc through both loops of final st, ch 1, turn [9]
Row 3: sc through both loops of the first st, BLO sc in next 8 st, sl st in next 2 st on last rnd of sleeve, ch 1, turn [9]
Row 4+: repeat rows 2 & 3 all the way around hem
Join first and last row of hem in same manner as joining collar. Fasten off. Weave in end.

SLEEVES:
- The sleeves are made in continuous rounds – do not turn at the end of each round.
- To adjust the length of the sleeve, add or remove rows prior to decreasing before the cuff is made
Rejoin yarn at the armpit of one of the arm holes. Secure with a slip stitch.
Rnd 1-40(40, 42, 42, 44)(44, 46, 46, 48): hdc in each st around [48](48, 52, 52, 56)(56, 60, 60, 62)
Rnd 41(41, 43, 43, 45)(45, 47, 47, 49): hdc dec around [24](24, 26, 26, 28)(28, 30, 30, 31)
Do not fasten off – you’ll continue straight away to finish the cuffs…
CUFFS:
NOTE:
- The cuffs are constructed in the exact same way as the hem – crocheting it directly onto the last round of the sleeve.
- Use the smaller hook size.
Switch to the smaller hook size, and begin the cuff by chaining 10
Row 1: sc in 2nd ch from hk and next 8 st, sl st in next 2 st on last rnd of sleeve, ch 1, turn [9]
Row 2: skipping the ch and both sl st’s, BLO sc in next 8 st, sc through both loops of final st, ch 1, turn [9]
Row 3: sc through both loops of the first st, BLO sc in next 8 st, sl st in next 2 st on last rnd of sleeve, ch 1, turn [9]
Row 4+: repeat rows 2 & 3 all the way around cuff
Join first and last row of cuff in same manner as joining hem. Fasten off. Weave in end.
Congratulations! You’re about to slip into what might end up being your new favorite go-to sweater! I highly recommend steam blocking your sweater but it’s certainly not required. Because of the “bubbly” nature of this sweater, blocking goes a long way towards creating a nice drape to the fabric.
I would love to see your finished crochet pullover sweaters! Post a photo on Instagram and tag me @offthebeatenhook and use #offthebeatenhook. Thank you for crocheting with me!
Leave a Reply