
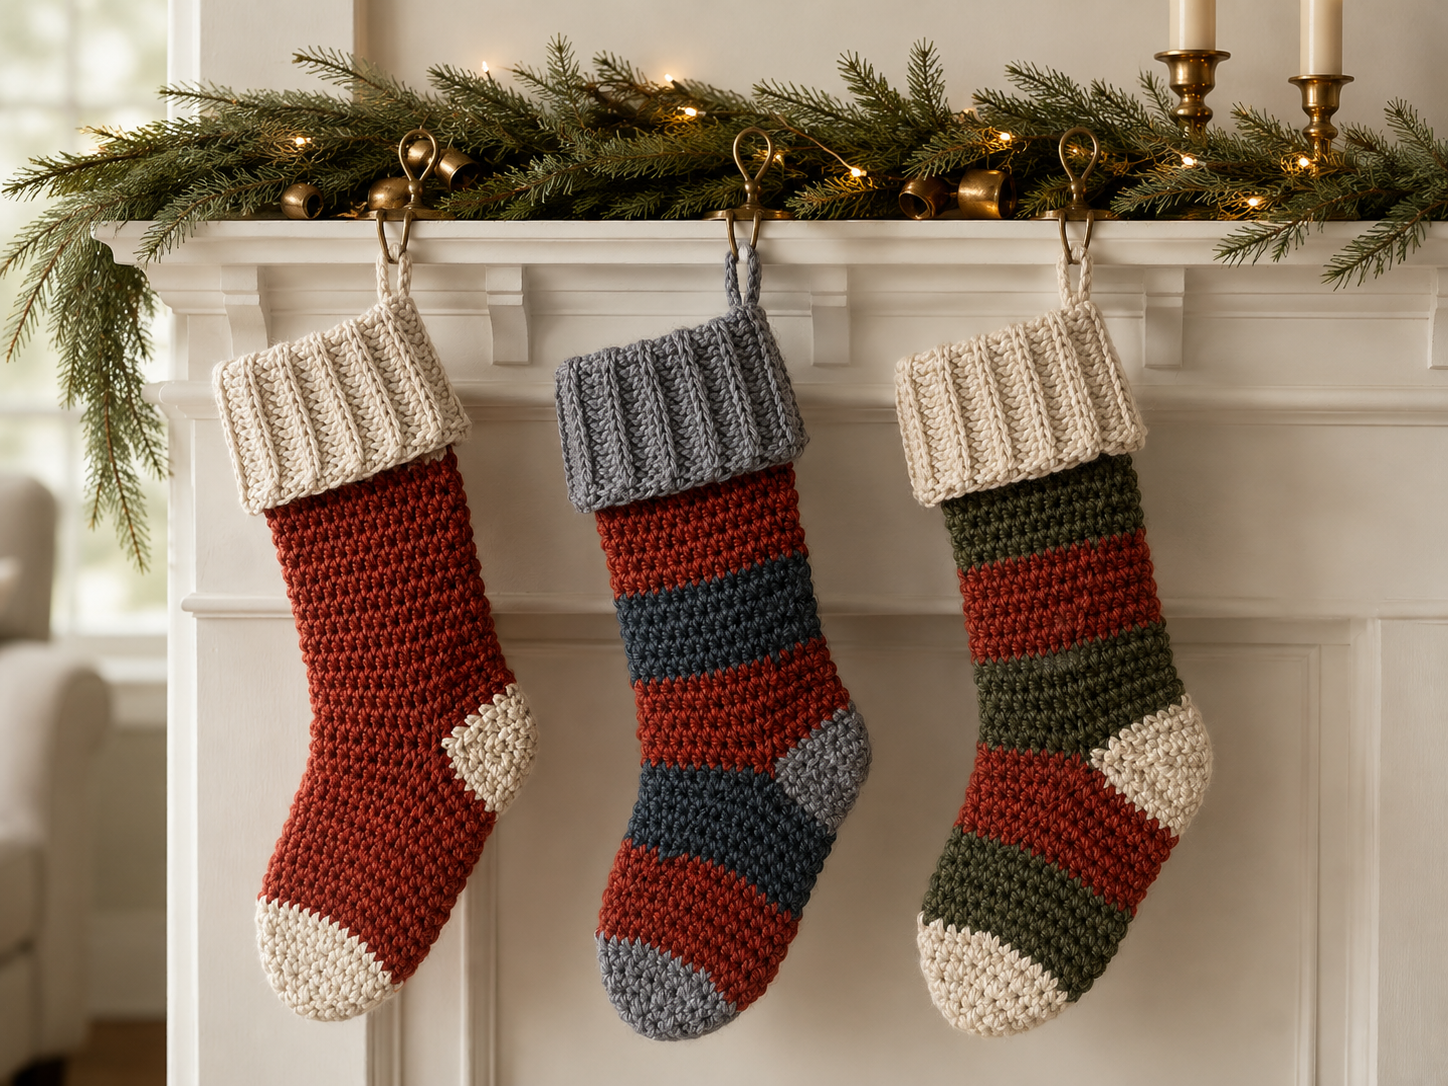
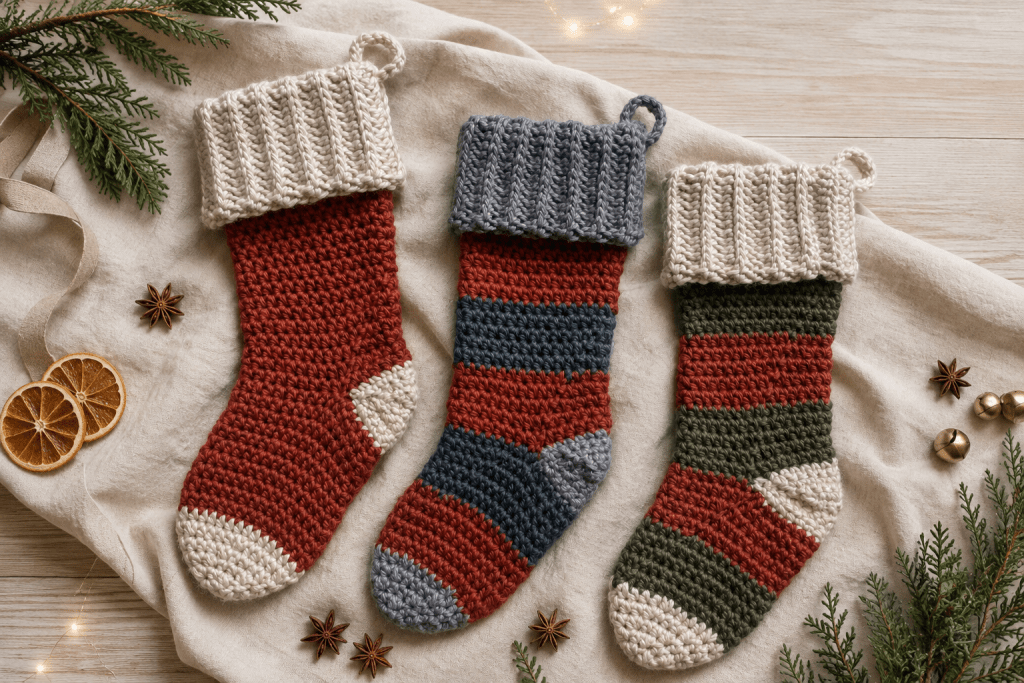
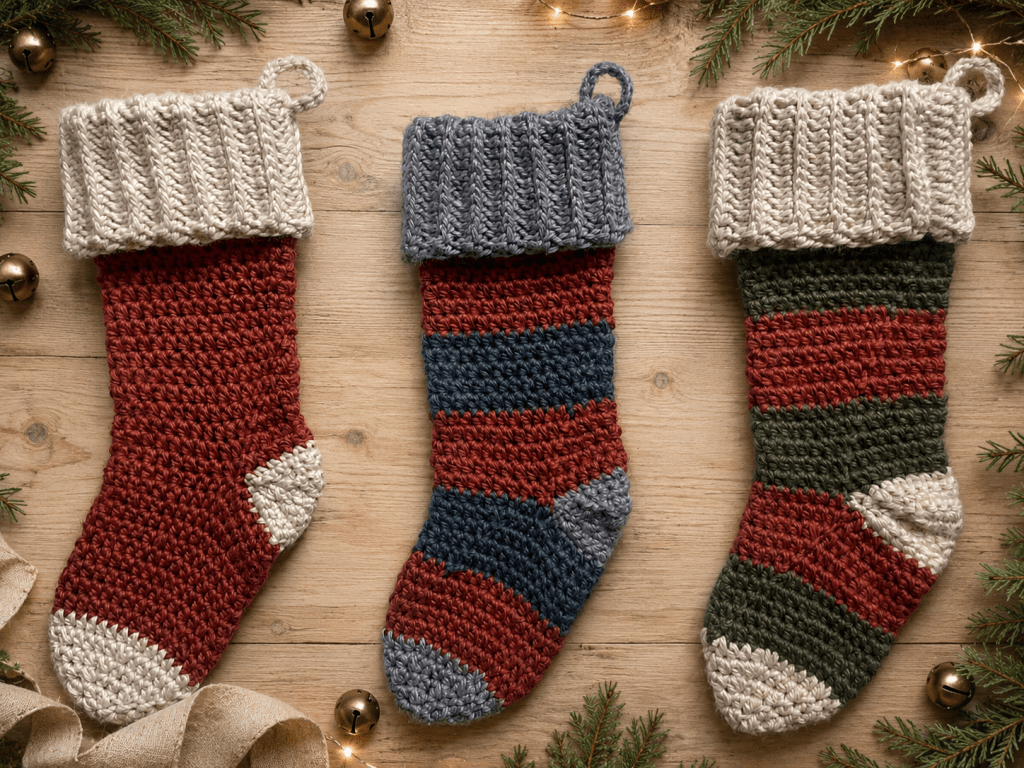
Make the holidays extra cozy with this free crochet Christmas stocking pattern. It is chunky, oversized, and roomy enough to hold actual gifts – not just one candy cane and a heartfelt apology.
The stocking is worked in one piece from the cuff down to the toe, so there are no separate pieces waiting around to be assembled when you would rather be wrapping gifts, eating cookies, or doing almost anything else. Make it in one solid color for a timeless look, or use stripes to create a stocking that feels playful, personal, and right at home with your holiday decor.
Whether you make one for the mantel or a full matching set for the family, this crochet Christmas stocking is designed to become part of your Christmas traditions for years to come.
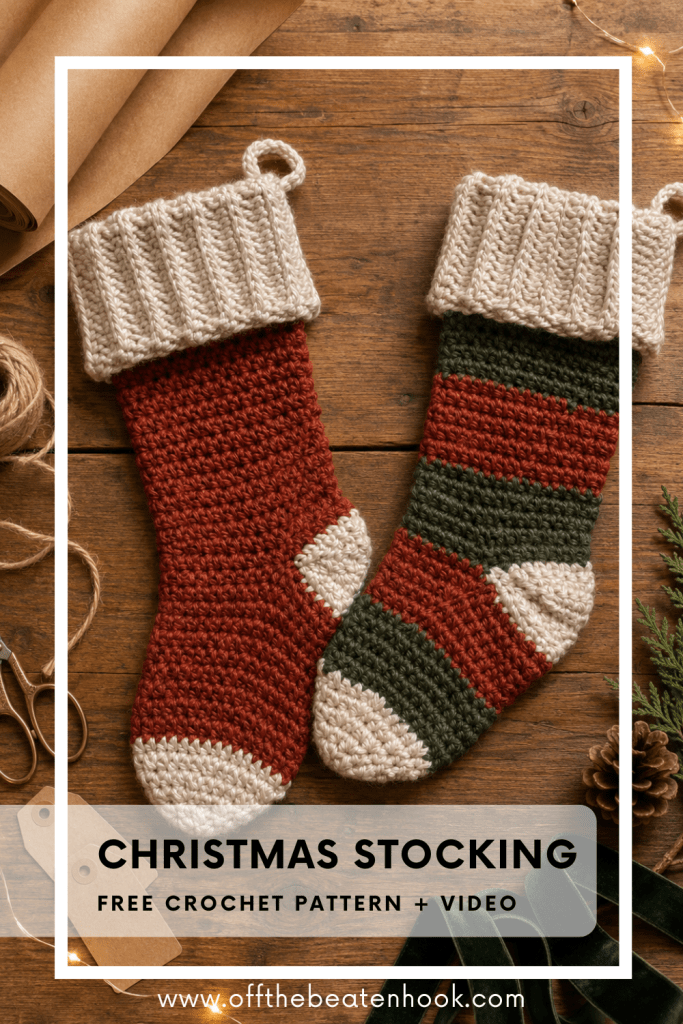
Jump into the crochet Christmas stocking pattern now, or pin it for later here!
LOVE COLLECTING Patterns?
If you love collecting crochet patterns, you might enjoy my Fiber Love Club — it gives you lifetime access to every pattern I’ve ever designed (plus all future releases).
Instead of buying patterns one by one, unlock the full pattern vault forever in one simple payment.

A Crochet Christmas Stocking Made for Real Christmas Morning
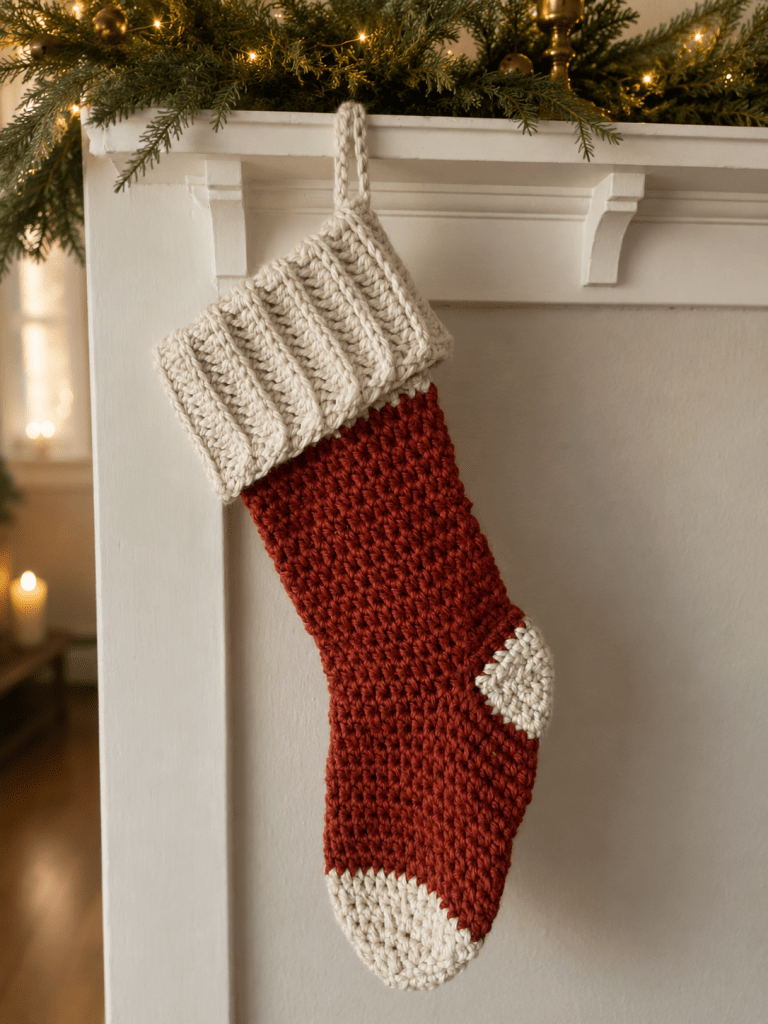
I love a beautiful handmade stocking, but I also want it to do its job. This one is intentionally oversized and functional, with plenty of room for the small gifts, treats, oranges, tiny toys, and other mysterious objects that somehow find their way into stockings every year.
The chunky fabric gives it a cozy, substantial feel that looks beautiful hanging by the fireplace, along a staircase, or anywhere else you have decided stockings belong. And because the simple silhouette works in both solid colors and stripes, you can make it fit nearly any holiday style – traditional, modern, rustic, colorful, or delightfully mismatched.
Why You Will Love This Crochet Christmas Stocking Pattern
- It is oversized and roomy enough to be a genuinely functional Christmas stocking.
- The chunky yarn creates cozy texture and helps the project grow quickly.
- It is worked in one piece from the cuff down to the toe.
- You can make it in a solid color or add stripes for a completely different look.
- The classic shape is easy to customize for every person in the family.
- It makes a meaningful handmade decoration you can bring out year after year.
Make It Solid, Striped, or Completely Your Own
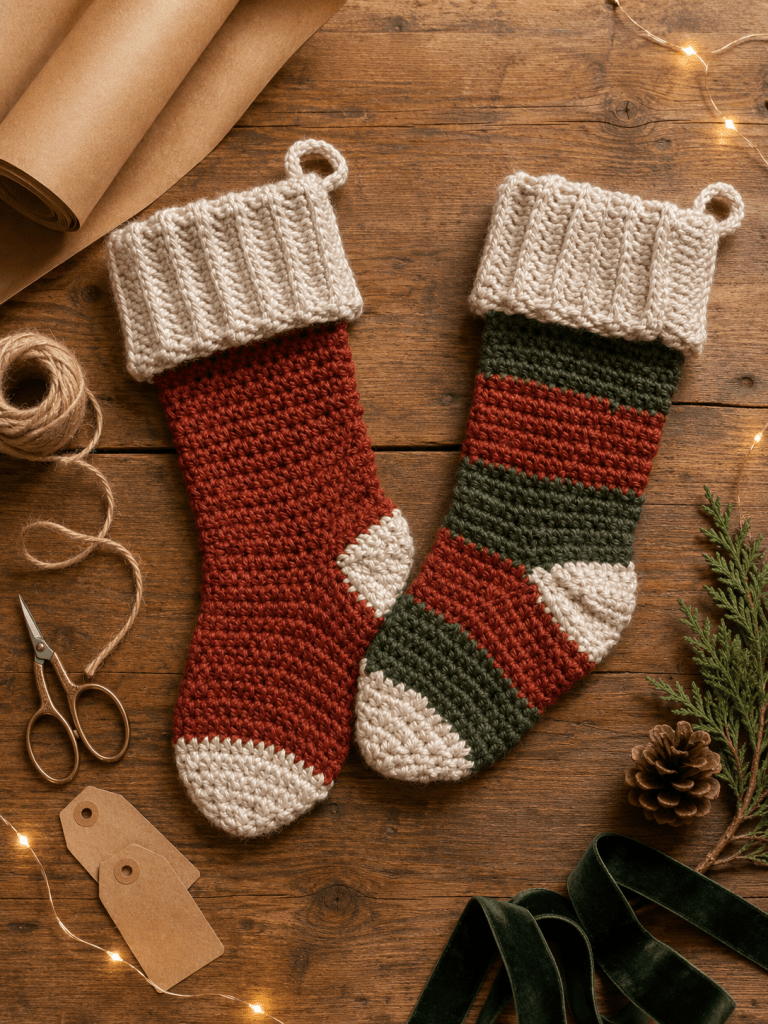
A solid crochet Christmas stocking is classic, clean, and easy to coordinate with the rest of your holiday decor. Choose a traditional red, green, or cream, or use a color that feels unmistakably like the person you are making it for.
For the striped version, you can keep the colors evenly spaced or change them whenever the mood strikes. Two-color stripes create a crisp, graphic look, while several colors are perfect for using smaller amounts of coordinating yarn. The stripe placement does not have to be identical from one stocking to the next, either. A related color palette will make a family set feel cohesive without requiring every stocking to be a clone.
You can also personalize the finished stocking with a tag, embroidered name, pom-pom, tassel, or other small detail. Keep it beautifully simple or give it a little extra holiday personality. There are no stocking police.
How Is This Crochet Christmas Stocking Constructed?
This stocking is crocheted in one piece, beginning at the cuff and working down toward the toe. The construction creates the full stocking shape without making separate front and back panels that need to be sewn together later.
Working from the cuff down also makes it easy to decide on your color plan at the beginning. Start with a solid shade and continue throughout, or change colors as you go to create stripes. The written pattern below will guide you through each part of the stocking in order, and the accompanying video tutorial lets you follow the construction step by step.
You can find that video tutorial further down in this post or access it straight away on YouTube here.
Printable PDF Crochet Pattern
This crochet pattern is reader supported by ads on my blog. If you’d rather print the pattern for some cozy couch crocheting, you can find the ad-free, printable PDF in my shop here or on Ravelry here.

🌿 Eco-Friendly Crafting
What makes this crochet pattern eco-friendly and sustainable?
THE YARN: I use only sustainable and eco-friendly yarn that has been ethically grown/raised and processed, putting the people and the planet first. This is why I chose 100% natural yarn for this pattern.
HANDMADE FOR LONGEVITY: Creating your own Christmas decor promotes mindful consumption. This durable, handmade crochet Christmas stocking reduces the need for mass-produced alternatives.
THE SLOW YARN MOVEMENT: I’m participating in the Slow Yarn Movement. There’s far too much to talk about here, but please take a few minutes to learn about what this means by reading the article I wrote about the Slow Yarn Movement as part of my 6-part Sustainable Crochet Series.
If you’re interested in learning more about sustainable crochet you can read all about it in the 6-part series I wrote covering everything about Sustainable Crochet and how to implement it into your own crafting starting today!
Materials You Will Need For This Crochet Christmas Stocking
The chunky yarn is part of what gives this crochet Christmas stocking its cozy look and satisfyingly substantial fabric. For the best results, choose a yarn that shows the stitch texture clearly and creates a fabric sturdy enough to hold its shape when filled.
If you are making several stockings, choosing one shared cuff color or repeating the same small palette is an easy way to make the set feel connected. You can also reverse the color order, vary the stripe widths, or let each person choose their own colors while keeping the same stocking pattern.
My Recommended Yarn
Lion Brand Re-Spun Thick & Quick Yarn
100% Recycled Polyester | 6/Super Bulky | 223y (204m)/ball
- Color A: Whipped Cream or Silver for the cuff, toes & heel (you’ll need a full ball for these parts on 1 stocking)
- Color B & C: Any solid or combination of Cinnamon Stick, Evergreen or Night Sky (you’ll use about 180 yards for the leg & toe)
Crochet Hook Needed
Additional Supplies Needed
- Jumbo Tapestry Needle (bent tips make all the difference!)
- Stitch Markers
- Scissors
Crochet Christmas Stocking Video Tutorial:
Sizing
21″ tall (from the top of the cuff to the toe tip)
8″ wide (across the cuff laying flat)
Gauge
N/A
Abbreviations Used in the Crochet Christmas Stocking Pattern
This pattern is written in English, using US terms. If needed, you can find a handy term conversion chart right here in my Resource Library.
ch – chain
st – stitch
hk – hook
sk – skip
sl st – slip stitch
sc – single crochet
hdc – half double crochet
fhdc – foundation half double crochet
inc – increase
dec – decrease
rep – repeat
(…) x – repeat instructions indicated number of times
[…] – number of stitches in row/round
PH – photo reference number
Skill Level
Beginner
Perfect for crocheters who are just getting started! This pattern uses basic stitches and simple construction with step-by-step instructions to help build confidence as you crochet.
FAQ & Terms
Affiliate Links & Ad Support
This post may contain affiliate links. At no extra cost to you, purchases made through these links may earn Off the Beaten Hook a small commission which in no way affects the cost to you. The content on this site is supported by advertisements. By using this site, you agree not to circumvent, block, or tamper with these ads.
Copyright & Intellectual Property
All content on this blog, including free crochet patterns, instructions, charts, photos, videos, and written materials, are the property of Off the Beaten Hook and are protected under copyright and other intellectual property laws. Screenshots or any other method of copying the pattern for offline use or redistribution is prohibited. Sharing patterns in forums, social media groups, or private messages without permission is also prohibited.
Personal Viewing & Use Only
Free patterns published on this site are provided for viewing only on this blog. You may not copy, download, print, take screenshots, or redistribute the pattern in any form (digital or physical) outside this blog. You may not post the pattern or instructions elsewhere online or share it publicly without written consent.
Questions & Permissions
For questions about these permissions or to use or share patterns outside of these rules, please contact Off the Beaten Hook in writing.
Absolutely! You may sell finished items made from Off the Beaten Hook’s patterns, but please credit:
“Pattern by Off the Beaten Hook”
Pattern Support is only available in our Facebook Community group and Video Tutorials. No additional support is provided for modified patterns, alternate yarns, or changes to gauge.
Yes. The pattern can be made in one color from cuff to toe for a classic, timeless crochet Christmas stocking.
Absolutely. Change colors as directed in the pattern or create your own stripe sequence. You can use two colors, several coordinating shades, or a different stripe arrangement for every member of the family.
No. It is worked in one piece from the cuff down to the toe, so you will not crochet separate front and back panels.
Yes. This is an oversized, functional stocking designed with plenty of room for Christmas morning treats and small gifts.
Yes! The easiest way to adjust the size (up or down) is to use a different yarn weight and hook size. If you use a larger yarn weight like JUMBO, paired with it’s recommended hook size, your stocking will be bigger. If you use a worsted weight yarn paired with it’s recommended yarn weight, the stocking will be smaller. I don’t have the specific measurements for those modifications but this way you won’t have to modify the actual pattern instructions in any way!
The Crochet Christmas Stocking Pattern
How to Crochet a Christmas Stocking
Before you begin, read through the full pattern and decide whether you want a solid or striped stocking. Gather your yarn, choose your color order, and make a quick note of where you plan to change colors if you want evenly placed stripes.
Then begin at the cuff and follow the written instructions as the stocking takes shape toward the toe. Check your stitch counts at the end of each section, especially around any shaping. A quick count now is considerably more festive than discovering a surprise several rounds later.
Cuff
NOTES:
- The stocking is worked in one piece from the cuff to the toe
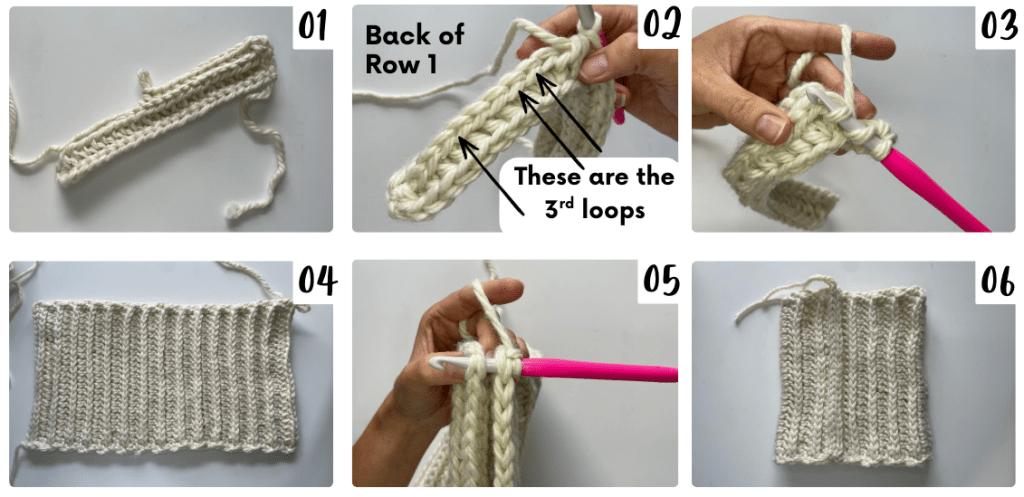
- The cuff is worked in turning rows through the 3rd loop only which is a loop unique to the hdc. Using this loop pushes the top 2 loops (the loops that create the “v” of the stitch) to one side of the fabric, creating a beautiful ribbed effect.
| Row 1: | In Color A, FHDC 22, ch 1, turn | [22] |
| Row 2-30: | hdc through both loops of the first st, hdc in 3rd loop only across to the last st, hdc through both loops of the last st, ch 1, turn | PH 01, 02 & 03 | [22] |
| Fold the cuff so rows 1 and 30 are together. Sl st across to join into a tube (PH 04-06). Fasten off. | ||
Leg
NOTES:
- The leg is worked in continuous, joined rounds.
- FOR SOLID STOCKING: Follow pattern as written below
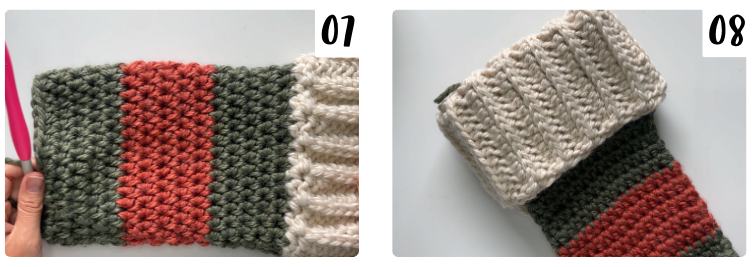
- FOR STRIPED STOCKING: The leg consists of 15 rows. Make 5 rows for each stripe. (For example: Rnds 1-5 red, Rnds 6-10 green, Rnds 11-15 red)
| Be sure the stocking is right side facing out, which is the side where you slip stitched the cuff into a tube (when you fold it over the seam will be hidden). With Color B, join yarn anywhere along the edge of the cuff with a sl st, and ch 1 | ||
| Rnd 1: | place 1 hdc at the end of each of the 30 rows of ribbing, sl st to 1st st to join rnd, ch 1 (do not turn) | [30] |
| Rnd 2: | hdc around, sl st to 1st st to join rnd, ch 1 (do not turn) | [30] |
| Rnd 3-15: | repeat Rnd 2 (refer to note above regarding where to change colors if making stripes) | PH 07 & 08 | [30] |
| If making the leg a solid color, do not break yarn after Rnd 15, simply drop it and stitch mark it. If making the leg in a striped pattern, you can fasten off Color B at this point and rejoin with Color C after the heel is complete. | ||
Heel
NOTES:
The heel is worked in turning rows using sc, then sewn into the proper shape
| With Color A, rejoin yarn with a sl st in the same st where you made your last st of the leg, and ch 1 | ||
| Row 1: | sc in next 14 st, ch 1, turn | [14] |
| Row 2: | dec over the first 2 sc, sc across to last 2 st, dec over the last 2 st, ch 1, turn | [12] |
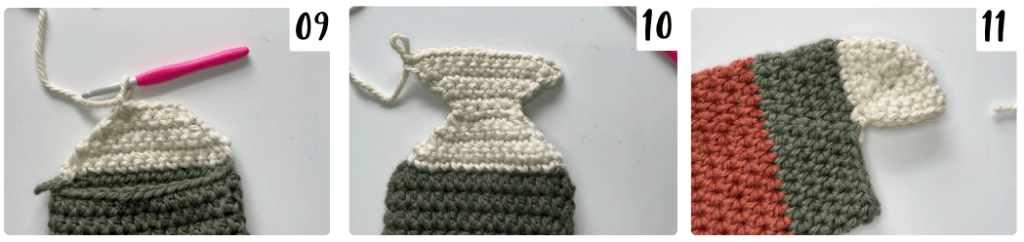
| Row 3-6: | repeat Row 2 (Row 3 = 10 st, Row 4 = 8 st, Row 5 = 6 st, Row 6 = 4 st | PH 09 | |
| Row 7: | inc in first st, sc across to last st, inc in last st, ch 1, turn | [6] |
| Row 8-11: | repeat Row 7 (Row 8 = 8 st, Row 9 = 10 st, Row 10 = 12 st, Row 11 = 14 st | PH 10 | |
| Fasten off, leaving a long tail for seaming. Fold the 2 triangles of the heel against each other with the right side facing together (wrong side out). Using the long tail, seam along both sides of the heel. Fasten off and fold the heel right side out before continuing with the foot. PH 11 | ||
Foot
NOTES:
- The foot is worked in continuous, joined rounds just like the leg.
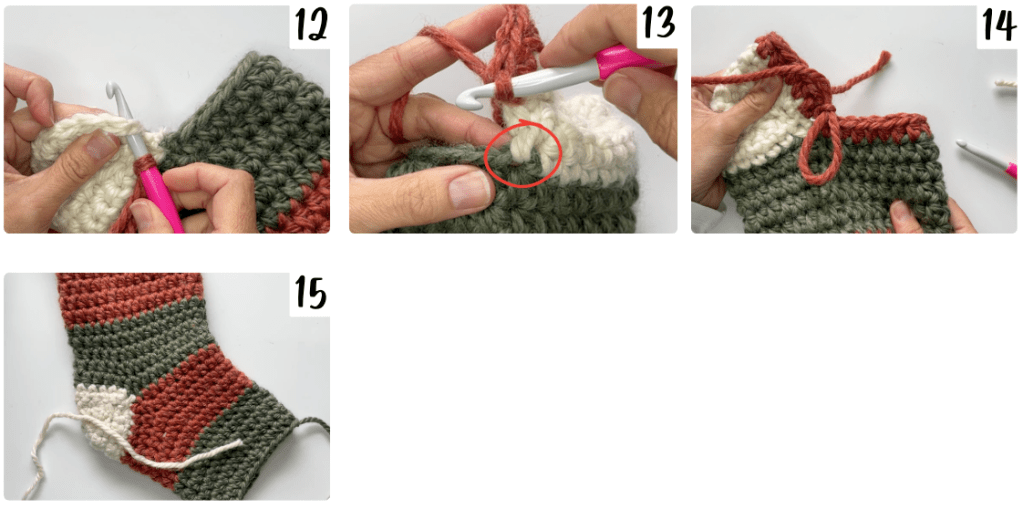
- After the heel is complete, your first Rnd of the foot will have 30 stitches total (just like the leg did). These 30 stitches will consist of 14 stitches across the heel and the 16 stitches remaining across the rest of Rnd 25 of the leg.
| With Color B (or C if you’re doing stripes), rejoin yarn with a sl st in the st on the right corner of the heel (PH 12), and ch 1 | ||
| Rnd 1: | hdc in the next 14 st of the heel, sl st in the same st of the last st you made of Row 1 of the heel (PH 13), hdc across the next 16 stitches of Rnd 25 of the leg, sl st in next st which is the first st you made of Row 1 of the heel, sl st to 1st st of Rnd to join, ch 1. (The 2 sl st’s in this Rnd do not count as st’s. Mark them if needed, to remind yourself NOT to work into them during Rnd 2.) PH 14 | [30] |
| Rnd 2: | hdc in each st around, sl st to join, ch 1 (do not turn) | [30] |
| Rnd 3-10: | repeat Rnd 2, maintaining 5 Rnds for each contrast color if making stripes | PH 15 | [30] |
| Fasten off and weave in end. | ||
Toe
NOTES:
- The toe is worked in continuous, joined rounds
| With Color A, rejoin yarn with a sl st in the same st where you made your last st of the foot, and ch 1 | ||
| Rnd 1: | (hdc 4, hdc dec) x5, sl st to join, ch 1 | [25] |
| Rnd 2: | (hdc 3, hdc dec) x5, sl st to join, ch 1 | [20] |
| Rnd 3: | (hdc 2, hdc dec) x5, sl st to join, ch 1 | [15] |
| Rnd 4: | (hdc 1, hdc dec) x5, sl st to join, ch 1 | [10] |
| Rnd 5: | hdc dec around, sl st to join | [5] |
| Snip yarn, leaving a long tail for closing rnd and pull yarn tail through final loop. Using the yarn tail on a tapestry needle, thread the needle through the front loop only of each of the remaining 5 stitches, pull tightly to close and weave in end. | ||
Hanging Cord
NOTES:
- I cover the technique for the hanging cord, in detail, in the video tutorial as well.
- The cord uses two strands of yarn worked at the same time. I use the center pull and the outer strand from a cake of yarn
- Slip knot onto your hook with both ends of the two strands of yarn, or if you’re using one long folded strand, slip knot at the fold
- Take one of the yarns into your hand as your working end. The other yarn will dangle forward towards you over the palm of your hand.
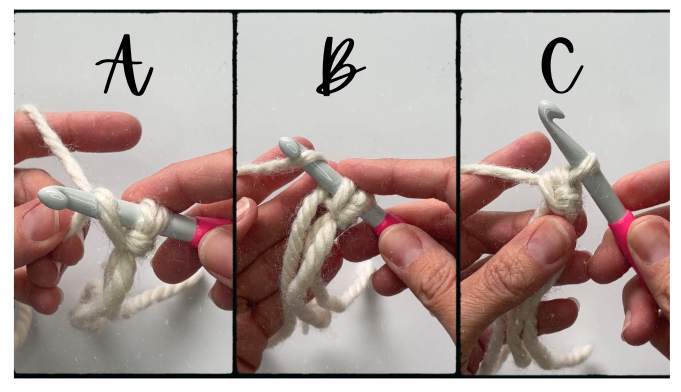
- Next, with the strand in your palm (the one dangling forward towards you), yarn over hook from front to back and hold it in in place on the shaft of your hook PHOTO A
- Next, with the yarn in your working hand, yarn over hook from back to front (just like a normal yarn over) PHOTO B and pull through both loops on the hook PHOTO C
- Repeat steps 3 & 4, 15 times or until you reach the desired length of hanging cord.
- When complete, pull both yarn ends through the final loops and tie off.
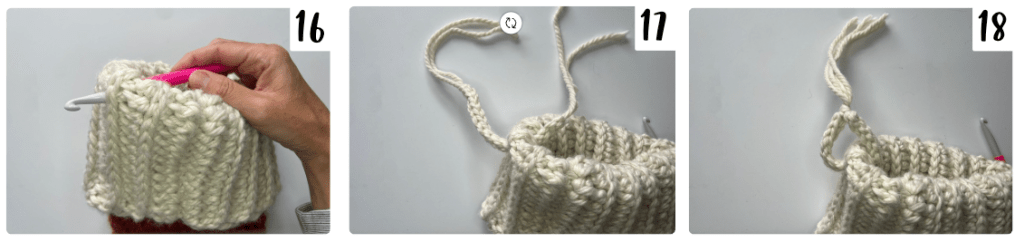
Install the cord onto the stocking through both layers of the folded-over cuff: snatch it with your hook, pull it through and tie it off. Be sure the yarn tails remain on the inside of the stocking. PH 16-18
Finishing and Personalizing Your Stocking
Once the crocheting is finished, weave in every remaining end securely and gently shape the stocking. If the finished fabric would benefit from blocking, follow the care instructions for your chosen yarn.
This is also the moment to add any optional personalization. Attach a name tag, embroider an initial, add a tassel or pom-pom, or leave the stocking exactly as it is. The oversized shape and chunky texture already give it plenty of presence.
Show Off Your Work! ✨
I can’t wait to see your beautiful crochet Christmas stockings! Be sure to tag me on social media @offthebeatenhook or use the hashtag #offthebeatenhook so I can admire your makes. ❤️
🔗 Other Christmas Patterns To Check Out:
- Advent Calendar Crochet Pattern
- Nativity Set Crochet Pattern
- Christmas Tree Trio Crochet Pattern
- Christmas Lights Garland Crochet Pattern
SOCIAL MEDIA YOUR THING?
Connect with me on your favorite social network!
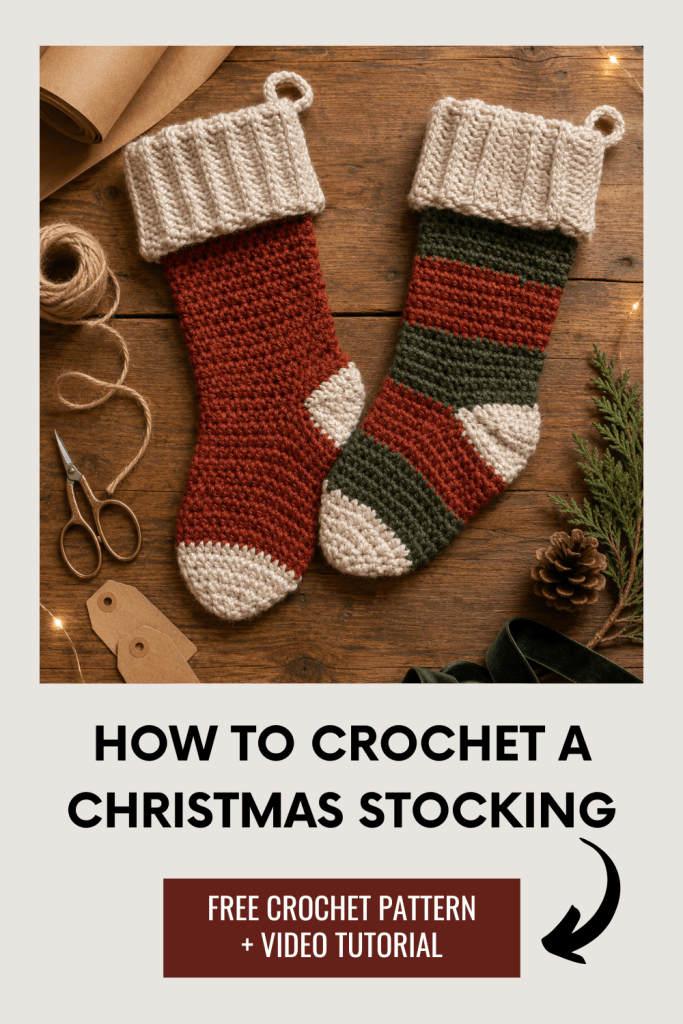
Pin this crochet Christmas stocking pattern here:
Leave a Reply