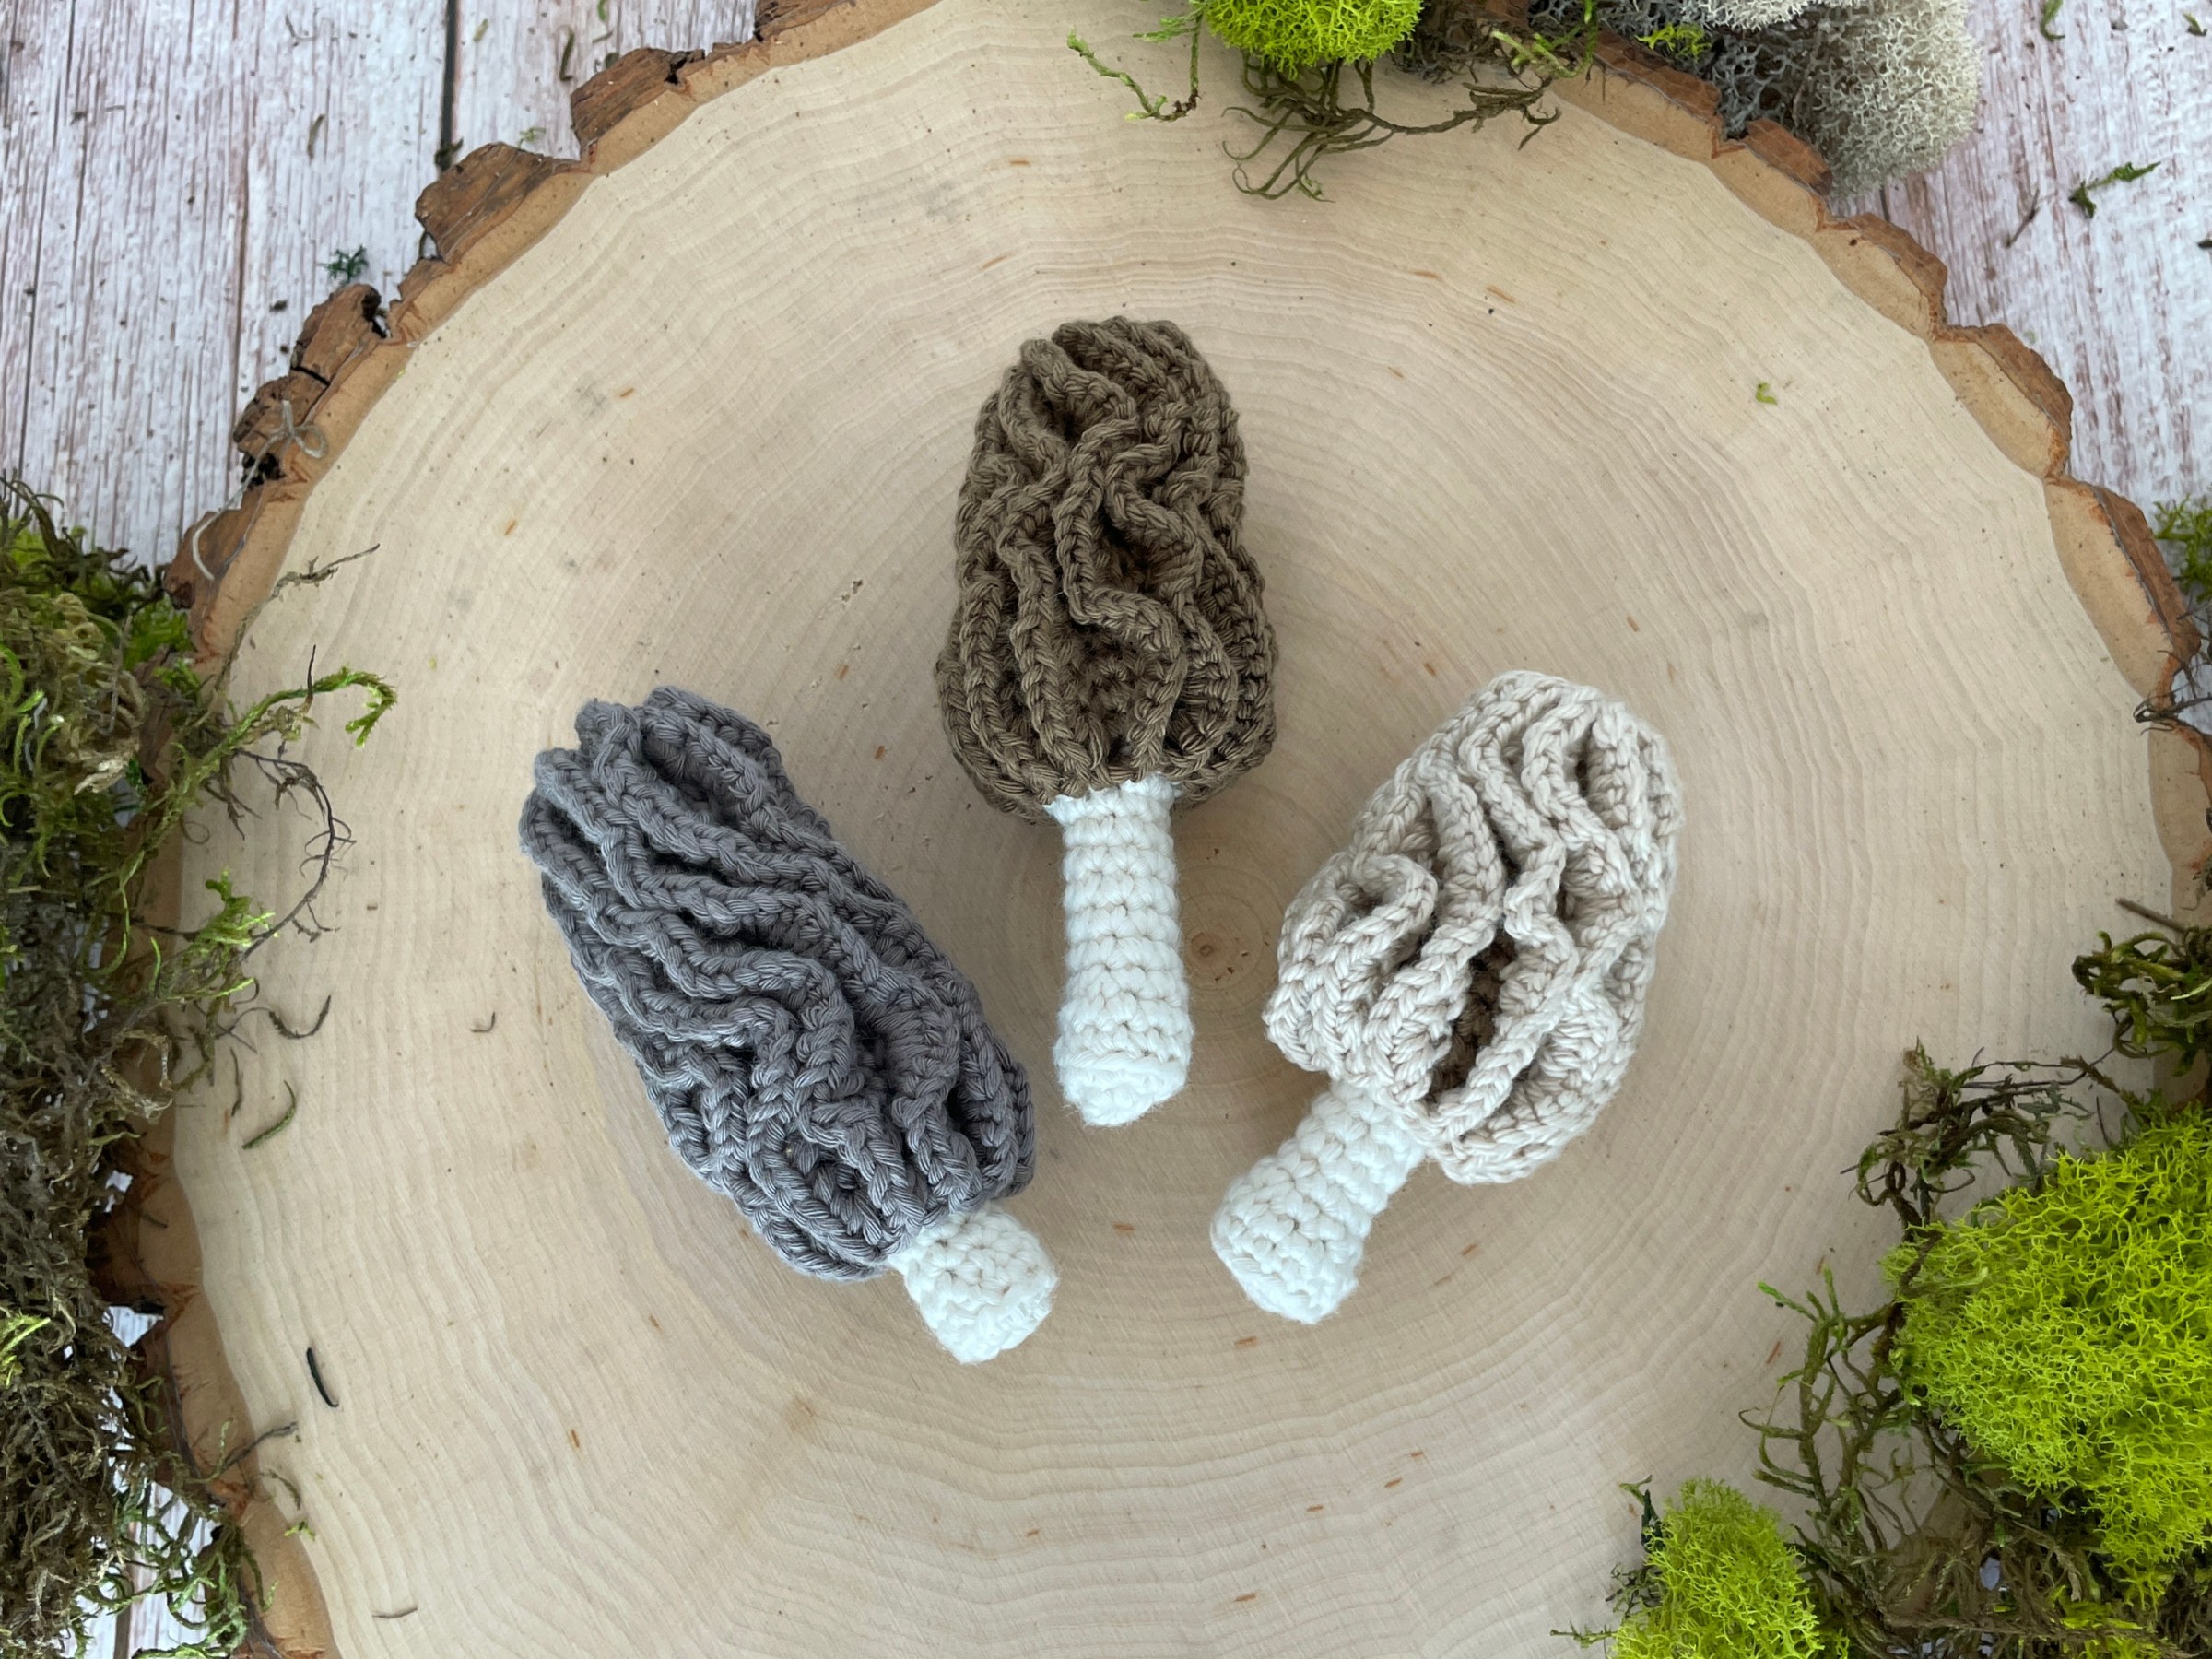
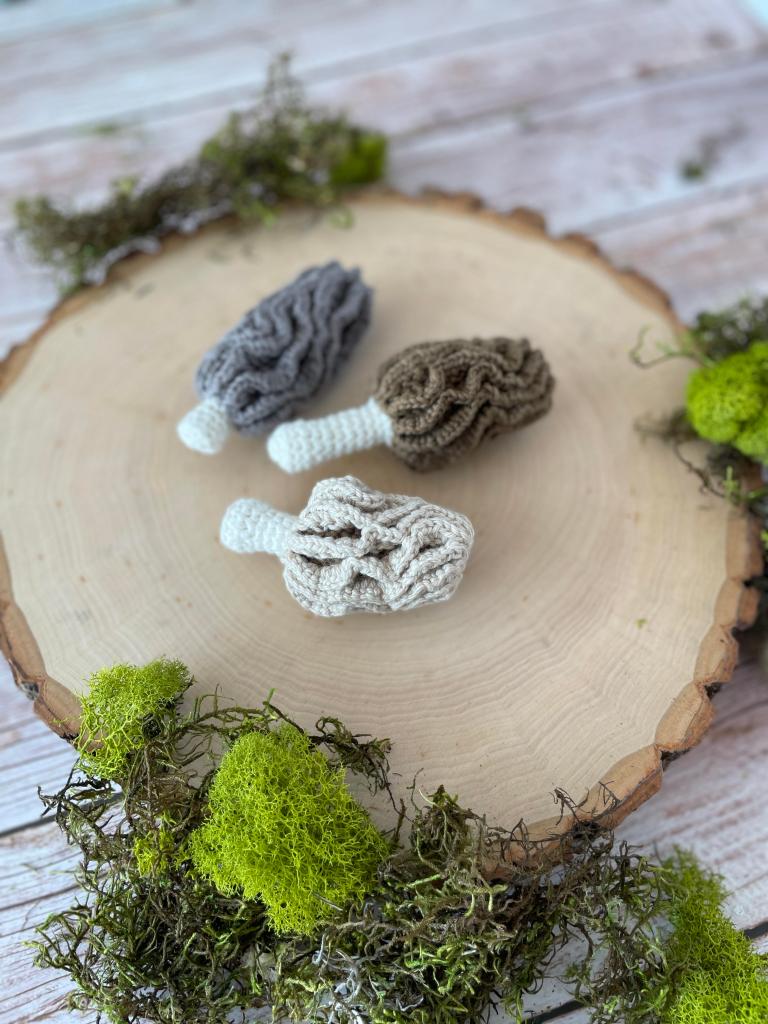
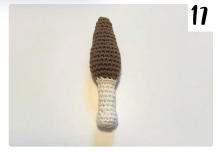
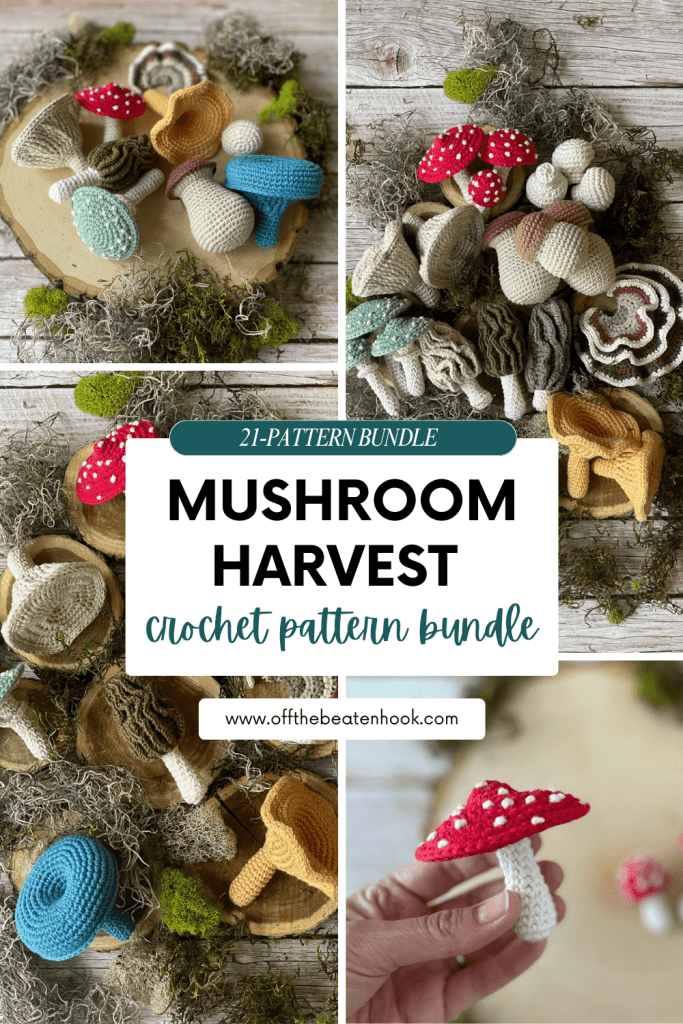
The Morel Mushroom Crochet Pattern brings this woodland delicacy to life in yarn form! Known for its iconic honeycomb texture and tall, conical cap, this design is a must-try for crochet enthusiasts who love nature-inspired projects. It’s just one of 9 stunning mushroom varieties found in the Mushroom Harvest pattern bundle, which includes 21 unique designs for endless creativity.
Jump into the morel mushroom crochet pattern now, or PIN it for later here!

Just so you can appreciate crocheting this little fungi even more:
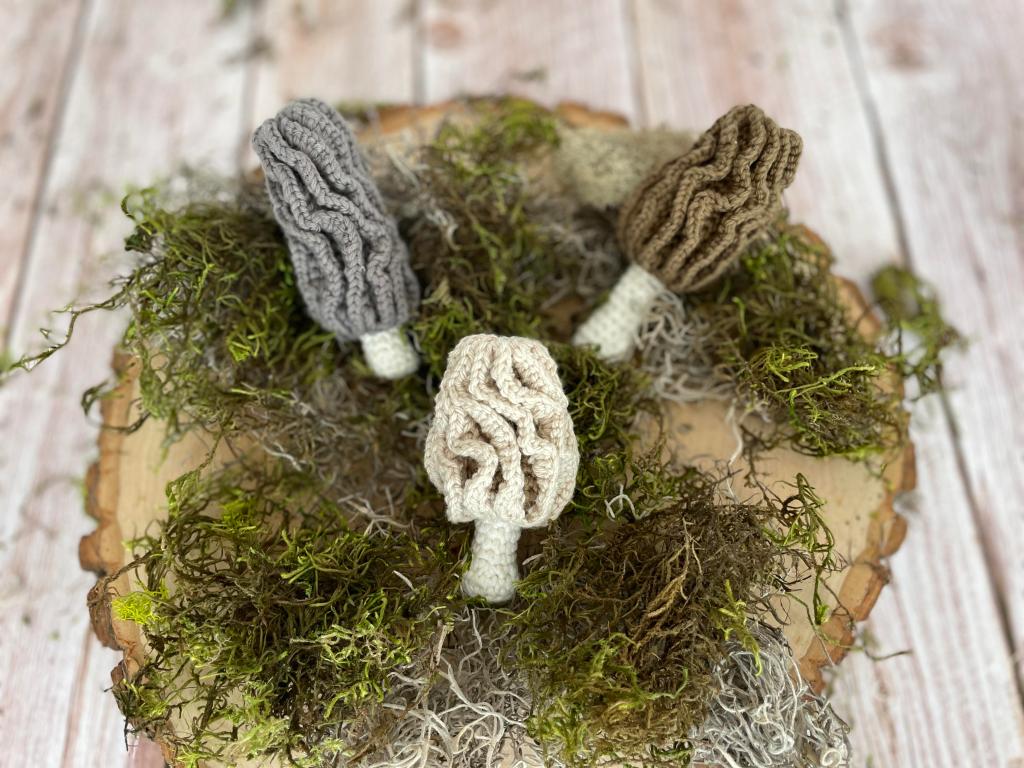
The Morel (Morchella esculenta), also known as the True Morel, is a highly edible and prized mushroom. It is celebrated for its earthy and nutty flavor, making it a favorite in gourmet cooking. These mushrooms are rich in antioxidants and nutrients, including vitamin D, though they are not traditionally used for medicinal purposes. Morels thrive in temperate forests across North America, Europe, and Asia, often appearing in sandy soil around decaying trees during the spring.
Their honeycomb-like caps make them easily identifiable, though foragers need to be cautious of toxic lookalikes.
Interesting Facts:
- Morels are one of the most sought-after wild mushrooms, often commanding high prices in markets.
- Their honeycomb-like caps make them easily identifiable, though foragers need to be cautious of toxic lookalikes.
I’ve created a helpful video tutorial for this pattern as well, which covers the making of the pits and gills of this morel in detail. You can find that further down in this post or access it straight away on YouTube here.
Are you embarking on a crochet mushroom-foraging adventure?
You can download this morel mushroom crochet pattern as part of the Mushroom Harvest Crochet Pattern Bundle here. This ad-free, printable PDF conveniently includes all 9 mushroom varieties in one place for some seriously cozy couch crocheting!
With all the different sizes included in the written pattern, that’s actually 21 (yes, TWENTY-ONE) mushrooms all in one pattern. I guess it’s sort of a crochet mushroom e-book, really!
The mushroom varieties included in the Mushroom Harvest are:
- Morel (3 sizes)
- Fly Agaric (3 sizes)
- Verdigris Agaric (3 sizes)
- Chanterelle (2 sizes)
- Indigo Milk Cap (2 sizes)
- Button (1 size)
- Turkey Tail (3 sizes)
- Porcini (3 sizes)
- Oyster (1 size)
This pattern is written in English, using US terms. If needed, you can find a handy term conversion chart right here in my Resource Library.

Morel Mushroom Crochet Pattern Guide:
Size & Gauge:
Size: Between 3.5″ – 4″
Gauge: N/A
Policies & Disclaimers:
This crochet pattern is for PERSONAL USE ONLY. This pattern or parts of it may not be reproduced, resold, distributed, published, altered, translated, posted or shared without authorization. You can sell your finished items provided that you credit Off the Beaten Hook as the designer using this verbiage, “This pattern was designed by Lindsey Roe and Off the Beaten Hook.” Thank you for your respectfulness!
This post contains affiliate links for materials I use and love. If you purchase something using one of these links I may earn a small commission which in no way affects the cost to you. These partnerships help me support my small business which allows me to provide you with free crochet patterns. Thank you from the bottom of my heart for your support!
What makes this crochet pattern eco-friendly and sustainable?
THE YARN: I use only sustainable and eco-friendly yarn that has been ethically grown/raised and processed, putting the people and the planet first. This is why I chose 100% cotton yarn yarn for this pattern.
THE STUFFING: I used a variety of recycled materials to stuff these mushrooms, including recycled polyester, recycled cotton and yarn scraps.
THE SLOW YARN MOVEMENT: I’m participating in the Slow Yarn Movement. There’s far too much to talk about here, but please take a few minutes to learn about what this means by reading the article I wrote about the Slow Yarn Movement as part of my 6-part Sustainable Crochet Series.
If you’re interested in learning more about sustainable crochet you can read all about it in the 6-part series I wrote covering everything about Sustainable Crochet and how to implement it into your own crafting starting today!
Materials you will need:
Yarn:
100% Cotton | 3/DK/Light Worsted
I used yarn from my stash for this mushroom, which I always encourage you to try first! If you don’t have anything that will work, you’re sure to find a suitable color using one of the following collections:
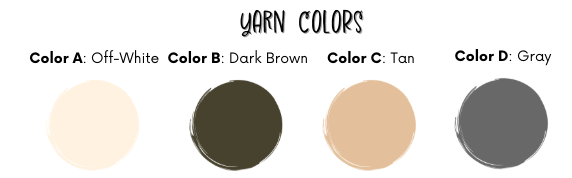
- Paintbox Yarns Cotton DK – I recommend the colors Champagne White, Coffee Bean, Vanilla Cream, and Slate Gray, for these Morel mushrooms
- The yardage for this mushroom is small enough (under 1 ball), so the quantities are not specified.
If you would like to explore other yarn options, here are some that would work well for this pattern:
DK Weight (use a hook sized somewhere between 2.50 mm and 3.00 mm)
Worsted/Aran Weight for a larger mushroom (use a hook sized somewhere between 3.50 mm and 4.50 mm)
Other tools and materials needed:
- Crochet Hook Size: 2.75 mm
- Tapestry Needle (bent tips make all the difference!)
- Stitch Markers
- Scissors
- Stuffing
Abbreviations/Skills:
ch – chain
st – stitch
hk – hook
sk – skip
sl st – slip stitch
sc – single crochet
hdc – half double crochet
dc – double crochet
FLO – front loop only
BLO – back loop only
fpdc – front post double crochet
inc – increase
dec – decrease
rep – repeat
(…) x – repeat instructions indicated number of times
[…] – number of stitches in row/round
PH – photo reference number

The Morel Mushroom Crochet Pattern:
NOTES:
- Work in continuous rounds – do not join.
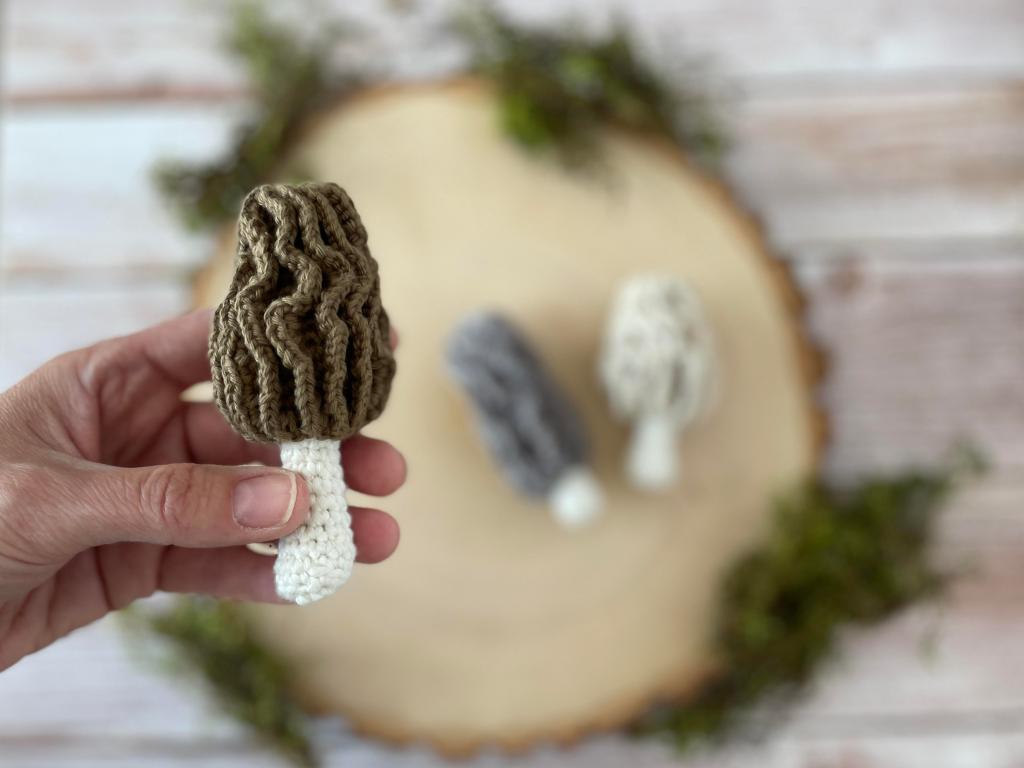
- The morels are worked from the stem up to the tip of the cap with the squiggly ridges and pits being added afterwards.
- The ridges & pits have an extensive overview below and is also covered in detail in the video tutorial. The method is provided once (after Morel #1) and is the same for each mushroom so please refer back to that page if needed for Morel #2 and Morel #3.
Morel Mushroom #1
| Begin with Color A | ||
| Rnd 1: | st 6 sc in a magic circle | [6] |
| Rnd 2: | inc in each st around | [12] |
| Rnd 3: | BLO sc around | [12] |
| Rnd 4: | sc around | [12] |
| Rnd 5: | (sc 2, dec) x3 | [9] |
| Rnd 6-9: | sc around | [9] |
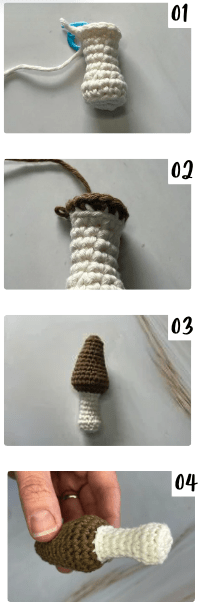
| Rnd 10: | (sc 2, inc) x3 | PH 01 | [12] |
| Stuff the stem. Switch to Color B | ||
| Rnd 11: | BLO (sc, inc) x6 | PH 02 | [18] |
| Rnd 12: | (sc 2, inc) x6 | [24] |
| Rnd 13-14: | sc around | [24] |
| Rnd 15: | (sc 4, dec) x4 | [20] |
| Rnd 16-17: | sc around | [20] |
| Rnd 18: | (sc 3, dec) x4 | [16] |
| Rnd 19-20 | sc around | [16] |
| Stuff mushroom | ||
| Rnd 21: | (sc 2, dec) x4 | [12] |
| Rnd 22-23: | sc around | [12] |
| Stuff mushroom | ||
| Rnd 24: | dec around | [6] |
| Snip, leaving a tail for closing. Pull the yarn through your final 2 loops. Using a tapestry needle, weave the yarn tail through the front loops only of the remaining 6 stitches and pull tightly to close. Bring the yarn to the inside. | PH 03 & 04 | ||
| With Color C, add ridges & pits (method to follow). | ||
Morel Mushroom Cap Ridges & Pits
We will now make the squiggly ridges and pits across the cap of the morel mushroom. Here is the method for how to do so. This section is covered in the video tutorial which I highly recommend watching before starting this since there are some unconventional techniques that can sound confusing when just reading the instructions. PHOTOS ON THE NEXT PAGE.
OVERVIEW:
- We will make the ridges and pits by making rows of surface single crochet around the posts of the smooth cap you just made. These are similar to surface slip stitches, but instead of slip stitches, you’ll be making single crochets.
- Then, we will go back and work sc increases into each of the surface sc’s which will create the squiggly texture.
- The surface single crochets are worked going vertically up the rows of the mushroom cap – beginning at the row where you switch from the off-white stem to the colored cap. You’ll do this by inserting the hook into the cap between those two rows, pushing the hook under the row and popping it back up between the two stitches of the row above it and then completing a single crochet – you’ll continue in this way from the base of the cap to the top of the cap.
- You’ll be making 12 of these squiggly single crochet rows going vertically from the base of the cap to the top. However, note that the first row of the cap includes 12 stitches around, but only 6 stitches at the top (because you decreased as you made your way to the tip). This means you will have to have two of the surface single crochet rows end in the same stitch as each other at the top.
METHOD:
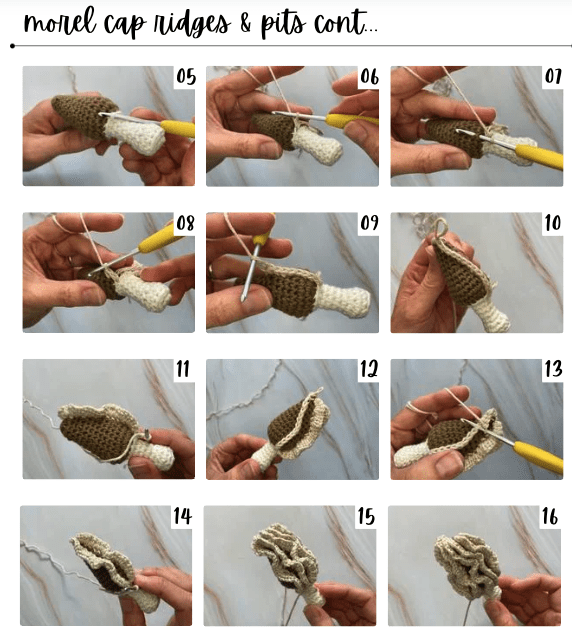
| Rejoin anywhere along the FLO of the final round of the stem (where you used the BLO for the first row of the cap) and ch 1 | PH 05 & 06 | ||
| Row 1: | Insert your hook into the mushroom, between the first two rows of the cap and back up between the 2nd and 3rd row of the cap and complete a single crochet (PH 07 & 08). Then, insert the hook between the 3rd and 4th row and complete a single crochet. Continue in this way over every single row of the cap, making one single crochet over each of the rounds of the cap (PH 09 & 10), and ultimately making your last single crochet over the last round of the cap (not including where you CLOSED the top), ch 1, turn | |
| Row 2: | Working your way back down the row of surface single crochets you just made: (2 sc in next st, 3 sc in next st) x across, stopping before the last st, leave the last st unworked, ch 1, sl st to the next FLO along the base of the cap, ch 1 | PH 11 | |
| Row 3+: | Repeat rows 1 & 2 all the way around (PH 12-16). You’ll end up with 12 squiggly surface single crochet rows. After the last row, sl st to the first FLO from the base of the cap and fasten off. Using a tapestry needle, bring the yarn end to the inside | |
| Using your artistic liberty, push and pull and distort the ridges and pits to achieve a random, squiggly texture across the surface of the cap. | ||
Morel Mushroom #2
| Begin with Color A. | ||
| Rnd 1: | st 6 sc in a magic circle | [6] |
| Rnd 2: | inc in each st around | [12] |
| Rnd 3: | BLO sc around | [12] |
| Rnd 4: | sc around | [12] |
| Rnd 5: | (sc 2, dec) x3 | [9] |
| Rnd 6-11: | sc around | [9] |
| Rnd 12: | (sc 2, inc) x3 | [12] |
| Stuff the stem. Switch to Color B. | ||
| Rnd 13: | BLO (sc, inc) x6 | [18] |
| Rnd 14: | (sc 8, inc) x2 | [20] |
| Rnd 15-20: | sc around | [20] |
| Rnd 21: | (sc 3, dec) x4 | [16] |
| Rnd 22-24: | sc around | [16] |
| Stuff mushroom. | ||
| Rnd 25: | (sc 2, dec) x4 | [12] |
| Rnd 26-27: | sc around | [12] |
| Stuff mushroom. | ||
| Rnd 28: | dec around | [6] |
| Snip, leaving a tail for closing. Pull the yarn through your final 2 loops. Using a tapestry needle, weave the yarn tail through the front loops only of the remaining 6 stitches and pull tightly to close. Bring the yarn to the inside. PH 17 | ||
| With Color B, add ridges & pits (method as per Morel #1). | ||
Morel Mushroom #3
| Begin with Color A. | ||
| Rnd 1: | st 6 sc in a magic circle | [6] |
| Rnd 2: | inc in each st around | [12] |
| Rnd 3: | BLO sc around | [12] |
| Rnd 4: | (sc 2, dec) x3 | [9] |
| Rnd 5-6: | sc around | [9] |
| Stuff the stem. Switch to Color D. | ||
| Rnd 7: | BLO sc around | [9] |
| Rnd 8: | (sc 2, inc) x3 | [12] |
| Rnd 9-20: | sc around | [12] |
| Stuff mushroom. | ||
| Rnd 21: | (sc 2, dec) x3 | [9] |
| Rnd 22-24: | sc around | [9] |
| Stuff mushroom. | ||
| Rnd 25: | (sc, dec) x3 | [6] |
| Rnd 26-27: | sc around | [6] |
| Snip, leaving a tail for closing. Pull the yarn through your final 2 loops. Using a tapestry needle, weave the yarn tail through the front loops only of the remaining 6 stitches and pull tightly to close. Bring the yarn to the inside. PH 18 | ||
| With Color D, add ridges & pits (method as per Morel #1). | ||

Are you read to make your next mushroom?
You can find the individual free patterns to each of the varieties found in my Mushroom Harvest bundle here:
- Morel (3 sizes)
- Fly Agaric (3 sizes)
- Verdigris Agaric (3 sizes)
- Chanterelle (2 sizes)
- Indigo Milk Cap (2 sizes)
- Button (1 size)
- Turkey Tail (3 sizes)
- Porcini (3 sizes)
- Oyster (1 size)
Or snag all 21 mushrooms (9 varieties) in the Mushroom Harvest Pattern here:
Mushroom Crochet Pattern Video Tutorial:
Show Off Your Work! ✨
I can’t wait to see your beautiful morel mushrooms! Be sure to tag me on social media @offthebeatenhook or use the hashtag #offthebeatenhook so I can admire your makes. ❤️
Pin this Morel Mushroom Crochet Pattern:

Leave a Reply