

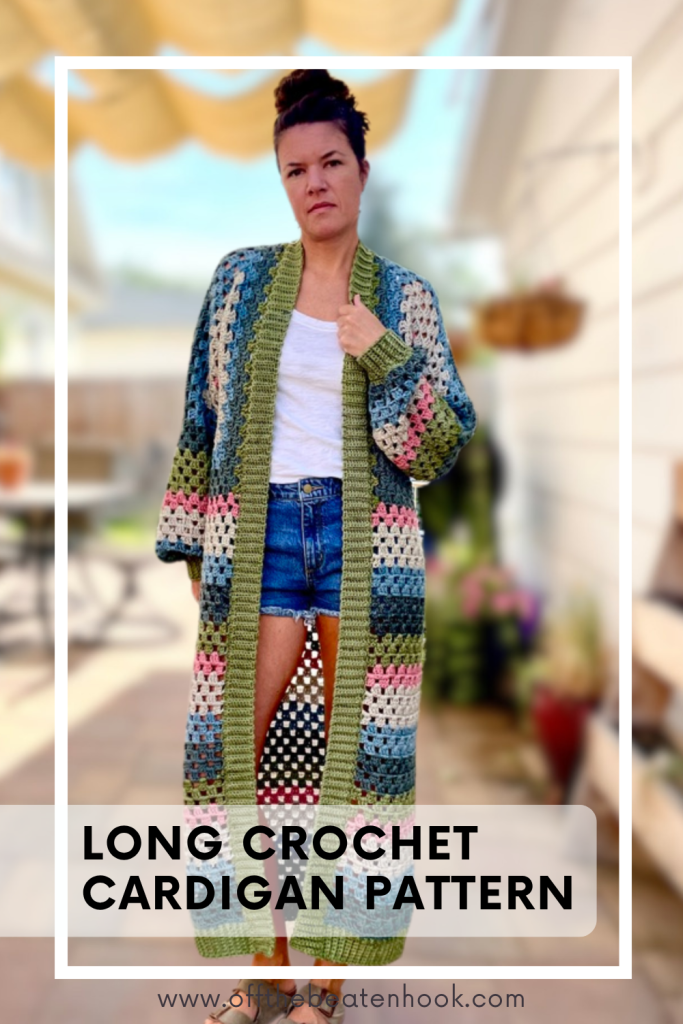
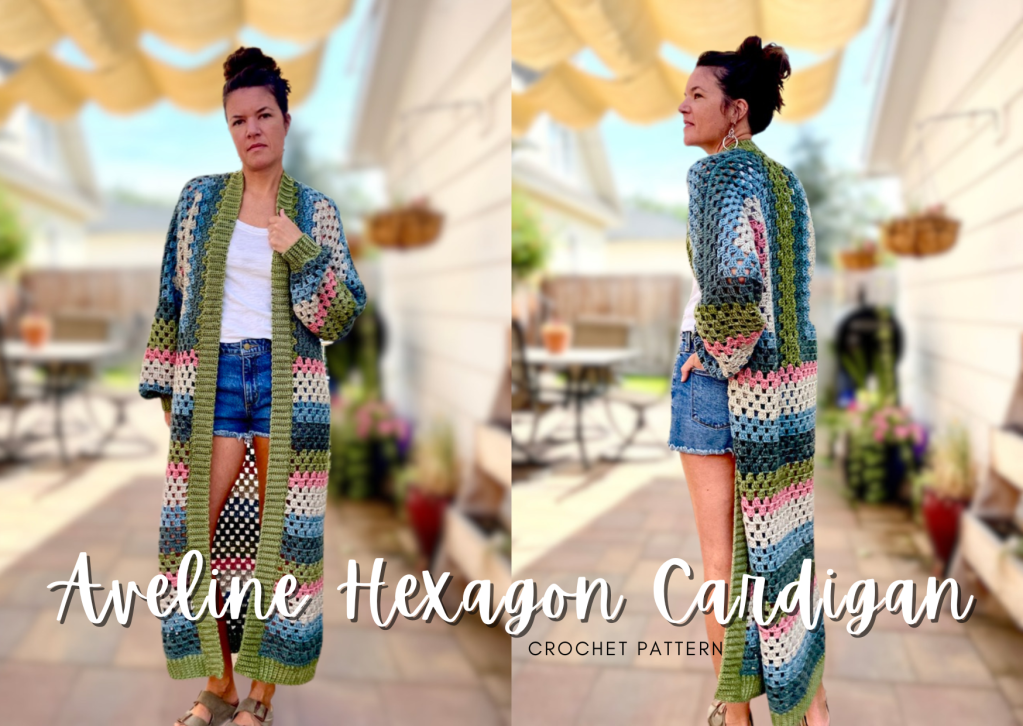
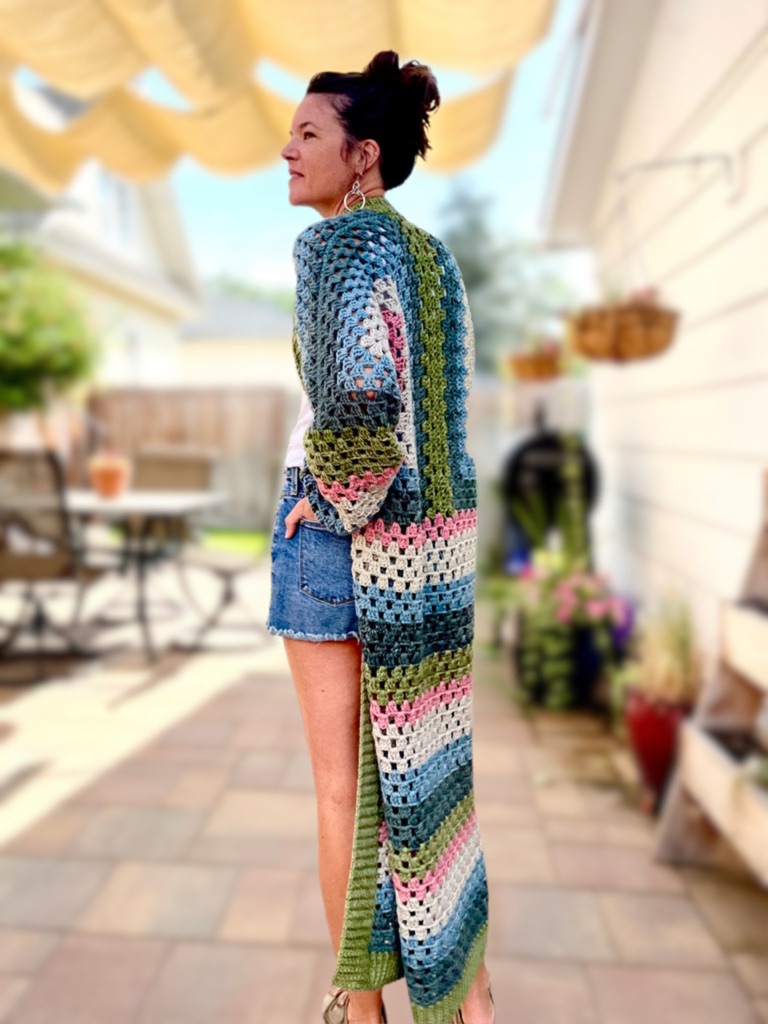
If you’ve been looking for a long crochet cardigan pattern that brings plenty of cozy comfort—and perhaps just a little drama—the Aveline Cardigan is ready to sweep into your wardrobe. This floor-skimming layer is colorful, relaxed and surprisingly simple to construct from two granny-stitch hexagons.
Aveline features five coordinating colors, a beautifully flowing length and polished ribbing around the cuffs, collar and lower border. You can follow the complete free pattern below and crochet along with the video tutorial, or purchase the ad-free printable PDF for some peaceful, screen-free stitching.
Jump into the long crochet cardigan pattern now, or pin it for later here!
LOVE COLLECTING Patterns?
If you love collecting crochet patterns, you might enjoy my Fiber Love Club — it gives you lifetime access to every pattern I’ve ever designed (plus all future releases).
Instead of buying patterns one by one, unlock the full pattern vault forever in one simple payment.
Meet the Aveline Long Crochet Cardigan Pattern
The Aveline Cardigan takes the wonderfully clever construction of a hexagon cardigan and gives it a long, sweeping silhouette. It’s comfortable enough to throw on over your everyday clothes but distinctive enough to become the entire outfit. Very convenient for days when coordinating several separate articles of clothing feels unnecessarily ambitious.
The granny-stitch fabric gives Aveline beautiful movement and drape while creating plenty of opportunities to play with color. I used five shades for my sample, alternating brighter Colors A and C with more grounded Colors B, D and E. The result is colorful and interesting without making the cardigan feel chaotic.
Of course, you can make yours in any combination you love. Choose five colors, create a monochromatic gradient, use up coordinating yarn from your stash or make the entire long crochet cardigan pattern in one solid shade.
Why You’ll Love This Long Crochet Cardigan Pattern
- Simple construction: Two hexagons form the foundation of the cardigan.
- Beginner-friendly stitches: The familiar granny stitch creates most of the fabric.
- Dramatic length: The long silhouette makes Aveline cozy, flattering and fun to wear.
- Plenty of color possibilities: Use five coordinated shades or make it entirely your own.
- Polished ribbing: Ribbed cuffs, collar and lower border give the cardigan a beautifully finished appearance.
- Customizable fit: Adjust the body or sleeve length to suit your measurements and personal style.
- Video support: Follow the complete tutorial as you work through the pattern.
How the Aveline Cardigan Is Constructed
Aveline begins with two granny-stitch hexagons—one for each side of the cardigan. As the hexagons grow, they naturally create the foundation for the body and sleeves. Once they reach the required size, they are folded, joined and extended to create the cardigan’s long silhouette.
The cuffs, lower border and collar are finished with ribbing. This gives the relaxed granny-stitch fabric a little more structure and makes the finished cardigan look polished and intentional.
There are no pockets or complicated closures to add in this long crochet cardigan pattern. Once the primary pieces are joined and the ribbing is complete, Aveline is ready to wear.
Choosing Colors for Your Aveline Cardigan
Choosing five colors may initially feel like being asked to name your five favorite children, but it becomes much easier when each color has a specific job.
For a balanced palette, try this approach:
- Color A: A brighter or lighter accent
- Color B: A soft neutral or muted shade
- Color C: A second bright or saturated accent
- Color D: A deeper coordinating shade
- Color E: A grounding color that ties everything together
Colors A and C provide the little pops of brightness, while Colors B, D and E keep the combination grounded. You can use this formula with warm colors, cool colors, earthy shades, pastels or a monochromatic palette.
If choosing five colors still causes an unreasonable amount of staring at your yarn shelves, I’ve included several ready-made color palette ideas in the printable pattern.
Looking for a Shorter Hexagon Cardigan?
Love this construction but want a more traditional cardigan length? Meet the Elowen Hexagon Cardigan! Elowen offers the same wonderfully simple two-hexagon construction in a shorter, everyday silhouette.
Printable PDF Crochet Pattern
This crochet pattern is reader supported by ads on my blog. If you’d rather print the pattern for some cozy couch crocheting, you can find the ad-free, printable PDF in my shop here or on Ravelry here.
🌿 Eco-Friendly Crafting
What makes this crochet pattern eco-friendly and sustainable?
THE YARN: I use only sustainable and eco-friendly yarn that has been ethically grown/raised and processed, putting the people and the planet first. This is why I chose 100% natural yarn for this pattern.
HANDMADE FOR LONGEVITY: Creating your own wardrobe pieces promotes mindful consumption. This durable, handmade long crochet cardigan reduces the need for mass-produced alternatives.
THE SLOW YARN MOVEMENT: I’m participating in the Slow Yarn Movement. There’s far too much to talk about here, but please take a few minutes to learn about what this means by reading the article I wrote about the Slow Yarn Movement as part of my 6-part Sustainable Crochet Series.
If you’re interested in learning more about sustainable crochet you can read all about it in the 6-part series I wrote covering everything about Sustainable Crochet and how to implement it into your own crafting starting today!
Materials You Will Need For This Long Crochet Cardigan Pattern
Yarn
100% Acrylic | 4/Medium/Worsted | 355y (199g)/ball
- I used the color Petits Fours Galore (self color changing yarn)
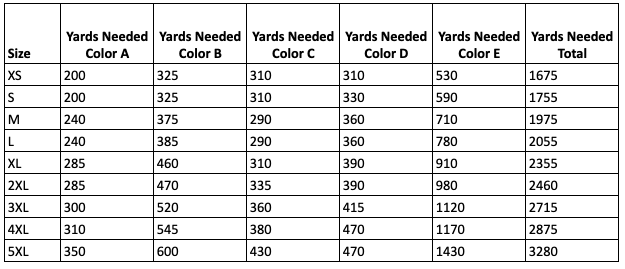
- Please see chart below for quantities needed per color & size
Yarn Substitutes
I chose the yarn recommended in this pattern because it works so well for this design. However, if you’re looking for substitutes, here are some that would work well with this pattern:
- Malabrigo Worsted | 100% Merino Wool
- Berroco Vintage | 52% Acrylic, 40% Wool, 8% Nylon
- Cascade Yarns 220 | 100% Superwash Merino
- Sirdar Country Classic | 50% Wool, 50% Acrylic
- Valley Yarns Becket | 50% Alpaca, 50% Wool
Yarn Quantities Needed Per Size
Because Aveline is a long cardigan, modifications to the body or sleeve length will affect the amount of yarn required. If you plan to add length, I recommend purchasing a little extra yarn—because losing yarn chicken three inches before the finish line builds character in ways none of us requested.
Crochet Hooks Needed
Additional Supplies Needed
- Tapestry Needle (bent tips make all the difference!)
- Stitch Markers
- Scissors
Long Crochet Cardigan Video Tutorial:
Sizing
This pattern is written in size XS with all other sizes following in parenthesis like this, XS(S, M, L, XL)(2XL, 3XL, 4XL, 5XL).
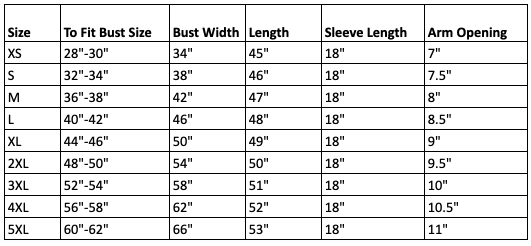
The Aveline Cardigan is designed with a relaxed, open-front fit. Use the finished measurements rather than relying only on your standard clothing size, and choose the size that provides your preferred amount of ease.
I am pictured wearing size XS with a 34″ bust and a height of 5’4″.
Gauge
Abbreviations Used in the Long Crochet Cardigan Pattern
This pattern is written in English, using US terms. If needed, you can find a handy term conversion chart right here in my Resource Library.
ch – chain
st – stitch
hk – hook
mc – magic circle/magic ring
sl st – slip stitch
sc – single crochet
dc – double crochet
beg – beginning
inc – increase
dec – decrease
BLO – back loop only
cl – cluster: 3 dc in same space
rep – repeat
(…) x – repeat instructions indicated number of times
[…] – number of stitches in row/round
PH – photo reference number
Skill Level
Advanced Beginner
A great next step after learning the basics. This pattern includes simple stitch combinations, shaping, or light assembly while still being approachable for newer crocheters ready to grow their skills.
Color Scheme
The fun thing about this cardigan is the color schemes are endless! I include the color scheme I used (below), but here are some other ideas if you need some inspiration!
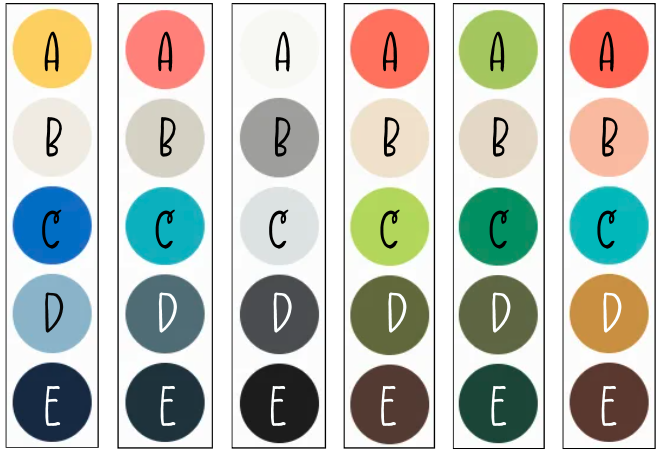
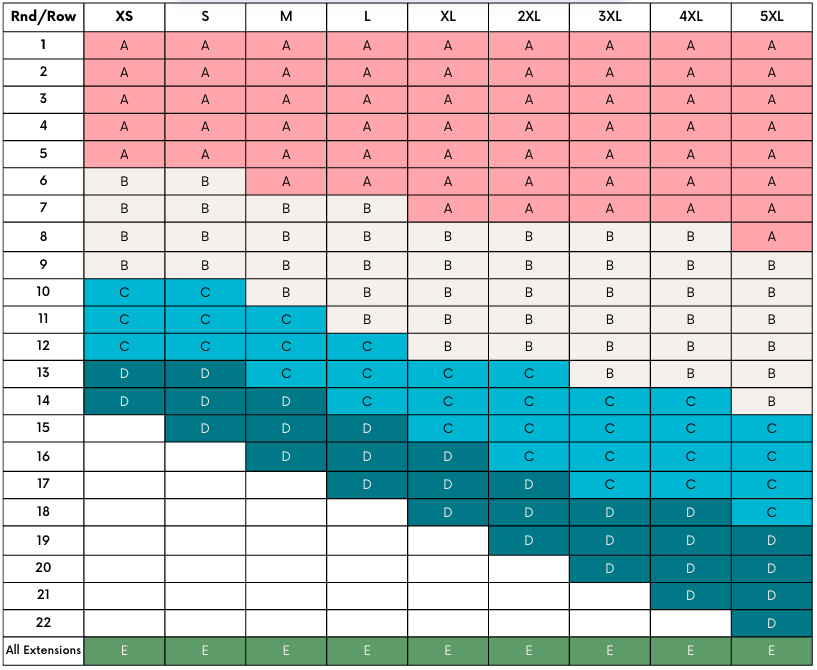
The table below is the color scheme I used for the hexagons in case you want to match it. For the remainder of the pattern: all front/back extensions will be made in Color E. The sleeves and the length extensions follow this repeat: Color A for 2 rows, Color B for 4 rows, Color C for 3 rows, Color D for 4 rows, Color E for 3 rows, and then repeat for the required number of rows.

Policies & Terms
Affiliate Links & Ad Support
This post may contain affiliate links. At no extra cost to you, purchases made through these links may earn Off the Beaten Hook a small commission which in no way affects the cost to you. The content on this site is supported by advertisements. By using this site, you agree not to circumvent, block, or tamper with these ads.
Copyright & Intellectual Property
All content on this blog, including free crochet patterns, instructions, charts, photos, videos, and written materials, are the property of Off the Beaten Hook and are protected under copyright and other intellectual property laws. Screenshots or any other method of copying the pattern for offline use or redistribution is prohibited. Sharing patterns in forums, social media groups, or private messages without permission is also prohibited.
Personal Viewing & Use Only
Free patterns published on this site are provided for viewing only on this blog. You may not copy, download, print, take screenshots, or redistribute the pattern in any form (digital or physical) outside this blog. You may not post the pattern or instructions elsewhere online or share it publicly without written consent.
Questions & Permissions
For questions about these permissions or to use or share patterns outside of these rules, please contact Off the Beaten Hook in writing.
Absolutely! You may sell finished items made from Off the Beaten Hook’s patterns, but please credit:
“Pattern by Off the Beaten Hook”
Pattern Support is only available in our Facebook Community group and Video Tutorials. No additional support is provided for modified patterns, alternate yarns, or changes to gauge.
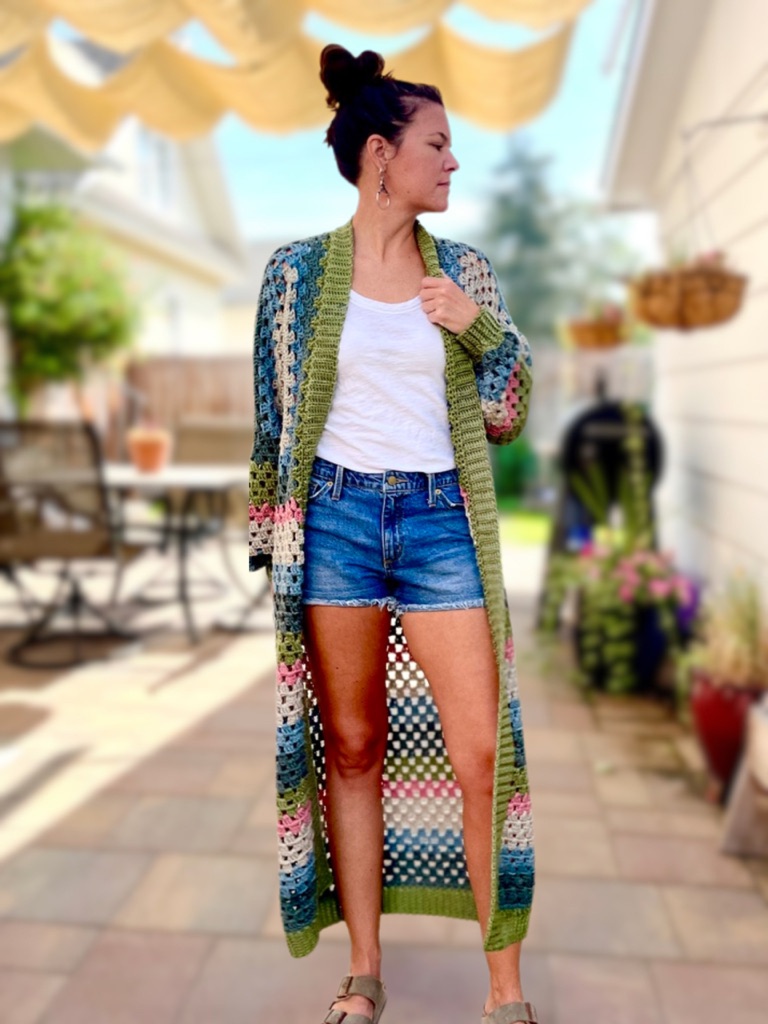
The Aveline Long Crochet Cardigan Pattern:
Hexagons – make 2
NOTES:
- The hexagons are worked in continuous rounds, joined after each round (do not turn)
- The method below gives instructions on how to transition rounds when using the SAME color. If and when you want to change colors after a completed row, simply fasten off after joining the round and add your new color into the next ch-2 corner space. You won’t have to start the Rnd with the “3 sl st across to next ch 2 sp”, you’ll simply fasten off and rejoin in the next ch sp (this is demonstrated in the video tutorial).
- You’ll find the hexagon begins to ruffle and remains ruffled the whole time – that is what is supposed to happen – you’re not doing anything wrong!
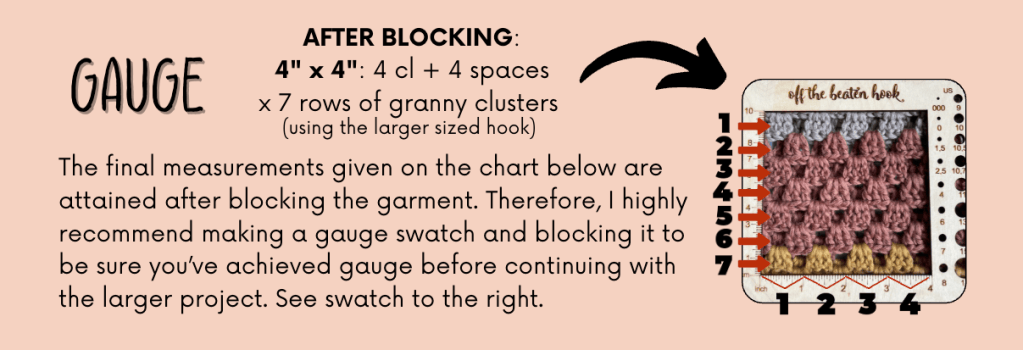
- Use the larger sized hook
| Rnd 1: | Make a mc, ch 3 (counts as your first dc here and throughout), dc 2, ch 1 (first cl made), *cl, ch 1* into mc 5 times, sl st to the top of beg ch-3 to join, close mc | [6 cl] |
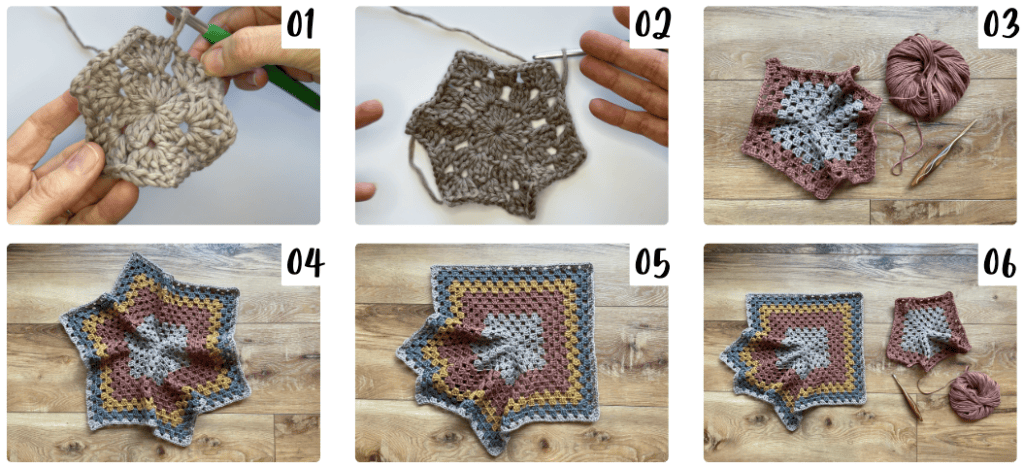
| Rnd 2: | 3 sl st across to next ch 1 sp, into ch sp: (ch 3, dc 2, ch 2, cl, ch 1), *into next ch 1 sp: (cl, ch 2, cl), ch 1, rep from *4 more times, sl st to beg ch-3 to join rnd (12 clusters/6 corners made) | PH 01 | [12 cl] |
| Rnd 3: | 3 sl st across to next ch 2 sp, into ch 2 sp: (ch 3, dc 2, ch 2, cl, ch 1), *cl in next ch 1 sp, ch 1, into next ch 2 sp: (cl, ch 2, cl,) ch 1, rep from *4 more times, cl in next ch 1 sp, ch 1, sl st to beg ch 3 to join rnd. | PH 02 | [18 cl] |
| Rnd 4: | 3 sl st across to next ch 2 sp, into ch 2 sp: (ch 3, dc 2, ch 2, cl, ch 1), *(cl, ch 1) in each ch 1 sp across to next ch 2 sp, into ch 2 sp: (cl, ch 2, cl,) ch 1, rep from *4 more times, (cl, ch 1) across to end of rnd, sl st to beg ch 3 to join rnd. | [24 cl] |
| Rnd 5-14(15, 16, 17, 18)(19, 20, 21, 22): Repeat Rnd 4 | PH 03-06 | ||
| Fasten off and weave in ends. | ||
Front & Back Extensions
NOTES:
- You will now add rows onto the front opening and the back center of the cardigan (on BOTH hexagons) in order to widen it without continuing to widen the sleeves.
- The number of row extensions you add is based on your size or your modification preferences as indicated below
Fold your hexagons into an “L” shape – PHOTO 07. Using stitch markers, identify and mark the center front opening and the center seam down the back. These are the 2 sides of the hexagon that you will extend by making turning rows of granny clusters.
The back of the hexagons will have one more row extension than the front opening will. That leaves a small space at the back of the neck to allow room for the collar.
Follow the method below until you achieve the required number of rows for the size you’re making OR until you reach the bust width you’d like based on how form fitting or how loose fitting you’d like it!

| Row 1: | With the right side facing, rejoin your yarn with a sl st into the ch 2 space at the edge of the side you are going to extend (PH 08 & 09). Ch 3 (counts as dc – PH 10), dc 2 in same ch 2 sp (PH 11), *ch 1, cl in next ch 1 sp, repeat from * across, ending with a cl in the final ch 2 sp at the opposite side (PH 12-13), turn | |
| Row 2: | Ch 4 (counts as dc + ch 1 – PH 14), *cl, in next ch 1 sp (PH 15), ch 1, repeat from *across, dc in top of beg ch 3 from previous row (PH 16-18), turn | |
| Row 3: | Ch 3 (counts as dc), dc 2 in first ch 1 sp, *ch 1, cl in next ch 1 sp, repeat from *across, ending with a cl in the final ch 1 sp, turn | |
| Row 4+: | Repeat Row 2 for this row and all subsequent EVEN rows | |
| Row 5+: | Repeat Row 3 for this row and all subsequent ODD rows | |
| Fasten off and weave in ends. PH 19 | ||

Assembly & Seaming
PREPARE FOR SEAMING: With WRONG sides facing out (seaming on the inside), fold the hexagons into the “L” shape again, being sure the extensions are on the front opening and the center back. Since the back extensions have one extra row on each side (compared to the front), be sure to overlap the front and back properly – do not overlap over those extra rows or your hexagons won’t align properly (PH 19-21).
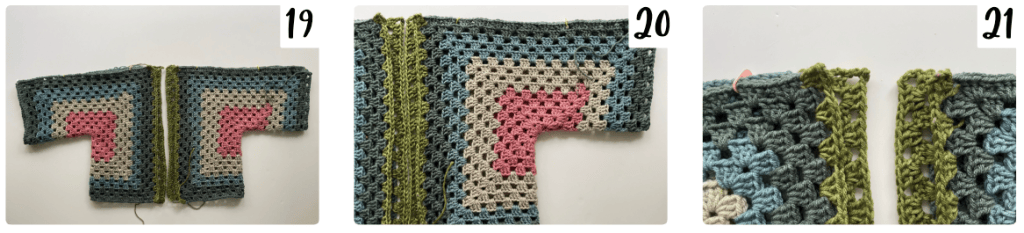
SEAM THE BACK: Using your preferred seaming method (like the whip stitch or the mattress stitch) seam together the center back extensions through the front loops only of each stitch (PH 22-24).
SEAM ACROSS THE SHOULDERS: Next, with WRONG sides still facing out, seam closed across the shoulders of both hexagons through the front loops only of each stitch – all the way from the edge to the center, leaving those extra back extensions unseamed.
Length Extension
NOTES:
- You will now add rows onto the bottom of the cardigan in order to lengthen it
- This pattern is written to extend the cardigan for the same number of rows for every size because we are all different heights and this aspect is HIGHLY modifiable! Add rows if you want it longer; remove rows if you want it shorter! For reference I’m shown modeling the cardigan and I’m an XS with and 5’4″ tall.
| Row 1: | With the right side facing, rejoin your yarn with a sl st around the outer dc of your final row of the front extension (PH 25 & 26), which will either be the outer dc of a cluster, or the dc turning ch. Ch 4 (counts as dc + ch 1 – PH 27), *cl in next gap, ch 1, repeat from *across, until you make your way across the extension and meet up with the original hexagon (PH 28), cl in the corner of the hexagon, ch 1 (PH 29), *cl, in next ch 1 sp, ch 1, repeat from *across to the extension on the opposite side (PH 30), cluster your way along the extension just as you did on the first side, ending with a dc, turn | |
| Row 2: | Ch 3 (counts as dc), dc 2 in first ch 1 sp, *ch 1, cl in next ch 1 sp, repeat from *across, ending with a cl in the final ch 1 sp, turn | |
| Row 3: | Ch 4 (counts as dc + ch 1), *cl, in next ch 1 sp, ch 1, repeat from *across, dc in top of beg ch 3 from previous row, turn | |
| Row 4+: | Repeat Row 2 for this row and all subsequent EVEN rows | |
| Row 5+: | Repeat Row 3 for this row and all subsequent ODD rows | |
| Stop after you’ve added 45 rows, or reached the desired length, ch 1, turn. | ||
| Row 46: | sc across, making one sc in each of the dc and one sc in each of the ch sp’s | |

Sleeves
NOTES:
- You will now add rounds onto the sleeves to lengthen them.
- You will work in continuous, joined rounds – do not turn.
- This pattern is written to extend the sleeves to achieve a 18″ sleeve (not counting the cuff), but the sleeves are HIGHLY modifiable! Add rows if you want them longer. Remove rows if you want them shorter!
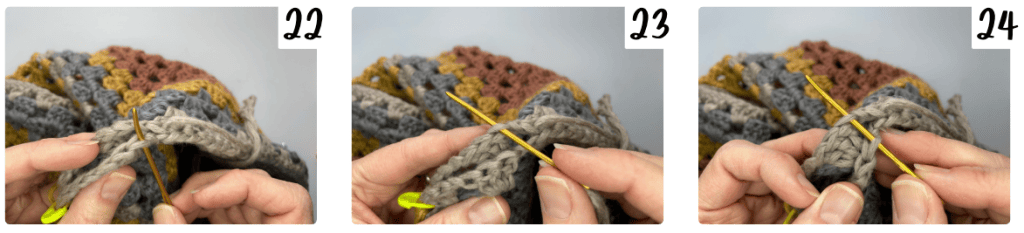
| Rnd 1: | With the right side facing, rejoin your yarn with a sl st into the ch 1 space in front of the cluster nearest the seam (PH 31). Ch 3 (counts as dc – PH 32), dc 2 in same ch 1 sp, *ch 1, cl in next ch 2 sp which is a corner of the hexagon, ch 1, sk the seam, cl in next ch 2 sp which is another hexagon corner (PH 33), * ch 1, cl in next ch 1 sp, repeat from *across, sl st to beg ch-3 to join rnd | |
| Rnd 2: | 3 sl st across to next ch sp, ch 3 (counts as dc), dc 2 in same ch 1 sp, *ch 1, cl in next ch 1 sp, repeat from *across, sl st to beg ch-3 to join rnd | |
| Rnd 3-16: | Repeat Row 2 | |
| Switch to the smaller hook size. | ||
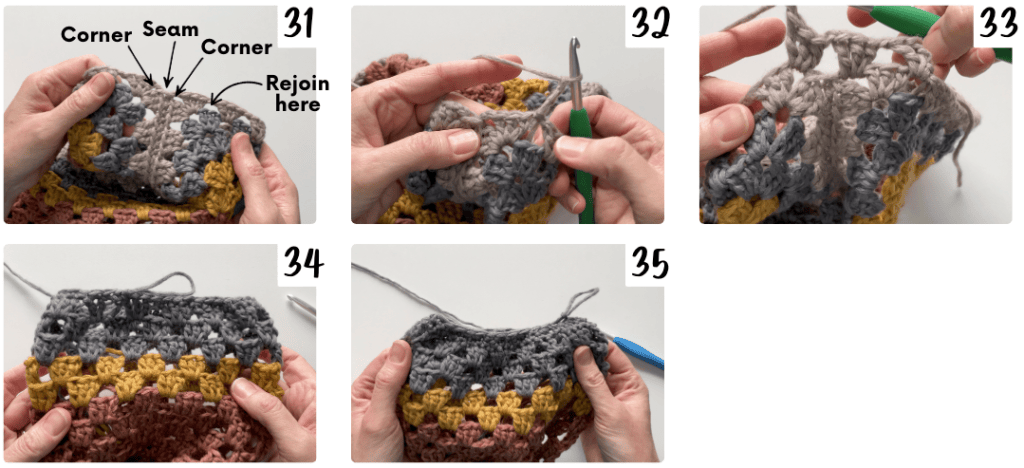
| Rnd 17: | ch 1, sc around, placing 1 sc in the top of each dc (do not place a sc in the ch spaces – just skip over them), sl st to first sc to join, ch 1 | PH 34 | |
| Rnd 18: | (sc 1, sc dec) x around, sl st to first sc to join | PH 35 | |
Sleeve Cuffs
| Still using the smaller hook, switch to the color you want to use for your border, and chain 9. | ||
| Row 1: | sc in 2nd ch from hk and next 7 st, sl st in next 2 st on last rnd of sleeve, ch 1, turn | [8] |
| Row 2: | skipping the ch and both sl st’s, BLO sc in next 7 st, sc through both loops of final st, ch 1, turn | [8] |
| Row 3: | sc through both loops of the first st, BLO sc in next 7 st, sl st in next 2 st on last rnd of sleeve, ch 1, turn | [8] |
| Row 4+ | repeat rows 2 & 3 all the way around cuff | [8] |
| Holding the first and last row of ribbing with right sides together, sl st the ribbing together across all 8 stitches. Fasten off and weave in end. | ||
Border – bottom hem
NOTES:
- You will now add the border to the cardigan which consists of the collar and the bottom hem.
- The border is made with the same ribbing technique you used for the sleeve cuffs – in turning rows.
- You will use the larger sized hook to prep for the border, then switch to the smaller hook for the ribbing.
| We’re going to do one simple row of sc around the front opening to make adding the ribbed border nice and easy and clean (this is demonstrated in the video tutorial as well).Switch back to the larger sized hook. With the right side of the cardigan facing out, rejoin border color yarn with a slip stitch to the bottom front right corner (left corner if you’re left handed) and chain 1. | ||
| Row 1: | sc around the entire front opening (up one side, across the back of the neck and back down the other side. For even placement, make 2 sc at the end of every dc row. Do not fasten off – we will start straight away with the hem. | |
| Switch back to the smaller sized hook… you will now be positioned at the bottom front left corner (right corner if you’re left handed). Chain 9 (PH 36-38). | ||
| Row 1: | sc in 2nd ch from hk and next 7 st, sl st in next 2 st on last row of cardigan, ch 1, turn | [8] |
| Row 2: | skipping the ch and both sl st’s, BLO sc in next 7 st, sc through both loops of final st, ch 1, turn | [8] |
| Row 3: | sc through both loops of the first st, BLO sc in next 7 st, sl st in next 2 st on last row of cardigan, ch 1, turn | [8] |
| Row 4+ | repeat rows 2 & 3 all the way around bottom hem | [8] |
| Fasten off and weave in end. | ||

Border – front opening / collar
| When you reach the end of the bottom hem, be sure your last row of ribbing ends on the outer edge of the ribbing (versus at the last row of the extensions of the cardigan) because you are going to start straight away with continuing with the border going up the inside of the front opening. Refer to the video tutorial if you need additional help visualizing this. After you complete the last stitch on your last row of ribbing from the hem, chain 9. | ||
| Row 1: | sc in 2nd ch from hk and next 7 st, sl st in next 2 st, ch 1, turn | [8] |
| Row 2: | skipping the ch and both sl st’s, BLO sc in next 7 st, sc through both loops of final st, ch 1, turn | [8] |
| Row 3: | sc through both loops of the first st, BLO sc in next 7 st, sl st in next 2 st, ch 1, turn | [8] |
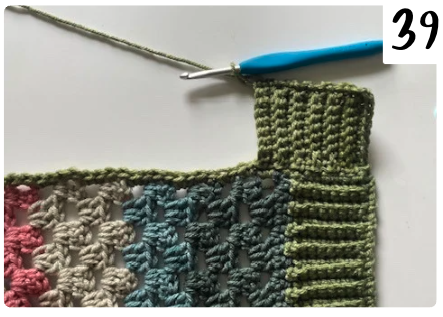
| Row 4+ | repeat rows 2 & 3 all the way up and around the front opening – PH 39 | [8] |
| Fasten off and weave in end. | ||
Long Crochet Cardigan Pattern FAQ
A hexagon cardigan is a very approachable first garment. Much of Aveline is made using repetitive granny stitches, and its clever construction eliminates some of the more complicated shaping found in traditional sweater patterns. You should be comfortable with basic stitches, working in rounds and following repeated instructions.
Yes. The full video tutorial accompanies the written pattern and demonstrates the cardigan’s construction, assembly, lengthening sections and ribbed finishing.
Absolutely. Although the sample uses five colors, Aveline would be beautiful in one solid color, a tonal gradient, two alternating shades or a self-striping yarn.
Yes. You can remove rows from the lengthening section to customize the finished length. Be sure to try the cardigan on as you work and account for any additional length the lower ribbed border will add.
The amount depends on the size, yarn weight and finished length you select. Refer to the yardage chart above for the standard version and purchase additional yarn if you plan to add length.
Start with two brighter colors for Colors A and C. Then choose three neutral, muted or deeper coordinating shades for Colors B, D and E. This creates contrast while keeping the overall palette balanced.
Your New Favorite Statement Layer
Aveline proves that uncomplicated construction can still create a seriously impressive finished cardigan. Two hexagons, five colors and some beautifully crisp ribbing come together to make a long, wearable layer with just the right amount of drama.
I hope you love choosing your colors, watching those hexagons grow and making an Aveline that feels completely your own. When you finish, share your cardigan and tag me at @offthebeatenhook so I can celebrate it with you!
🔗 Other Cardigan Patterns To Check Out:
- Hoodoo Classic Cardigan Crochet Pattern
- Airie Granny Square Cardigan Crochet Pattern
- Arkose Duster Cardigan Crochet Pattern
- Elowen Granny Stitch Hexagon Cardigan Crochet Pattern
SOCIAL MEDIA YOUR THING?
Connect with me on your favorite social network!
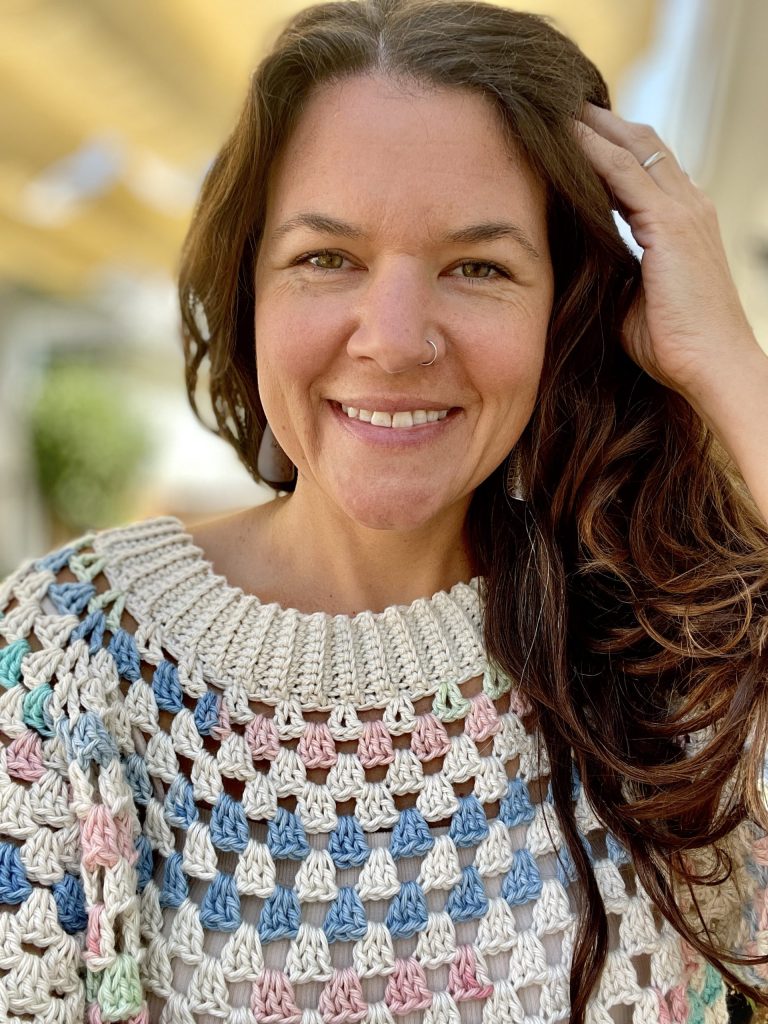
Pin this long crochet cardigan pattern here:


Leave a Reply