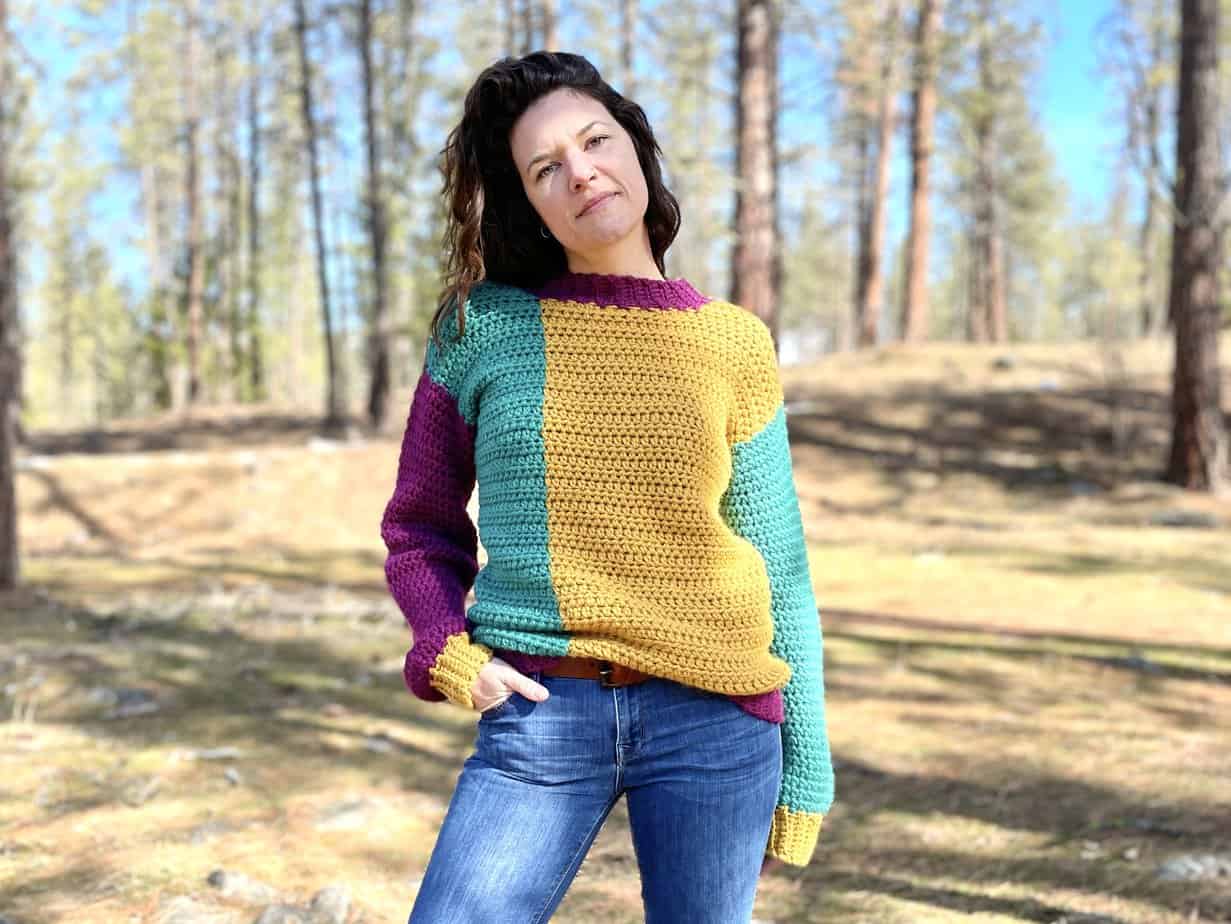
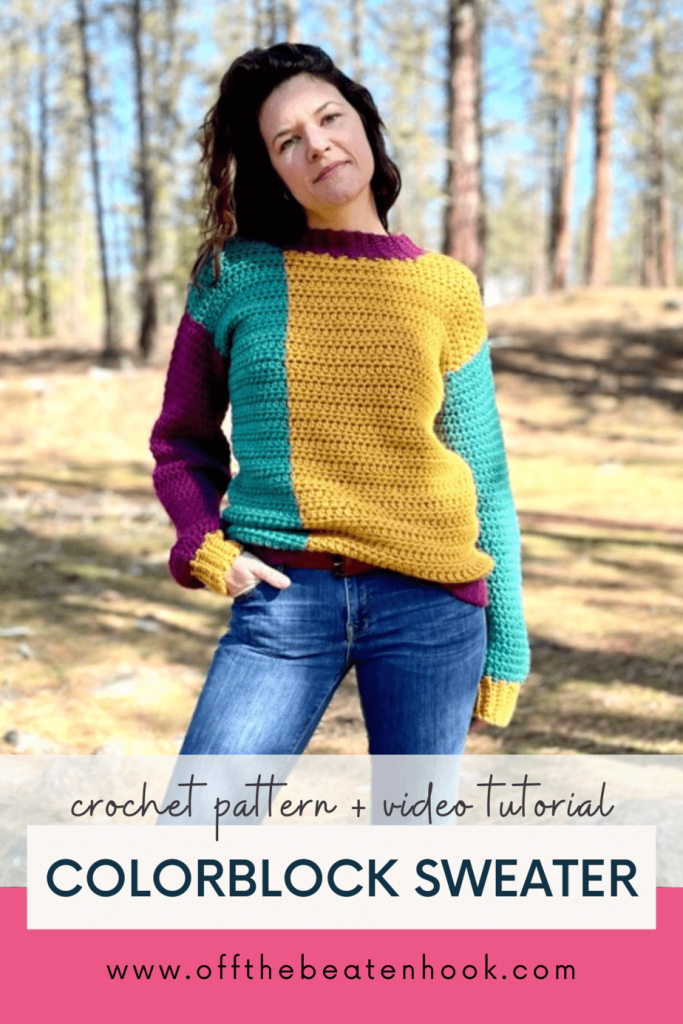
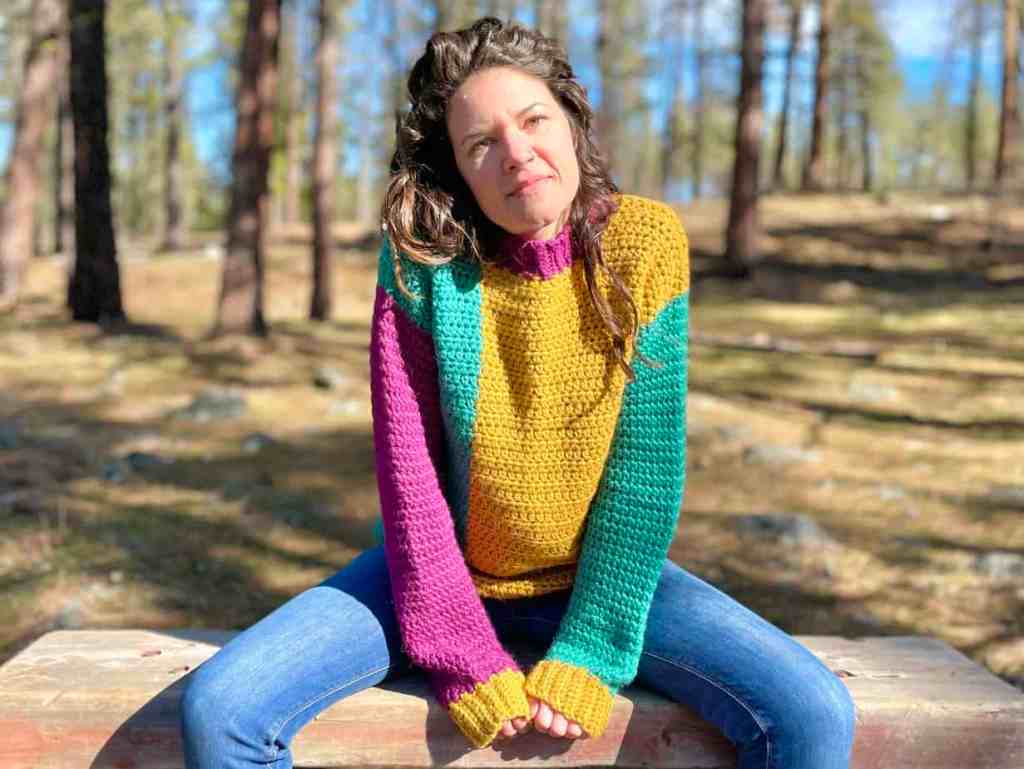
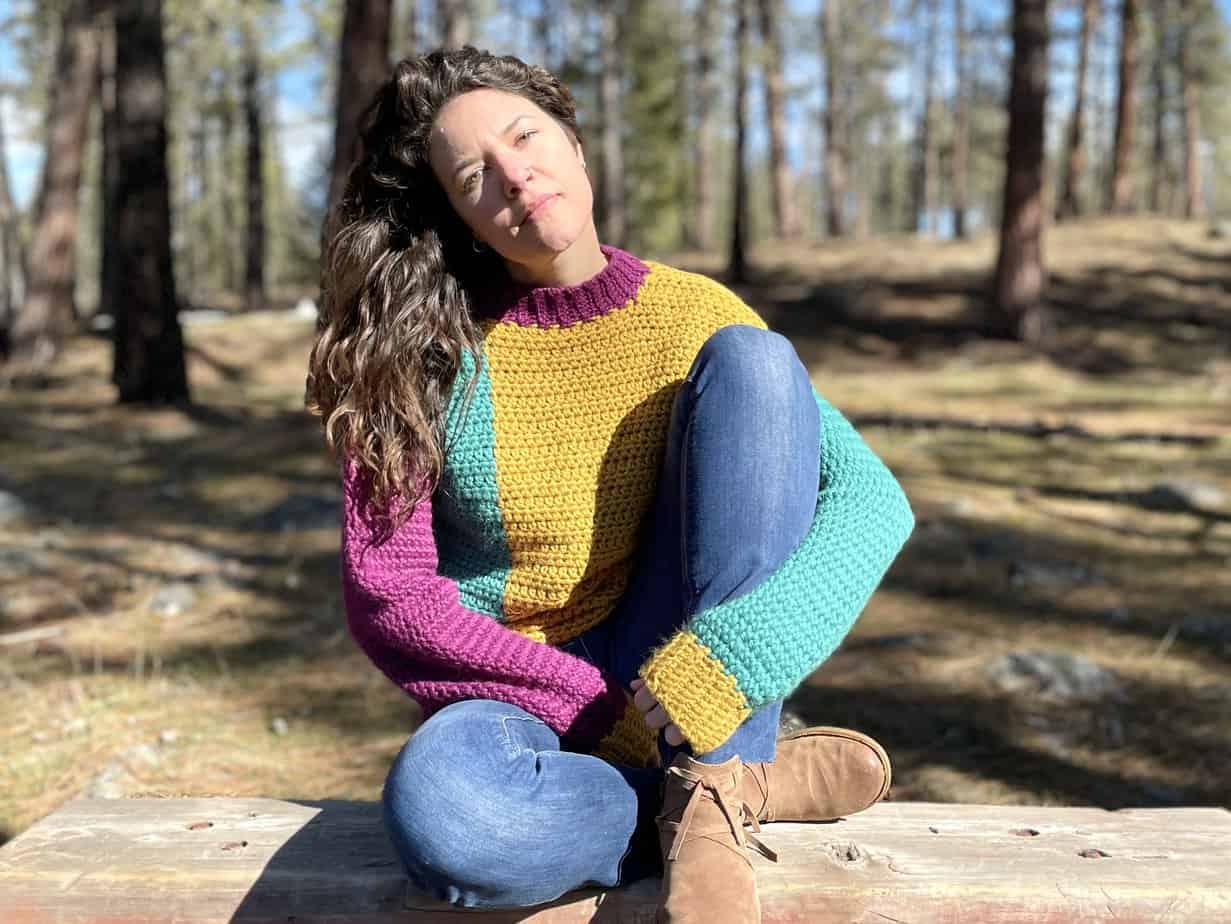
Welcome to the Apricity Color Block Sweater crochet pattern! This fun and colorful bulky crochet sweater pattern comes together easily and is perfect for the ambitious beginner. Made with bulky yarn and constructed from flat front and back panels, this sweater comes together quickly. If you want a fun and functional crochet pullover, you’ve found it.
The written pattern is also accompanied by a full video tutorial if you’re more of a visual learner or would rather crochet together! You can find the video further down in this post.
Design Inspiration:
I am very low-maintenance. Any kind of unnecessary sprucing-up (i.e. makeup or blow-drying), or taking more than 30 seconds to decide what outfit to wear is just not my thing. And since I always design my patterns with intention and purpose, I wanted a sweater that was versatile. My goal with this pattern was to design a bulky crochet sweater pattern that was cozy warm and that could be worn proudly paired with a variety of styles during the day and then transition into a cozy comfort with some sweats at the end of the day.
Check and check.
Just in case you’re wondering, Apricity means “the warmth of the sun in winter.” I could not think of a more fitting name for this sweater. It’s so cozy, it just invites you in – just like the warmth of the sun.

What makes this pattern eco -friendly and sustainable?
THE YARN: I use only sustainable and eco-friendly yarn. This primarily means that the yarn I use is made of fiber that has been ethically grown/raised and processed. I also place an emphasis on sourcing yarn from transparent companies that implement environmentally sustainable practices and who put the people, animals and planet first. That’s why I chose the super soft 100% llama yarn for this bulky crochet sweater pattern.
THE SLOW YARN MOVEMENT: I’m participating in the Slow Yarn Movement. Slow yarn is the fiber-arts version of other similar important movements today – like slow food, slow fashion, slow life. It’s all about being INTENTIONAL, PURPOSEFUL and MINDFUL about the entire process of making – from yarn sourcing to making.
There’s far too much to talk about here, but please take a few minutes to learn about what this means by reading the article I wrote about the Slow Yarn Movement as part of my 6-part Sustainable Crochet Series.

The Yarn:
I used a bulky weight yarn for this sweater. The chunky yarn gives it a squishy-ness and bulk to it that is just too hard to resist on a chilly day. I chose Cascade Yarns Baby Llama Chunky. This was the perfect yarn for this sweater because:
- it is a sustainable yarn made with animal fiber – 100% baby llama
- the colors were bright and irresistible
- it is buttery soft (let’s admit it – not all 100% wool is like that!)
If you choose to use a different yarn, please take care when substituting other bulky yarns! You want to make sure your yarn has a nice flexibility and softness to it. One of my pattern testers chose a bulky yarn that made the sweater feel, as she describes it, “basket-like”. Yikes! No one wants a sweater that feels like a basket. So keep that in mind when you choose your yarn!
Here’s how much you’ll need:

Other Tools You’ll Need for this bulky crochet sweater pattern:
- Crochet hook sizes 7.00mm (US K) & 8.00mm (US L)
- Tapestry needle
- Stitch markers
- Scissors
- Measuring tape
Sizing:
This sweater is written in size XS-4XL and is designed with a sizing style of XS/S, M/L, XL/2XL, etc, so you can decide how you want it to fit. The pattern is written in size XS/S with sizes (M/L, XL/2XL, 3XL/4XL) following in parenthesis. As such, it has a positive ease of about 6 inches. I am pictured wearing size XS/S. I am 5’4″ with a bust of 32″.
XS/S: bust 30″-34″ // length 24″ // sleeve length 22″
M/L: bust 35″-42″ // length 26″ // sleeve length 23″
XL/2XL: bust 43″-50″ // length 28″ // sleeve length 23″
3XL/4XL: bust 51″-58″ // length 29″ // sleeve length 24″
The written pattern includes a size chart with complete measurements including inches as well as stitch counts, making it super easy to modify. Want it cropped? Simply remove rows from the panel. Want the ribbed collar taller? Simply add chains. Take some artistic freedom and express yourself!
The gauge for this pattern in a 4″ x 4″ square is: 10.5 stitches 8 rows of hdc with the 8.00mm hook.

Policies and Disclaimers:
This pattern is for PERSONAL USE ONLY. This pattern or parts of it may not be reproduced, resold, distributed, published, altered, translated, posted or shared without authorization. You can sell your finished items provided that you credit Off the Beaten Hook as the designer using this verbiage, “This pattern was designed by Lindsey Roe and Off the Beaten Hook.” Thank you for your respectfulness!
This post contains affiliate links for materials I use and love. If you purchase something using one of these links I may earn a small commission which in no way affects the cost to you. These partnerships help me support my small business which allows me to provide you with free patterns and other crochet goodness. Thank you from the bottom of my heart for your support!

The construction:
The sweater is constructed has minimal seaming because I don’t like it any more than you do! It is made with two panels – one for the front and one for the back. The panels are then seamed together up the sides and across the shoulders. The sleeves are crocheted directly onto the sweater all the way down to the cuffs. The ribbed hem and collar is also crocheted directly on. Done!

Skill level:
I would encourage the ambitious beginner and above to make this pattern! You’ll learn or perform skills including color changing in hdc rows, working in the round and creating ribbing.
Abbreviations used in this color block sweater Free crochet pattern:
ch – chain
st – stitch
hk – hook
sl st – slip stitch
sc – single crochet
fhdc – foundation half double crochet
hdc – half double crochet
BLO – back loop only
hdc2tog – half double crochet 2 together (decrease)
(…) x – repeat instructions indicated number of times
[…] – number of stitches in row/round

Apricity Bulky Crochet Sweater Pattern Notes & Tips:
- TERMS: This crochet pattern is written in US terms. If needed, you can find a handy term conversion chart right here in my Resource Library.
- WET BLOCKING: I highly recommend wet blocking crochet garments. I know this is an intimidating subject for some, but I guarantee you will notice the difference in how your sweater looks, feels and drapes on your body.
- VIDEO TUTORIAL: The video tutorial is extensive and thorough. You’ll learn and SEE all the stitch techniques you’ll need to know for this pattern (and others!) including how to make a foundation half double crochet, how to change colors, how to crochet in the round and so much more.
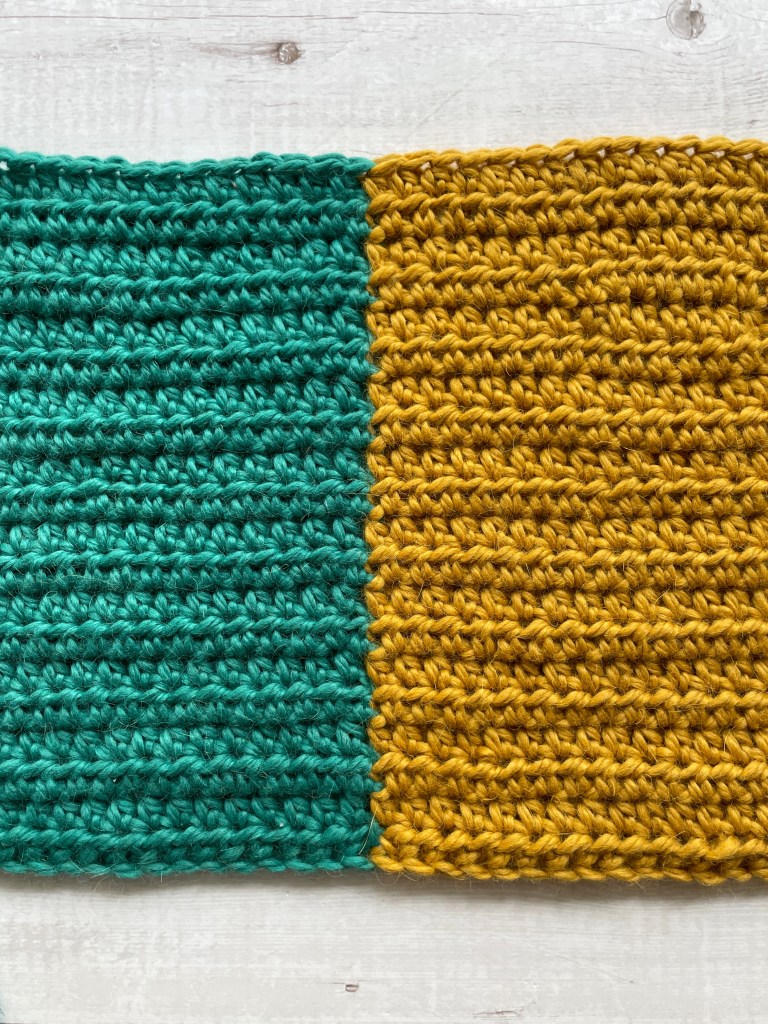
PANELS – Make 2:
NOTES:
- The front and back panels are worked in turning rows
- Chain 1 and turn at the end of each row – the turning chain does not count as a stitch
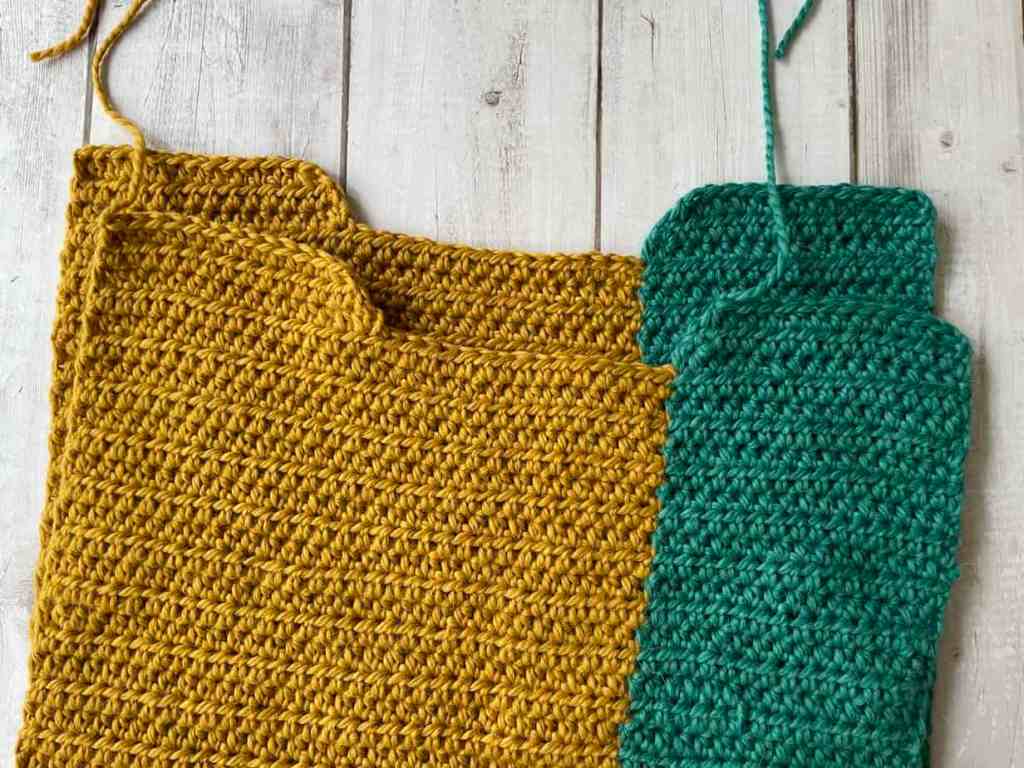
- The 2 panel colors create a vertical block; you will change colors within the row. Refer to the grid below to determine at which stitch to change colors for your size.
- Use the 8.00mm crochet hook
INTRO:
The panels are split by color with about 1/3 of the panel in Color A and 2/3 in Color B. Begin in Color A, then switch to Color B at the proper stitch as follows: XS/S: Color A – 15 st, Color B – 30 st | M/L: Color A – 17 st, Color B – 35 st | XL/2XL: Color A – 21 st, Color B – 41 st | 3XL/4XL: Color A – 23 st, Color B – 44 st
For example, for size XS/S, Row 1 will begin with Color A and make fhdc 15, then switch to Color B and complete the row with fhdc 30, for a total of fhdc 45.
There is a sneaky way to make your color changes when working the rows so you won’t have to snip and weave in ends every time! Refer to the video tutorial to practice the color change.
LET’S GET GOING!
Begin with Color A and change to Color B as described above.
Row 1: fhdc 45(52, 62, 67)
Row 2-40(44, 48, 50): hdc across [45](52, 62, 67)

SHAPING THE NECKLINE:
Continue straight away with Color A to shape the first side of the neckline:
Row 41(45, 49, 51): hdc 15(17, 21, 23), ch 1, turn
Row 42(46, 50, 52): hdc2tog, hdc 13(15, 19, 21), ch 1, turn
Row 43(47, 51, 53): hdc until last 2 st, hdc2tog [13](15, 19, 21)
Fasten off, leaving a long tail to sew together across shoulder (you only need to leave a long tail on one of the panels).
On opposite side (Color B), count 15(17, 21, 23) st in from the outer edge and rejoin yarn with a sl st
Row 41(45, 49, 51): hdc 15(17, 21, 23), ch 1, turn
Row 42(46, 50, 52): hdc 13(15, 19, 21), hdc2tog, , ch 1, turn
Row 43(47, 51, 53): hdc2tog, hdc to end of row [13](15, 19, 21)
Fasten off, leaving a long tail to sew together across shoulder (you only need to leave a long tail on one of the panels).
SEAM SHOULDERS:
Lay the panels on top of each other, taking care to match the same color sections to each other. Using a tapestry needle and the long tail left on one of the panels at the shoulder, seam across the top of the shoulders in their appropriate colors. Fasten off and weave in ends.
MEASURE FOR ARM OPENING AND SEAM SIDES:
Measure from the shoulder down 6.5″(7.5, 8.5, 8.5) inches and place a stitch marker (both sides).
Based on the gauge given in this pattern, these measurements should produce 13(15, 17, 17) rows for each of the front and back panels down the diameter of your armhole, making the number of rows for the entire arm opening 26(30, 34, 34)
SEAM BOTH SIDES:
With right side still facing in, take a long strand of yarn and a tapestry needle and seam from the bottom of the panel up – stopping at the stitch marker you placed for the arm opening. Try on the sweater to test out the size of the arm opening before tying off the seaming. Make adjustments larger or smaller if necessary. Now, turn the sweater right side out before proceeding. The rest of the sweater will be made with right side facing.
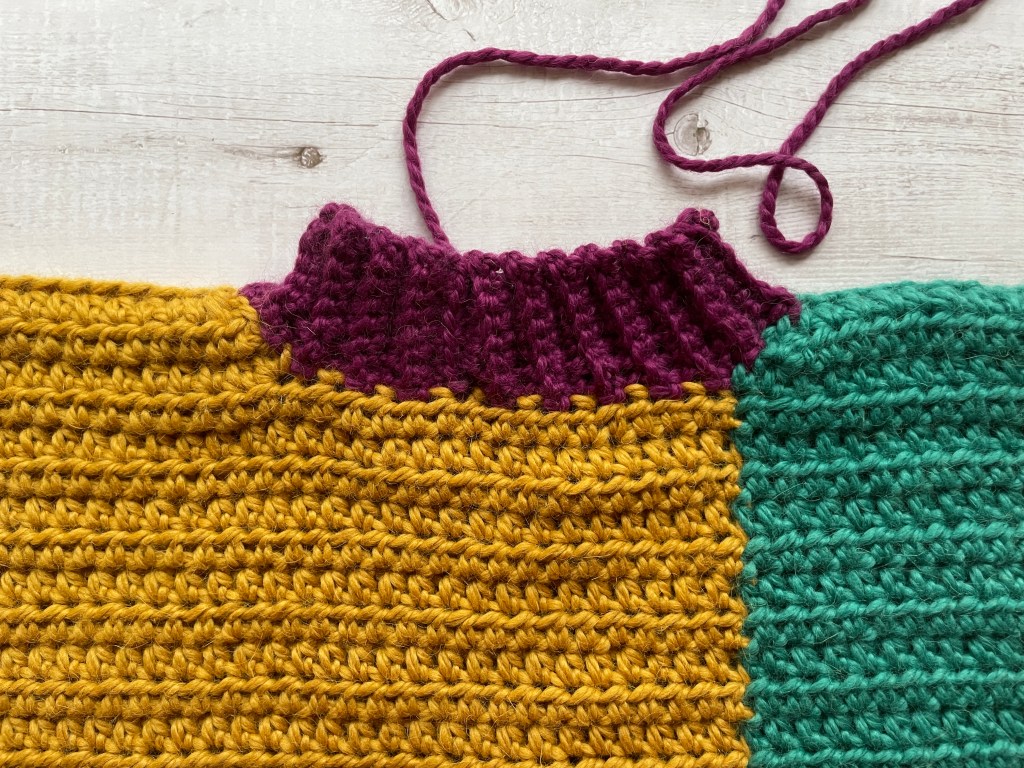
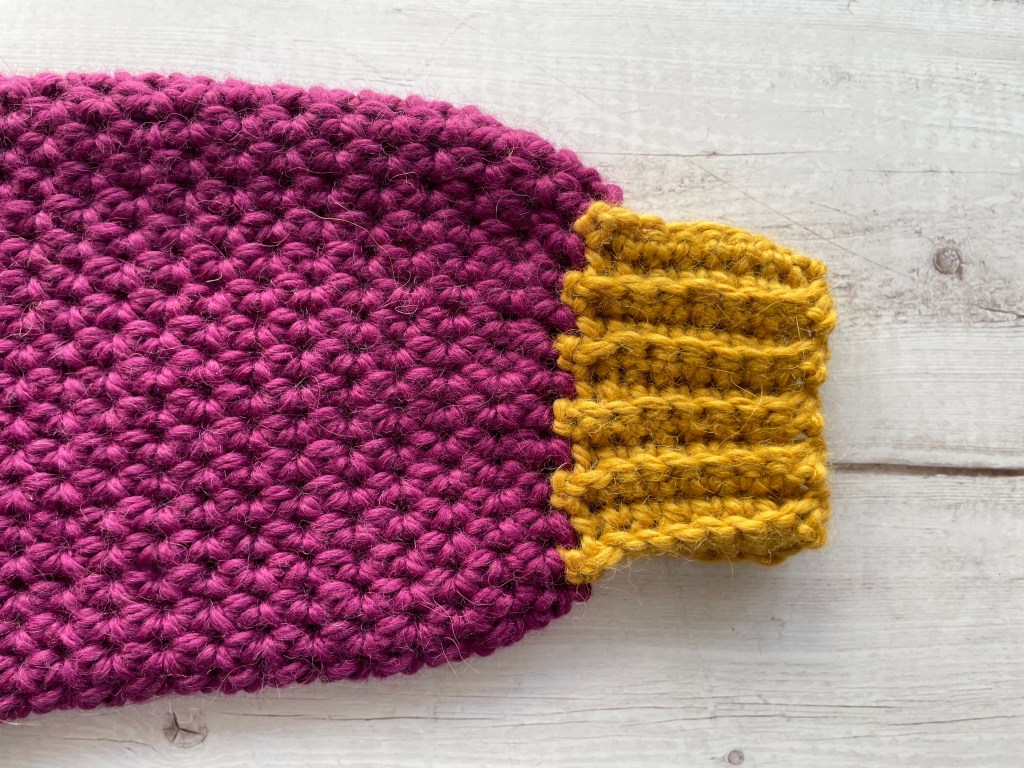
RIBBED HEM:
NOTES:
- The hem is worked in turning rows along the bottom edge of the sweater using Color C
- Use the 7.00mm crochet hook
With a sl st, join Color C yarn along the lower hem (Row 1 of the panel), where you made the side seam, then chain 8.
Row 1: sc in the 2nd back bump from ch, and next 6, sl st in next 2 st along panel, ch 1, turn [7]
Row 2: BLO sc 7, ch 1, turn [7]
Row 3: BLO sc 7, sl st in the next 2 st along the panel, ch 1, turn [7]
Row 4+: Repeat Rows 2 and 3 all the way around the hem of the sweater, ending with a Row 2.
Seam ribbing closed: Holding the first and last row of ribbing with right sides together, insert hk through both loops of row closest to you, and BLO of the row behind it and make a slip stitch. Repeat along each of the 7 stitches. Fasten off and weave in end.
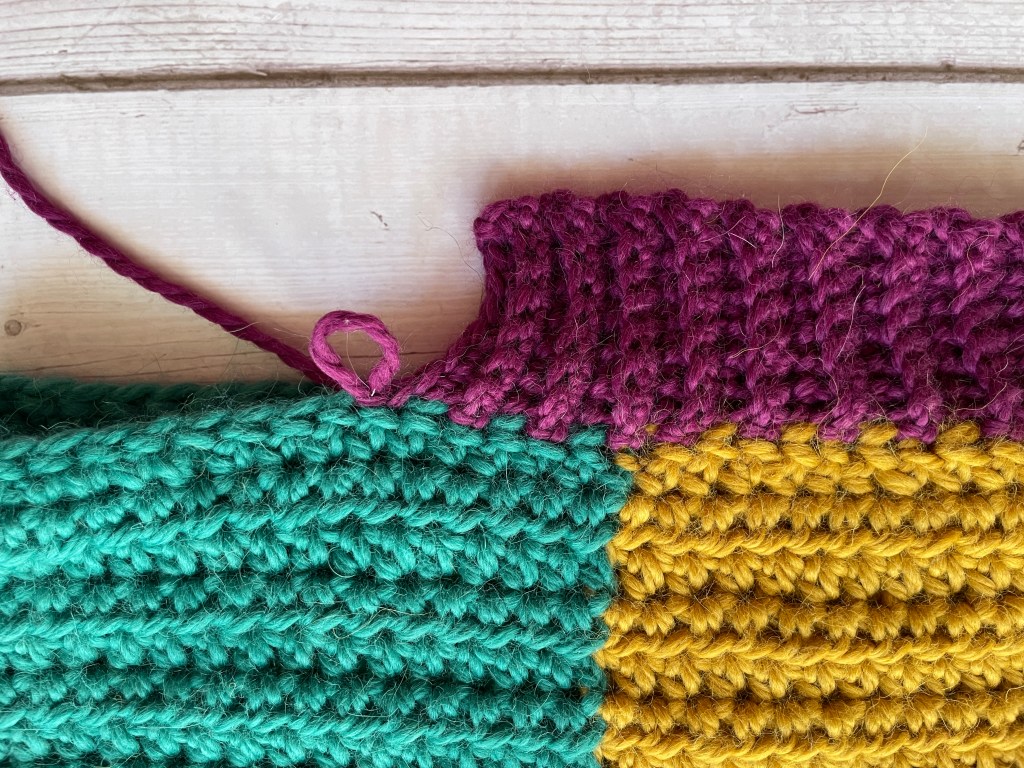
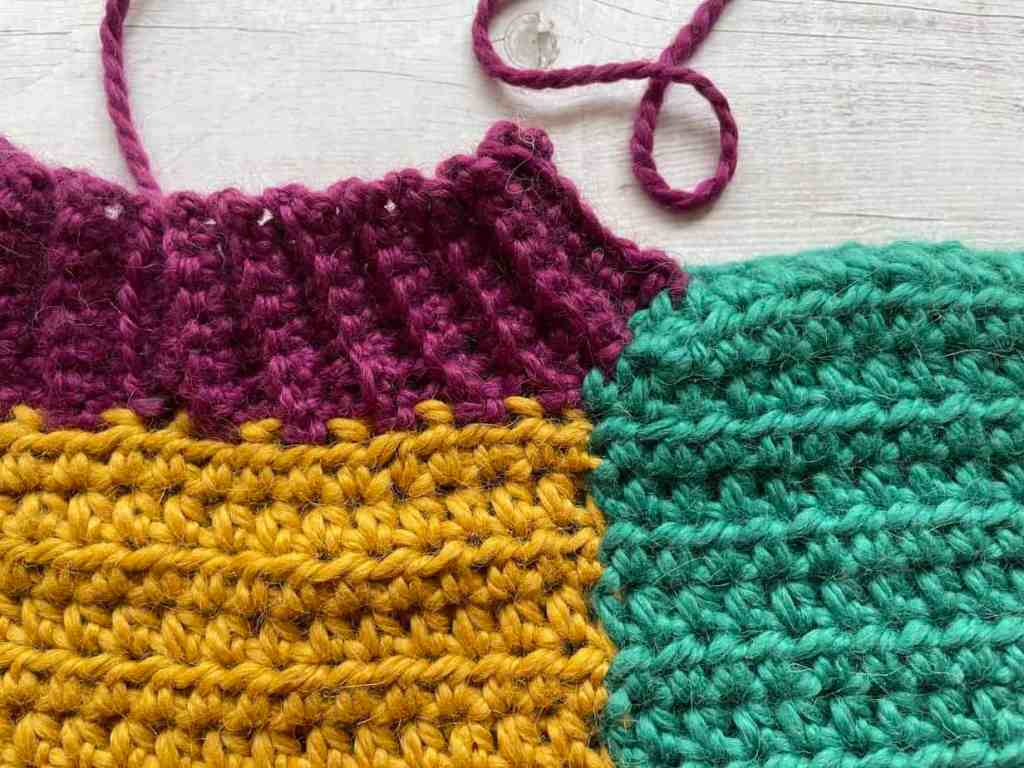
RIBBED COLLAR:
NOTES:
- The collar is worked in turning rows along the neckline using Color C
- Use the 7.00mm crochet hook
A bit of prep for the collar:
The collar is made using the exact same method as the hem, but we’ll need to prepare for how to treat the shaped edges of the neckline. You’ll remember that the shaping of the neckline was made using 3 rows of hdc. The ends of each of those 3 rows will count as one stitch as you make your way around the collar. So, take a moment and with 3 stitch markers, mark the ends of those rows where you want to place a stitch as you go along.

Begin the collar ribbing: With a sl st, join Color C yarn anywhere along collar, then chain 8.
Row 1: sc in the 2nd back bump from ch, and next 6, sl st in next 2 st along neckline, ch 1, turn [7]
Row 2: BLO sc 7, ch 1, turn [7]
Row 3: BLO sc 7, sl st in the next 2 st along the neckline, ch 1, turn [7]
Row 4+: Repeat Rows 2 and 3 all the way around the neckline of the sweater, ending with a Row 2.
Seam ribbing closed: Holding the first and last row of ribbing with right sides together, insert through both loops of row closest to you, and BLO of the row behind it and make a slip stitch. Repeat along each of the 7 stitches. Fasten off and weave in end.
SLEEVES:
NOTES:
- The sleeves are crocheted directly onto the sweater and are worked in continuous rounds (not turning rounds). Do not join the rounds – just keep on going!
- Use the 8.00mm crochet hook
- On the Color A side of the panel, you will use Color C for the sleeve; on the Color B side of the panel, you will use Color A for the sleeve (see photos for clarification if needed)
Be sure your sweater is right side out. As discussed earlier, the number of rows your arm opening will have is: 26(30, 34, 34)
The number of stitches for round 1 of the sleeve will be 42(46, 50, 50) around. If you’ve altered the number of rows for the arm opening based on personal preference, the math for the number of stitches for round 1 is: 1.5 hdc per row +2 (one additional for the shoulder seam and one for the side seam). If you come up with an odd number, you will round to an even number.
Now you’re ready to start your sleeves!
Rnd 1: beginning at the armpit, hdc evenly around the opening, sl st to first st, ch 1 [42](46, 50, 50)
Rnd 2-3: hdc until the last 2 st, hdc2tog [40](44, 48, 48)
Rnd 4-18(20, 20, 22): hdc around [40](44, 48, 48)
Rnd 19(21, 21, 23): hdc around until last 2 st, hdc2tog [39](43, 47, 47)
Rnd 20(22, 22, 24): hdc around [39](43, 47, 47)
Rnd 21-34(23-36, 23-36, 25-38): repeat rows 19 & 20 (you’ll be repeating them each seven times) [32](36, 40, 40)
Rnd 35(37, 37, 39): (hdc 2, hdc2tog) [24](27, 30, 30)
Fasten off and weave in end.

SLEEVE CUFFS:
NOTES:
- The sleeve cuffs are worked in turning rows along the wrist using Color B
- Use the 7.00mm crochet hook
With a sl st, join Color B yarn into any stitch along the last row of the sleeve, then chain 9.
Row 1: sc in the 2nd back bump from ch, and next 7, sl st in next 2 st along sleeve, ch 1, turn [8]
Row 2: BLO sc 8, ch 1, turn [8]
Row 3: BLO sc 8, sl st in the next 2 st along the panel, ch 1, turn [8]
Row 4+: Repeat Rows 2 and 3 all the way around the sleeve of the sweater
Holding the first and last row of ribbing with right sides together, insert through both loops of row closest to you, and BLO of the row behind it and make a slip stitch. Repeat along each of the 8 stitches. Fasten off and weave in end.
Apricity Bulky Crochet Sweater Pattern Video Tutorial:
Grab a copy of the written pattern before you dive into the video to be sure you’re making it to your size and measurements. I know you’ll find this tutorial helpful – especially if you’re new to crocheting garments or just prefer watching it come together!
I hope you will love making the Apricity Bulky Crochet Sweater Pattern!
Here’s where you can find the PDF crochet pattern:
I would love to see your completed Apricity bulky crochet sweaters. Please post pictures on instagram and tag me @offthebeatenhook and use #offthebeatenhook and #apricitycolorblocksweater. Cheers!
PIN THIS COLOR BLOCK SWEATER FREE CROCHET PATTERN HERE!


Leave a Reply