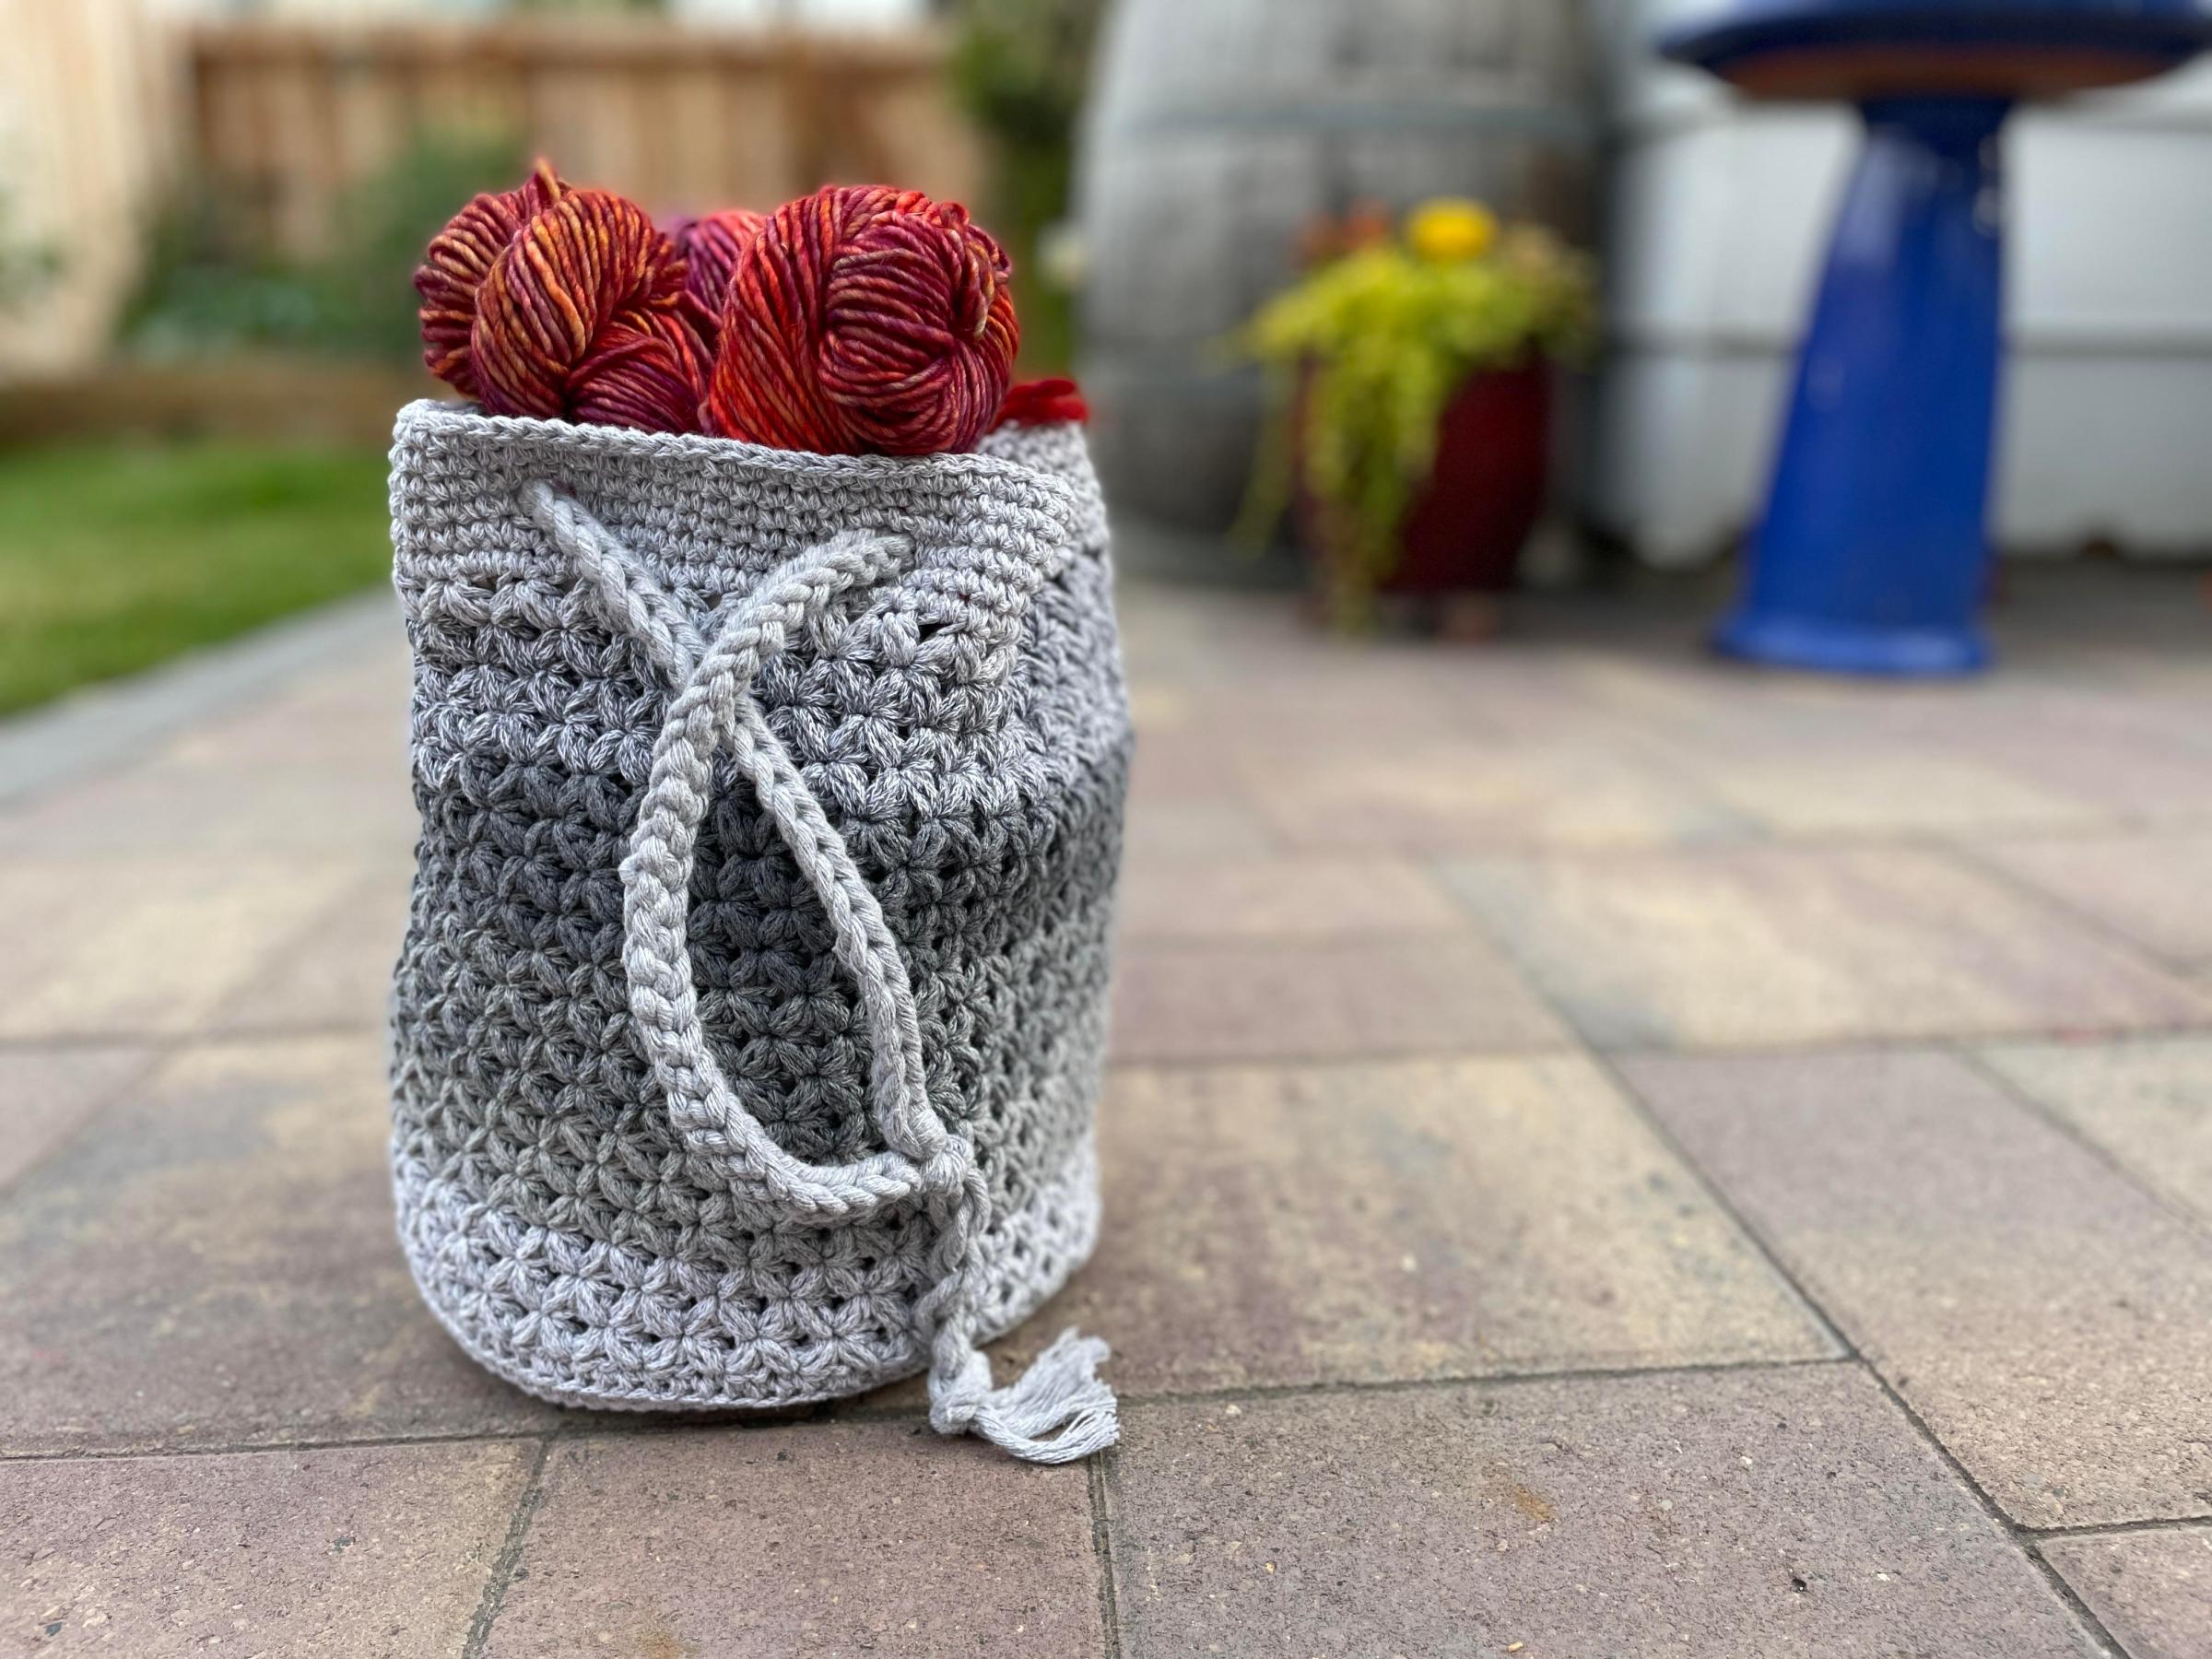
Looking for a stylish, sustainable, and functional crochet project? This crochet drawstring bag pattern is perfect! Made with 100% recycled fiber, the Nova Drawstring Bag is not only eco-friendly but also super versatile. Whether you need a small pouch for accessories or a larger bag for everyday use, this pattern can be easily adjusted to suit your needs. Plus, I’ve included a step-by-step video tutorial to guide you through the process!
Jump into the crochet drawstring bag pattern now, or pin it for later here!

Why You’ll Love This Crochet Drawstring Bag
- Eco-Friendly: Crafted with recycled fibers for a sustainable touch.
- Customizable Sizes: Adjust the pattern to create different sizes.
- Beginner-Friendly: Simple stitches make this pattern great for all skill levels.
- Multi-Purpose Use: Perfect for gifting, travel, storage, or everyday carry.
I’ve created a helpful video tutorial for this pattern as well. You can find that further down in this post or access it straight away on YouTube here.
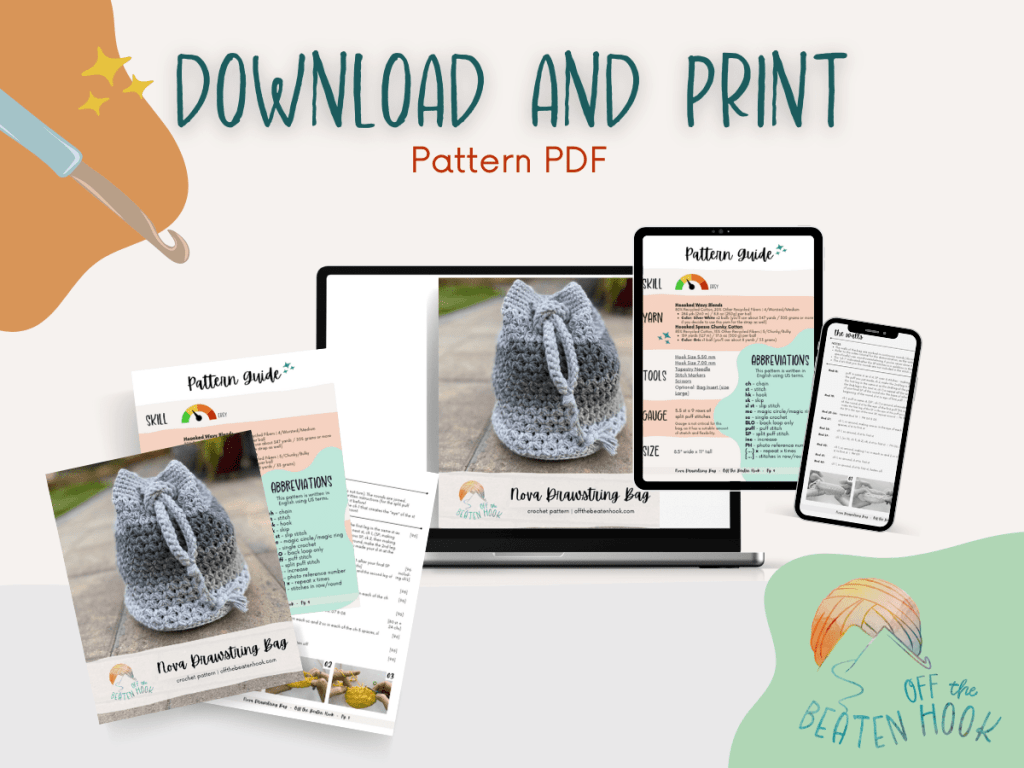
This crochet drawstring bag pattern is reader supported by ads on my blog. If you’d rather print the pattern for some cozy couch crocheting, you can find the ad-free, printable PDF in my shop here.
This pattern is written in English, using US terms. If needed, you can find a handy term conversion chart right here in my Resource Library.
Crochet Drawstring Bag Pattern Guide:
Size & Gauge:
Size: 8.5″ wide x 11″ tall
Stitch Multiple: 6 stitches – This means, you can crochet any number of rounds as long as the number is divisible by 6 (which this pattern is already written that way – each round increases by 6 stitches). If you want your bag to be smaller, simply crochet the base until you’re happy with the size. If you want it to be bigger, continue to add rows until it’s the size you want.
Gauge: 5.5 st x 9 rows of split puff stitches. Gauge is not critical with this bag, as it has a suitable amount of stretch and flexibility.

Policies & Disclaimers:
This crochet pattern is for PERSONAL USE ONLY. This pattern or parts of it may not be reproduced, resold, distributed, published, altered, translated, posted or shared without authorization. You can sell your finished items provided that you credit Off the Beaten Hook as the designer using this verbiage, “This pattern was designed by Lindsey Roe and Off the Beaten Hook.” Thank you for your respectfulness!
This post contains affiliate links for materials I use and love. If you purchase something using one of these links I may earn a small commission which in no way affects the cost to you. These partnerships help me support my small business which allows me to provide you with free crochet patterns. Thank you from the bottom of my heart for your support!

What makes this crochet pattern eco-friendly and sustainable?
THE YARN: I use only sustainable and eco-friendly yarn that has been ethically grown/raised and processed, putting the people and the planet first. This is why I chose 100% ethical merino wool yarn for this pattern.
IT’S A REUSABLE VERSION OF EVERYDAY DISPOSABLES: Reusable tote bags replace disposable tote bags in so many different scenarios… Plus it’s way more fun to use something you’ve handmade, right!?
THE SLOW YARN MOVEMENT: I’m participating in the Slow Yarn Movement. There’s far too much to talk about here, but please take a few minutes to learn about what this means by reading the article I wrote about the Slow Yarn Movement as part of my 6-part Sustainable Crochet Series.
If you’re interested in learning more about sustainable crochet you can read all about it in the 6-part series I wrote covering everything about Sustainable Crochet and how to implement it into your own crafting starting today!
Materials you will need for this crochet drawstring bag:
Yarn:
80% Recycled Cotton, 20% Other Recycled Fibers | 4/Worsted/Medium
- 284 yds (260 m) / 8.8 oz (250g) per ball
- I used the color Silver White: x2 balls (you’ll use about 347 yards / 305 grams or more if you decide to use this yarn for the strap as well)
85% Recycled Cotton, 15% Other Recycled Fibers | 5/Chunky/Bulky
Color: Gris x1 ball (you’ll use about 8 yards / 33 grams)Affiliate Link Yarn here
139 yards (127 m) / 17.6 oz (500 g) per ball
Other tools and materials needed:
- Crochet Hook Size: 5.50 mm
- Crochet Hook Size: 7.00 mm
- Tapestry Needle (bent tips make all the difference!)
- Stitch Markers
- Scissors
- Optional: This bag insert in size LARGE. This is the insert I used to design the size of this bag in order for it to function as a crochet project bag. It is completely optional! I demonstrate how it fits as well as how I use it in the video tutorial.
Abbreviations used in the Nova Crochet Drawstring Bag Pattern:
This pattern is written in English, using US terms. If needed, you can find a handy term conversion chart right here in my Resource Library.
ch – chain
st – stitch
hk – hook
sk – skip
sl st – slip stitch
mc – magic circle
sc – single crochet
BLO – back loop only
puff – puff stitch
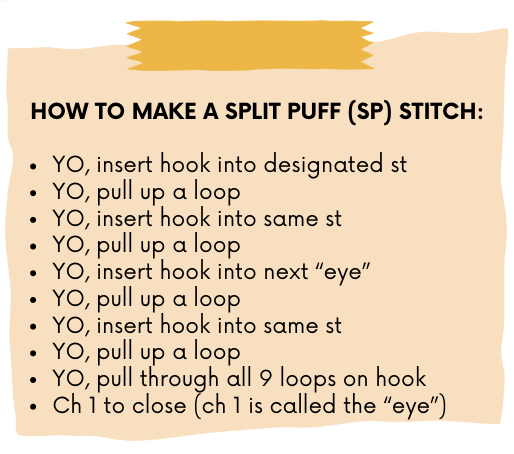
SP – split puff
inc – increase
rep – repeat
(…) x – repeat instructions indicated number of times
[…] – number of stitches in row/round
PH – photo reference number

The Nova Crochet Drawstring Bag Pattern:
Special Stitches:
This project uses the puff stitch and the more uncommon split puff stitch. Here are the written instructions for how to complete these stitches. For additional help, please refer to the video tutorial for a demonstration.

The Base
NOTES:
- The base is worked in continuous rounds – do not join after each round
- To make the base a true circle (rather than a hexagonal shape), I elected to alternate where the increases fall in each round. If you prefer to do it the more traditional way of creating an increasing circle, feel free to do so!
- Use the 5.50 mm hook
| Rnd 1: | st 6 sc in a magic circle | [6] |
| Rnd 2: | inc in each st around | [12] |
| Rnd 3: | (sc 1, inc) x6 | [18] |
| Rnd 4: | (sc 2, inc) x6 | [24] |
| Rnd 5: | (sc 3, inc) x6 | [30] |
| Rnd 6: | sc 2, (inc, sc 4) x5, inc, sc 2 | [36] |
| Rnd 7: | (sc 5, inc) x6 | [42] |
| Rnd 8: | sc 3, (inc, sc 6) x5, inc, sc 3 | [48] |
| Rnd 9: | (sc 7, inc) x6 | [54] |
| Rnd 10: | sc 4, (inc, sc 8) x5, inc, sc 4 | [60] |
| Rnd 11: | (sc 9, inc) x6 | [66] |
| Rnd 12: | sc 5, (inc, sc 10) x5, inc, sc 5 | [72] |
| Rnd 13: | (sc 11, inc) x6 | [78] |
| Rnd 14: | sc 6, (inc, sc 12) x5, inc, sc 6 | [84] |
| Rnd 15: | (sc 13, inc) x6 | [90] |
| Rnd 16: | sc 7, (inc, sc 14) x5, inc, sc 7, sl st to 1st st, ch 1 | [96] |
| Rnd 17: | BLO sc around, sl st to 1st st, ch 1 | PH 01 on next page | [96] |
The Walls
NOTES:
- If you have modified the size of the bag by adding or removing rounds to the base, then you will also need to modify the number of holes that are created in Rnd 39. Do this by finding a number that your total number of stitches is divisible by and modifying your stitch counts in between the ch-3’s to create an even number of holes around.
- The sl st’s that join the rounds are not included in the stitch count
- The walls of the bag are worked in continuous rounds (do not turn). The rounds are joined.
- Refer to the video tutorial for the demonstration, as the written instructions (for the split puff specifically) can sound overwhelming if you’ve never done it before!
- The “ch 1” indicated after the SP stitches is in addition to the ch 1 that creates the “eye” of the st
| Rnd 18: | puff in same st as sl st, SP over 4 stitches – making the first leg in the same st as the puff you just made, sk 2, make the 2nd leg in the next st, ch 1, (SP, making the first leg in the same st as the 2nd leg of the previous SP, sk 2, then making the 2nd leg in the next st, ch 1) x repeat all the way around, make the 2nd leg of your final SP of the round into the base of where you made your sl st at the beginning of the round, sl st to eye of first puff | PH 02 | [96] |
| Rnd 19: | ch 1, puff in same st, (SP*, ch 1) x around, eliminate the ch 1 after your final SP of the round, sl st to the eye of the first puff [96 including chs] *make the first leg of the SP in the eye of the puff you just made, and the second leg of the SP in the eye of the next SP, repeat around | PH 03 | [96 includ-ing ch’s] |
| Rnd 20-36: | repeat Rnd 19 | PH 04 & 05 | [96] |
| Rnd 37: | ch 1, sc around, making one sc in the eye of each SP and 2 sc in each of the ch spaces, sl st to first st | [96] |
| Rnd 38: | ch 1, sc around, sl st to first st | [96] |
| Rnd 39: | ch 1, (sc 10, ch 3, sk 2) x8, sl st to first st | PH 06, 07 & 08 | [80 st + 24 chs] |
| Rnd 40: | ch 1, sc around, making 1 sc in each sc and 2 sc in each of the ch-3 spaces, sl st to first st | PH 09 | [96] |
| Rnd 41: | ch 1, sc around, sl st to first st | [96] |
| Rnd 42: | ch 1, sc around, sl st to first st, fasten off | [96] |

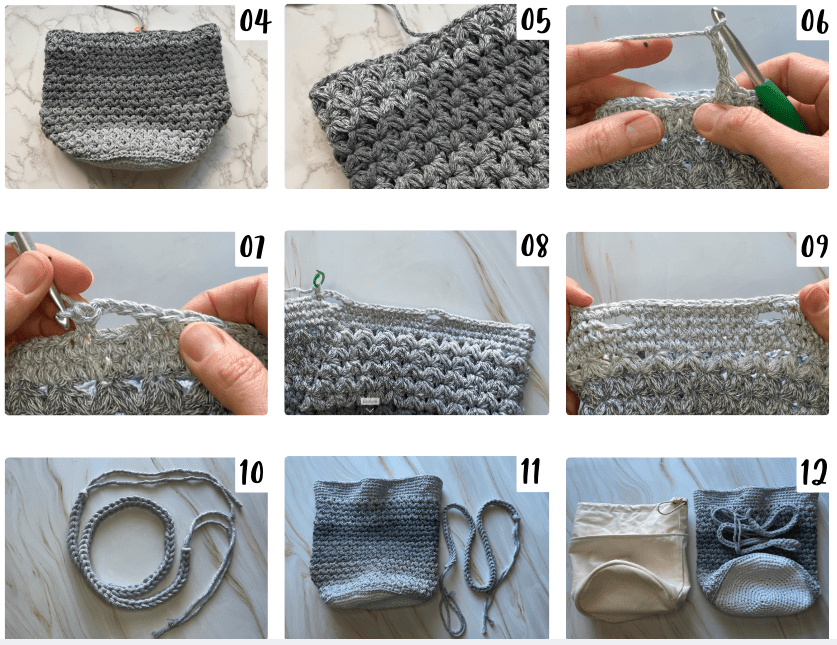
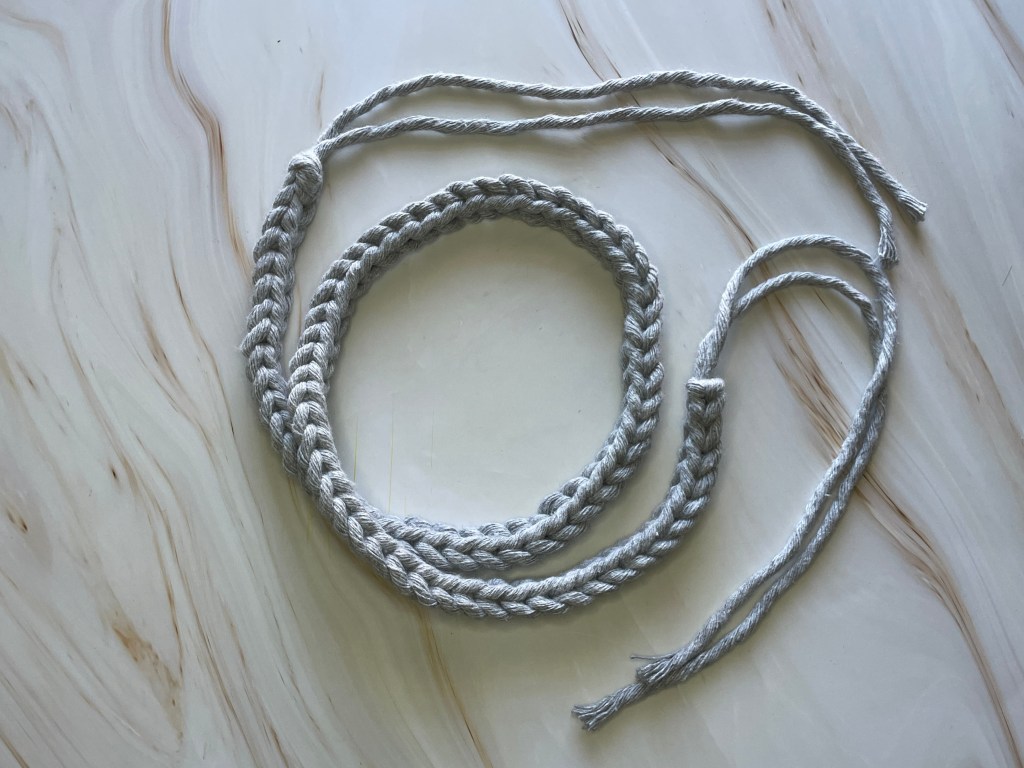
The Drawstring / Strap
NOTES:
- When complete, weave the strap through the strap holes beginning with inserting from outside to inside and out and in along the rim – you’ll end up with both ends dangling to the outside. Tie off in a strong knot. Decorate or fray ends as desired.
- I cover the technique for the drawstring, in detail, in the video tutorial
- The strap uses two strands of yarn worked at the same time. I use the center pull and the outer strand from a cake of yarn, but you can also cut a REALLY long length of yarn and fold it in half
- The strap should be 28” finished – during a test, it took a 90” length of yarn (folded in half) to produce 8” of strap
- The strap uses chunky cotton yarn. If you don’t have this on hand, you can certainly double up the worsted weight yarn you’re using for the bag
- Use the 7.00 mm hook
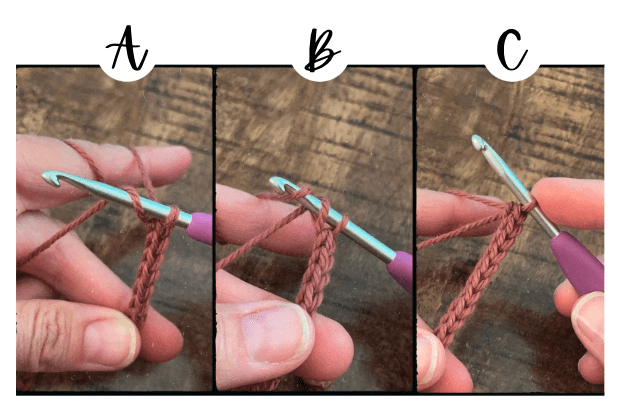
STEPS:
- Slip knot onto your hook with both ends of the two strands of yarn, or if you’re using one long folded strand, slip knot at the fold
- Take one of the yarns into your hand as your working end. The other yarn will dangle forward towards you over the palm of your hand.
- Next, with the strand in your palm (the one dangling forward towards you), yarn over hook from front to back and hold it in in place on the shaft of your hook PHOTO A
- Next, with the yarn in your working hand, yarn over hook from back to front (just like a normal yarn over) PHOTO B and pull through both loops on the hook PHOTO C
- Repeat steps 3 & 4 until the entire yarn strand has been used up.
- When complete, pull both yarn ends through the final loops and tie off.

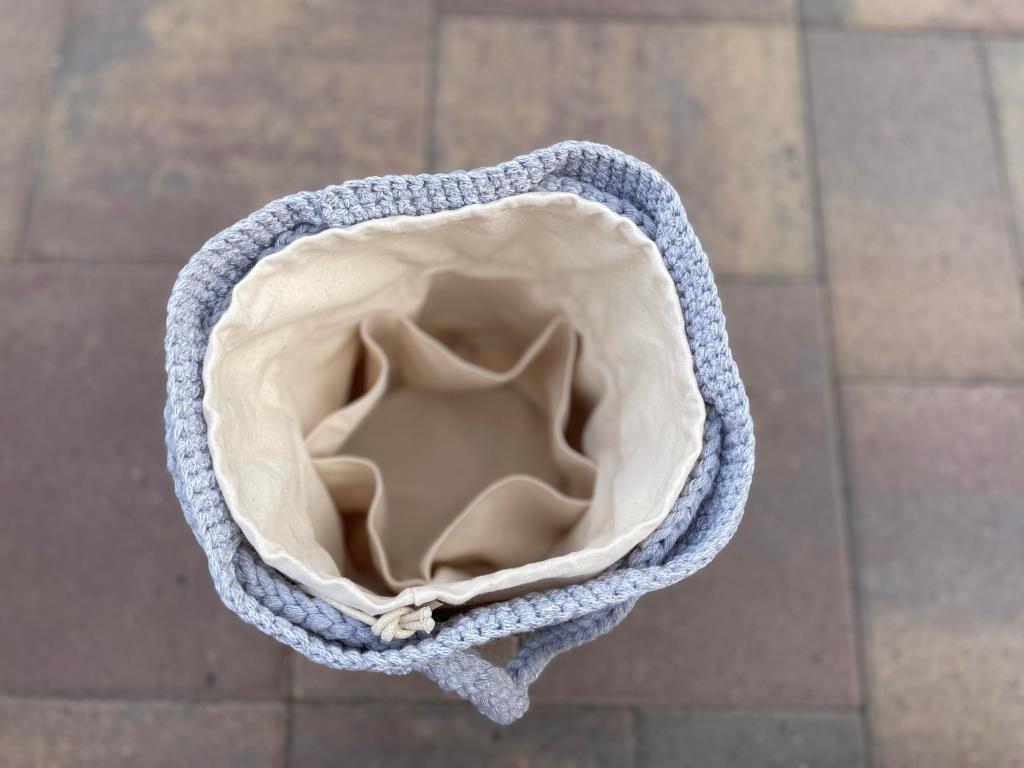
The Canvas Insert
I originally designed this bag to be a crochet project bag. I was inspired by a leather project bag that is beautiful, but I wasn’t ready to invest in it quite yet. So, I found this bag insert that did the trick, and I designed the crochet bag to fit it.
The insert is completely optional, but it really does wonders to organize and add some structure to this open-style drawstring bag!

Crochet Drawstring Bag Video Tutorial:
Show Off Your Work! ✨
I can’t wait to see your beautiful crochet drawstring bags! Be sure to tag me on social media @offthebeatenhook or use the hashtag #offthebeatenhook so I can admire your makes. ❤️
Pin this crochet drawstring bag pattern here:


Leave a Reply