

Let’s talk about crochet tension—one of those crochet terms that sounds much more serious and intimidating than it actually is.
When you first start crocheting, you may find that your stitches are so tight your hook needs to perform a small act of bravery just to get through them. Or perhaps your loops are loose enough to start developing personalities of their own.
All completely normal.
Crochet tension is not something most beginners understand immediately, and it certainly is not something you need to perfect before moving forward. It develops gradually as your hands learn how to hold the yarn, guide the hook, and work together without requiring your full concentration for every tiny movement.
In this lesson, you will learn:
- What crochet tension means
- Why tension matters
- How to recognize tension that is too tight or too loose
- How to adjust the way you hold your yarn
- How your working loop affects your stitches
- How to practice making your tension more consistent
- Why your tension does not need to look exactly like mine
Most importantly, you will learn that good crochet tension is not about pulling everything as tightly as possible.
It is about finding a comfortable amount of control that allows the yarn to move smoothly through your hands.
And yes, that really does become easier with practice.
LEARN TO crochet
Module 1: Foundations First
Lesson 6: Crochet Tension
This lesson is part of my free Learn to Crochet Course designed to take you from your very first stitch to completing your first projects and beyond.
24 step-by-step lessons with videos.
What Is Crochet Tension?
Crochet tension refers to how tightly or loosely you hold and control the yarn while you crochet.
As the yarn travels through your non-dominant hand, your fingers create a small amount of resistance. That resistance helps control how much yarn is available when you form each loop and stitch.
Too much resistance, and the yarn can barely move.
Too little resistance, and the yarn may flop around like it has somewhere else to be.
The goal is to find a comfortable place somewhere in the middle.
Your crochet tension affects:
- The size of your stitches
- The appearance of your fabric
- How flexible or stiff your project feels
- The amount of yarn you use
- The finished size of your project
- How easily your hook moves through your stitches
When your tension stays fairly consistent, your stitches will generally be similar in size. This creates fabric that looks even and predictable.
When your tension changes frequently, some stitches may be tight while others are loose. Your edges may become uneven, or your work may mysteriously grow wider or narrower even though you are absolutely certain you have been doing the same thing.
Crochet can be sneaky like that.
Slight variations are completely expected when you are learning. You are not aiming for machine-made perfection. You are simply helping your hands become more consistent over time.
A Little Help for Your Crochet Basket
Join and get the free Crochet Pro Essentials PDF Pack, plus gentle course reminders and new lessons in your inbox.

Crochet Tension Does Not Mean Pulling the Yarn Tight
One of the most common misunderstandings about crochet tension is that tighter must be better.
After all, tighter feels controlled. Secure. Responsible.
Unfortunately, it can also make your crochet hook feel like it is trying to tunnel through concrete.
The goal is not to pull the yarn tight after every stitch. In fact, repeatedly tightening each loop can make crocheting much more difficult than it needs to be.
Good tension allows the yarn to glide through your fingers with gentle resistance. You want enough control that the yarn does not fall loosely from your hand, but not so much that it cannot move.
Think of it like holding a small bird.
You want to hold it securely enough that it does not fly away, but gently enough that you do not squeeze it.
Your yarn should feel controlled—not trapped.
Why Does Crochet Tension Matter?
Crochet tension matters because it affects the size and consistency of every loop you create.
Every crochet stitch begins with loops of yarn on your hook. If those loops are very small and tight, your stitches will also be tight. If the loops are larger and looser, your stitches will be larger.
Neither tight nor loose tension is automatically wrong.
Some crocheters naturally crochet more tightly. Others crochet more loosely. You may even find that your tension changes depending on the day, the yarn, the hook, your mood, or whether someone is talking to you while you are trying to count.
The most important thing is consistency.
If you consistently crochet more tightly than another person, you may eventually need to use a larger crochet hook to create the same finished size. If you crochet more loosely, you may need to use a smaller hook.
This becomes especially important when you make projects where size matters, including:
- Sweaters
- Hats
- Mittens
- Fitted accessories
- Amigurumi pieces that need to match
Later in this course, we will spend an entire lesson talking about crochet gauge and how to adjust your hook size to match a pattern.
For now, do not worry about measuring anything or getting a particular number of stitches into a particular space. Your only job is to begin noticing how your hands control the yarn.
That is plenty for one lesson.
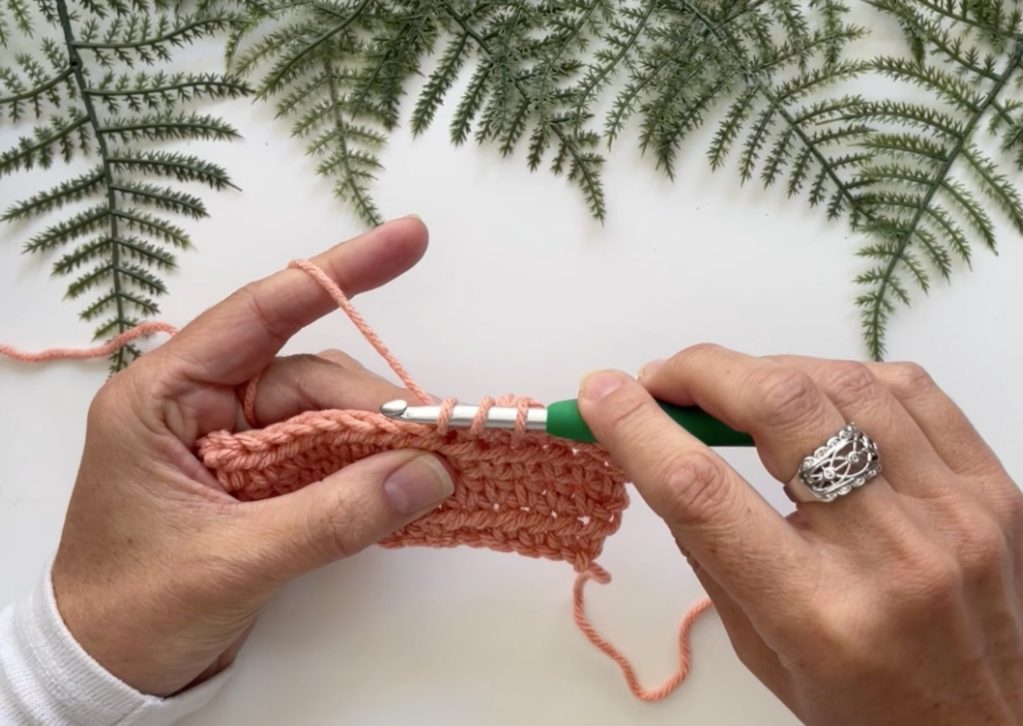
How to Hold the Yarn for Crochet Tension
In the previous lesson, you practiced holding your crochet yarn in your non-dominant hand. This is the hand responsible for feeding and controlling the yarn while your dominant hand moves the hook.
There are several ways to hold crochet yarn, and there is no single correct method that works for everyone.
A common method is to:
- Bring the yarn through or around the fingers of your non-dominant hand.
- Allow the yarn to travel over your index finger.
- Use your remaining fingers to gently hold the yarn against your palm.
- Adjust your index finger to help guide the yarn toward your hook.
Some crocheters wrap the yarn around their pinky before bringing it over the index finger. Others weave it between several fingers. Some hold it between two fingers with very little wrapping at all.
Crocheters are surprisingly creative when asked to make one piece of string behave.
The best method is the one that gives you comfortable control without causing pain, cramping, or excessive tightness in your hand.
Your yarn should move when you pull it with the hook. You should not have to stop after every stitch and manually tug more yarn through your fingers.
If the yarn refuses to budge, loosen your grip or remove one of the wraps around your fingers.
If the yarn is sliding around uncontrollably, add a little more contact by weaving it through another finger or wrapping it gently around your pinky.
Small adjustments can make a big difference.
What Should Proper Crochet Tension Feel Like?
Comfortable crochet tension should feel controlled but relaxed.
As you crochet, the yarn should:
- Move smoothly through your fingers
- Stay in contact with your guiding hand
- Feel secure without becoming stuck
- Feed toward your hook without sudden jerking
- Allow you to form loops without pulling forcefully
Your hands should not feel clenched. Your shoulders should not be slowly creeping toward your ears. You should not be holding your breath as though the yarn might escape if you exhale.
Beginners often concentrate so intensely that their entire bodies become tense.
So, pause for a moment.
Relax your shoulders.
Unclench your jaw.
Loosen your grip on the crochet hook.
Take a breath.
You do not need to wrestle the yarn into submission. The hook and yarn are designed to work together, and your job is mostly to guide them.
How the Golden Loop Affects Crochet Tension
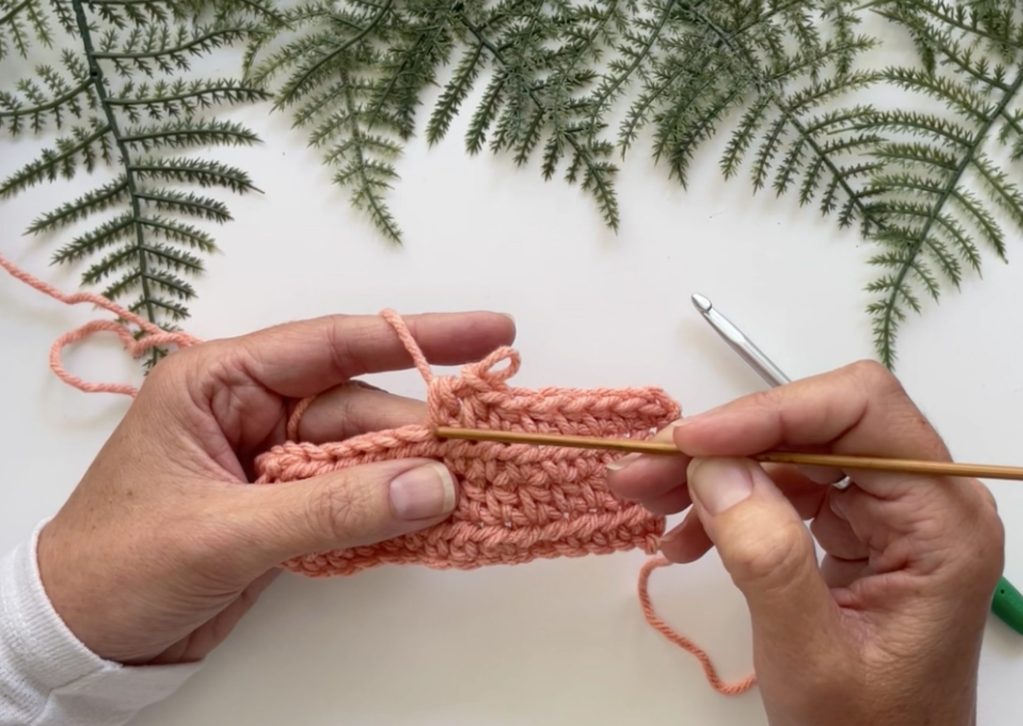
The golden loop is the final loop you pull up before completing your stitch.
This little loop may not look especially important, but its size plays a major role in the size of your next stitch.
If you pull the golden loop tightly around the narrow part of the hook, your next stitch may become too small. Alternatively, if the golden loop stretches far away from the hook, the next stitch may become unusually loose.
Try to keep the golden loop resting comfortably around the shaft of your hook.
The shaft is the straight section of the hook that determines the size of the loops you create. Allowing each loop to form around this section helps create stitches that correspond with the actual size of your crochet hook.
Avoid making your loops only around the narrow throat of the hook. This can make your stitches tighter and smaller than intended.
After pulling the yarn through a loop, gently allow the new working loop to slide back toward the shaft.
You do not need to dramatically reposition it after every stitch. It is a small, natural movement that will become part of your rhythm with practice.
The size of your golden loop will affect the height of your finished stitches—and it may reveal whether you are naturally a yanker, rider, or lifter.
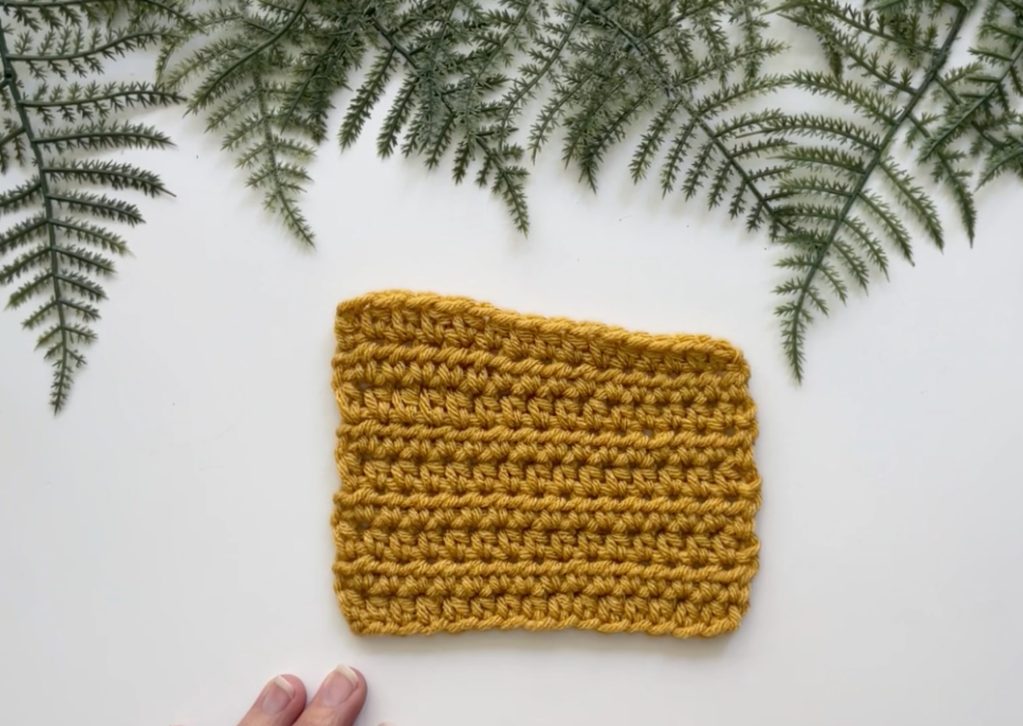
Are You a Yanker, Rider, or Lifter?
Here is where crochet tension gets especially interesting.
Two crocheters can use the exact same yarn, the exact same crochet hook, and the exact same stitch—and still end up with rows that are noticeably different heights.
This does not necessarily mean that either person is doing something wrong. It may simply come down to what they naturally do with that final golden loop – and its height helps determine the height of the finished stitch.
Some crocheters naturally pull that loop tighter. Others keep it close to the top of the previous row. Still others lift it higher before completing the stitch.
These three natural crochet styles are often described as yankers, riders, and lifters.
And although those names may sound like three characters arriving for a showdown in an old Western, they are actually a very helpful way to understand why everyone’s crochet tension looks a little different.

What Is a Crochet Yanker?
A yanker pulls that final loop snug and makes it shorter.
Instead of allowing that loop to remain comfortably on the hook, a yanker may pull the working yarn backward and tighten the loop around the hook.
This creates a smaller golden loop and usually produces shorter, tighter stitches.
You may be a yanker if:
- You instinctively tighten the yarn after pulling up a loop
- Your stitches tend to look short and compact
- Your rows are shorter than expected
- Your hook sometimes struggles to move through the loops
- Your crochet fabric feels dense or stiff
- Your hands tend to grip the yarn and hook firmly
Many beginners are natural yankers because pulling the yarn tight feels neat and secure.
It is almost as though your hands are saying, “There. That loop is definitely not going anywhere.”
Unfortunately, the hook may not be going anywhere either.
If you recognize yourself as a yanker, try resisting the urge to tighten the yarn after pulling up the loop. Allow the loop to sit comfortably around the shaft of the crochet hook before completing the stitch.
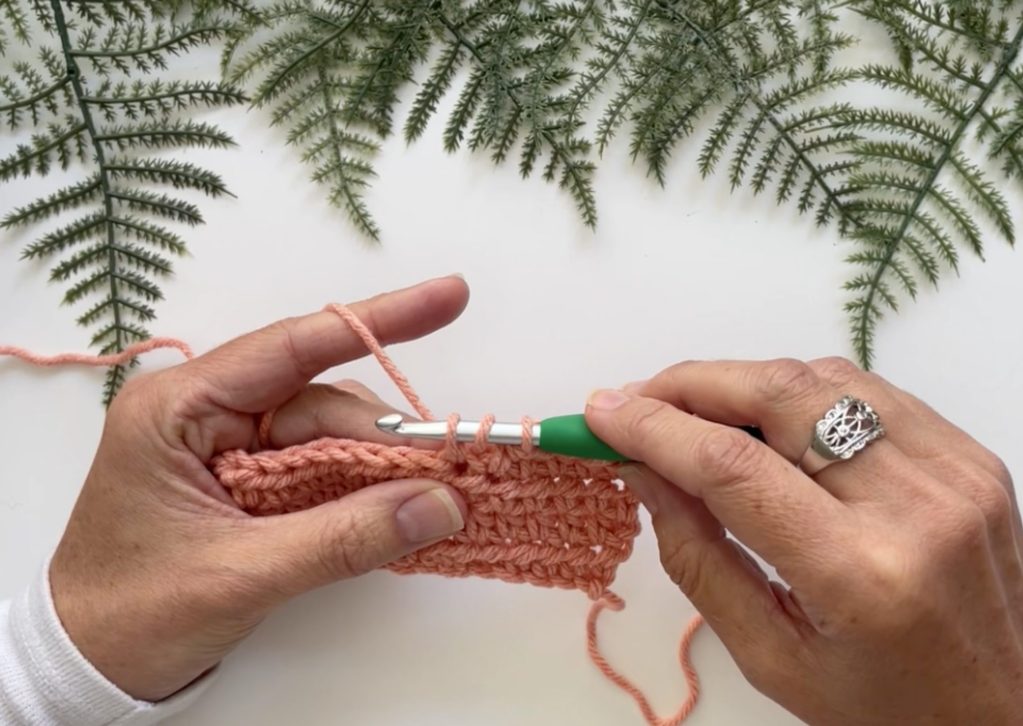
What Is a Crochet Rider?
A rider keeps that pulled-up loop resting close to the top of the previous row.
The golden loop rests comfortably on the hook and is usually about the same size as the other loops involved in the stitch.
Rather than pulling the loop tightly downward or lifting it high above the fabric, the hook seems to “ride” along the top of the work.
You may be a rider if:
- Your loops remain fairly consistent in size
- Your hook stays close to the top of the previous row
- Your stitches are neither especially short nor especially tall
- Your yarn moves smoothly without being pulled tight
- Your row height generally falls somewhere in the middle
Riding is often described as the middle ground between yanking and lifting.
That does not mean every crocheter must become a perfect rider. It simply gives us a useful reference point for understanding how the height of the pulled-up loop changes the finished stitch.
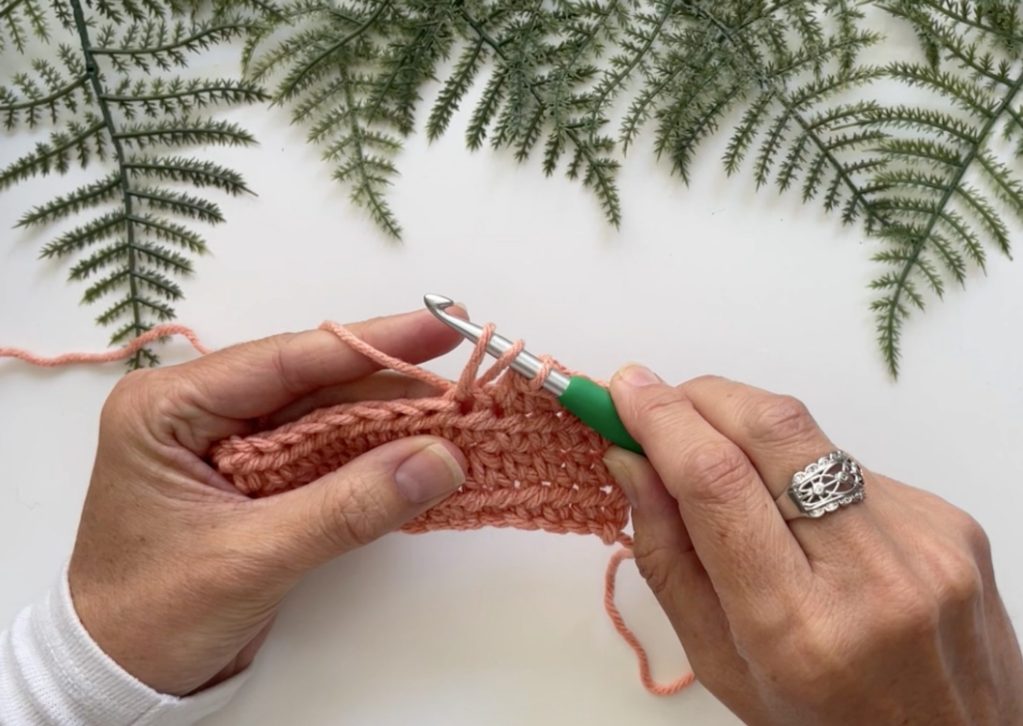
What Is a Crochet Lifter?
A lifter raises that final loop higher before continuing.
Instead of keeping the loop close to the fabric, a lifter naturally lifts the hook and loop upward before finishing the stitch.
This creates a taller golden loop and usually produces taller stitches and rows.
You may be a lifter if:
- You pull your hook upward after inserting it into a stitch
- Your golden loop is taller than the other loops on your hook
- Your stitches look long or elongated
- Your rows are taller than expected
- Your fabric feels more open or relaxed
- You naturally hold your hook farther above the work
Lifters are not necessarily crocheting too loosely. Their yarn tension may be perfectly consistent. They simply create more height in that final loop.
If you are a lifter and your rows are becoming taller than you want, try keeping your hook slightly closer to the top of the previous row as you pull up the loop.
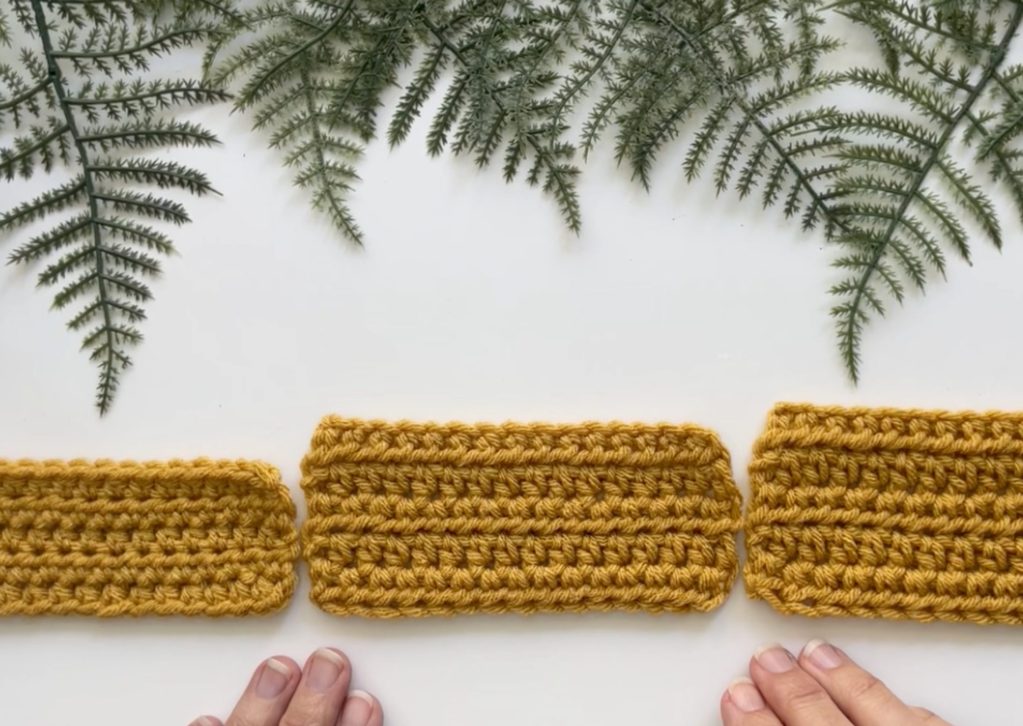
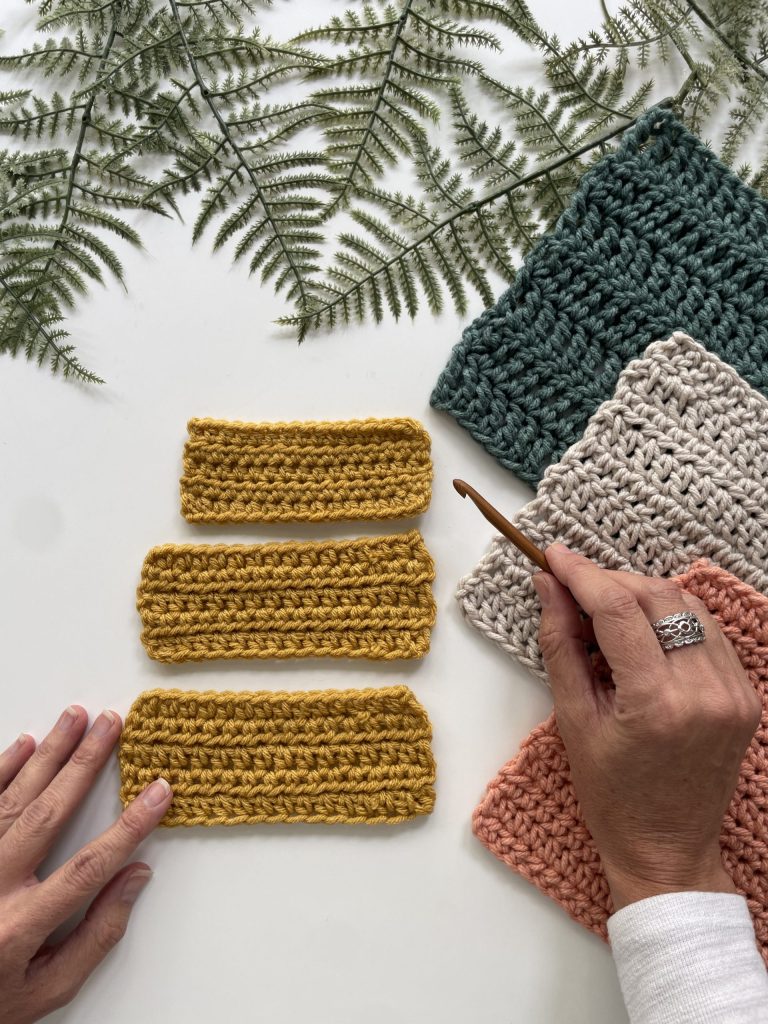
Same yarn, same hook, different tension
The above photo shows the results of 3 different swatches. All of them used the exact same yarn, exact same hook, but were crocheted as a “yanker” (on the left), a “rider” (in the middle) and a “lifter” (on the right). This is how dramatically your tension can affect your final project size.
Which Crochet Style Is Correct?
None of these crochet styles is automatically right or wrong.
Being a yanker, rider, or lifter simply helps describe your natural movement.
You may even discover that you change styles depending on:
- The stitch you are making
- The yarn you are using
- The shape of your crochet hook
- How quickly you are crocheting
- Whether you are relaxed or concentrating
- How tall the stitch needs to be
The important thing is understanding how your movement affects your crochet fabric.
A yanker will generally create shorter rows. A lifter will generally create taller rows. A rider usually lands somewhere in between.
This is especially helpful later when you begin working with crochet gauge. You may find that the width of your gauge swatch matches a pattern perfectly, while the height does not. Your natural golden-loop style may be the reason.
For now, you do not need to force yourself into a different category.
Simply pay attention.
When you pull up the final loop of a stitch, do you tighten it, keep it close to the row, or lift it upward?
Discovering whether you are naturally a yanker, rider, or lifter can help you understand your crochet tension—and explain why your stitches look uniquely yours.
And once you recognize your natural style, many mysterious crochet-tension problems suddenly become much less mysterious.
Watch the Video Lesson
Your Crochet Hook Grip Can Affect Your Tension Too
Your yarn hand is not the only hand involved in crochet tension.
The way you hold the hook can also affect the size and tightness of your stitches.
If you grip your hook very firmly, your movements may become small and stiff. You may begin pulling each loop forcefully through the stitch, tightening it as you go.
Whether you use the pencil grip or the knife grip, try to hold your hook securely but gently.
You do not want it flying across the room, of course. But you also do not need to hold it like someone is about to take it away from you.
Allow the hook to move within your hand. Your fingers should guide the movement rather than clamp around it.
Periodically pause and wiggle your fingers. Relax your hand. Roll your shoulders.
If your hand begins to ache, stop and take a break.
Pain is not a required step in learning to crochet.

Yarn and Hook Choice Can Affect Crochet Tension
Some yarns are much easier to control than others.
Very fuzzy, slippery, splitty, dark, thin, or heavily textured yarns can make it difficult to see and feel your stitches.
Those yarns may be beautiful. They may be calling your name from across the craft store. They may even have sparkles.
But they are not always the kindest choice when you are learning.
For crochet tension practice, choose:
- A smooth yarn
- A light or medium color
- A medium yarn weight
- A hook that feels comfortable in your hand
- A hook size recommended on the yarn label
A medium-weight yarn paired with an appropriately sized crochet hook gives you enough structure to see your stitches without requiring tiny, precise movements.
The material of the crochet hook may also affect how the yarn moves.
Some hooks allow yarn to glide very quickly. Others create more friction. Neither is automatically better.
You may prefer a smoother hook if your tension is very tight, while someone with loose tension may enjoy a hook with a little more grip.
As you continue crocheting, you will begin to recognize which hook and yarn combinations feel best in your hands.
Does Your Crochet Tension Need to Match Mine?
No.
Your crochet tension does not need to look exactly like mine—or anyone else’s.
Two crocheters can use the same yarn, the same hook, and the same stitch pattern and still create slightly different fabric.
One person may naturally crochet tightly. Another may crochet loosely. One person may hold the yarn over a single finger, while another winds it through their entire hand in a system that appears to require an advanced engineering degree.
These differences are normal.
Eventually, when you follow a pattern, your goal will be to create fabric that matches the pattern’s gauge. You will not need to copy the designer’s exact hand position or movements.
Use demonstrations as a starting point, then make small adjustments until the yarn feels comfortable and controlled in your own hands.
There is more than one correct way to crochet.
How Long Does It Take to Develop Consistent Crochet Tension?
There is no exact timeline.
Some people begin creating fairly consistent stitches after a few practice sessions. Others need several projects before their tension begins to feel natural.
You may understand exactly what you are supposed to do before your hands are capable of doing it consistently.
That can be frustrating, but it is a completely normal part of learning a physical skill.
Your brain is building new connections while your hands develop muscle memory.
Every time you pick up your crochet hook, the movements become a little more familiar.
Try not to judge your progress by a single row or one practice session.
Instead, notice the smaller signs of improvement:
- Are your stitches easier to form than they were yesterday?
- Are your hands feeling more relaxed?
- Can you make several stitches without repositioning the yarn?
- Are you spending less time thinking about where every finger goes?
- Are your chains beginning to look more similar in size?
Those are meaningful signs that your crochet tension is improving.
A Friendly Note About Crochet Tension and Perfection
Perfectly uniform stitches are not required for you to call yourself a crocheter.
Handmade fabric naturally contains small variations. Those little differences are part of what makes crochet feel warm, personal, and beautifully human.
Consistency is helpful, especially when size matters, but perfection is not the goal.
Your first chain may be uneven.
Your first rows may lean.
One side of your practice square may look different from the other.
Your beginning chain may look as though it has been through something.
Keep going.
The only way to develop consistent crochet tension is to allow yourself to crochet while your tension is still inconsistent.
You do not need to master this lesson before moving forward. Your tension will continue improving as you learn new stitches and complete new projects.
Practice does not come after you become good at crochet.
Practice is how you become good at crochet.
Common Beginner Mistakes & Troubleshooting
Signs Your Crochet Tension Is Too Tight
Your crochet tension may be too tight if:
- You struggle to insert your hook into the next stitch
- Your hook frequently becomes stuck
- You have difficulty pulling the yarn through your loops
- Your hands, fingers, or wrists begin to hurt
- Your stitches look very small and compressed
- Your fabric feels unusually stiff
- Your foundation chain curls tightly
- You hear the yarn squeaking against the hook
- Your project turns out smaller than expected
Tight tension is extremely common among beginners.
You may be worried that your stitches will unravel unless you pull them tight. You may be gripping the hook firmly because you are concentrating. Or your hands may simply be wondering why you have suddenly asked them to manage a hook, yarn, loops, fingers, counting, and breathing all at once.
Your stitches do not need to be pulled tight to stay together. Crochet stitches are secured by the structure of the stitch itself.
Your working loop can rest comfortably on the hook without everything falling apart.
How to Loosen Tight Crochet Tension
Begin by loosening your grip on both the yarn and the crochet hook.
Then check your working loop. Make sure it is sitting around the shaft of the hook rather than being pulled tightly into the narrow throat.
You can also try:
- Wrapping the yarn around fewer fingers
- Holding the yarn more lightly against your palm
- Raising your guiding index finger slightly
- Keeping your hands a little closer together
- Moving the hook more slowly
- Using a larger crochet hook while practicing
- Taking frequent breaks to relax your hands
- Practicing with a smooth, light-colored yarn
You may feel as though you are making your stitches far too loose at first.
That is normal. When you are accustomed to tight tension, comfortable loops can look enormous—even when they are not.
Give your hands time to adjust.

Signs Your Crochet Tension Is Too Loose
Your tension may be too loose if:
- Your working loop frequently falls off the hook
- Your stitches look stretched or floppy
- Your fabric has unexpectedly large spaces
- Your foundation chain looks uneven
- Your edges appear wavy
- Your project turns out larger than expected
- You have difficulty controlling the yarn
- The yarn hangs loosely between your guiding hand and hook
Loose tension often happens when the yarn is not making enough contact with the fingers of your non-dominant hand.
Your hand is supposed to provide a small amount of resistance. Without that resistance, every loop may come out a slightly different size.
How to Tighten Loose Crochet Tension
Try adding a little more contact as the yarn moves through your fingers.
You can:
- Wrap the yarn once around your pinky
- Weave the yarn between your fingers
- Gently close your lower fingers around the yarn
- Lower your guiding index finger slightly
- Keep your hands closer together
- Use a slightly smaller crochet hook while practicing
Remember that you are adding gentle resistance—not trying to cut off the yarn’s circulation.
The yarn should still move smoothly through your hand when you pull it with the hook.
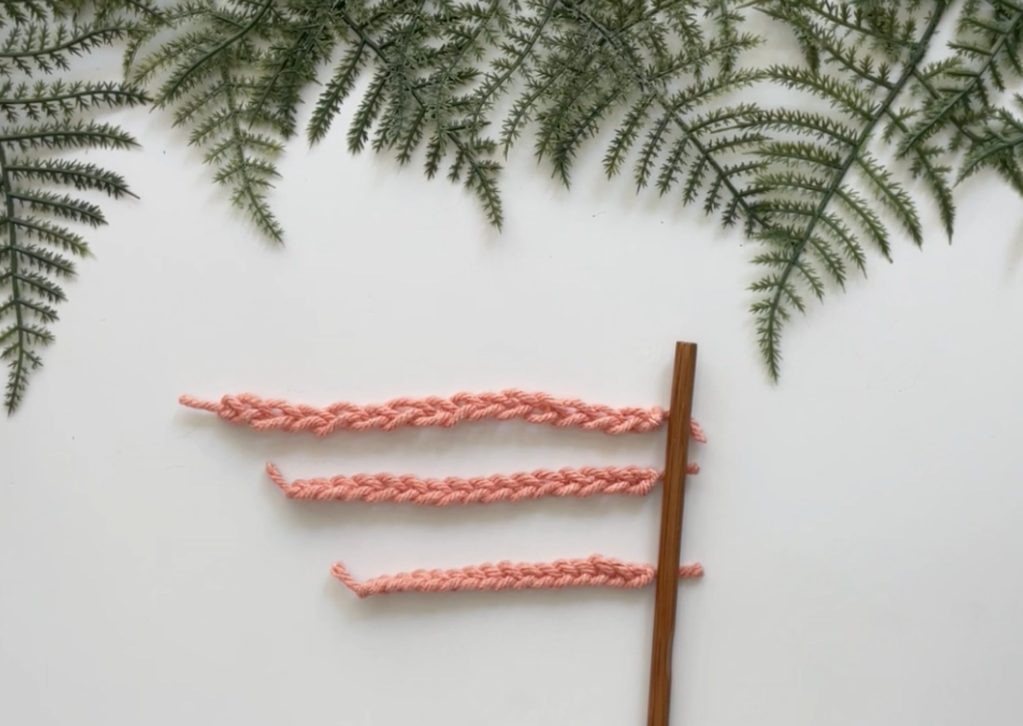
Same yarn, same hook, different chain
All 3 chains in the photo above were crocheted using the exact same yarn and the exact same hook. However, they were all made using different tension. The top chain was made using very loose tension, the bottom chain used very tight tension and the middle chain used an average, comfortable tension.
Why Your Foundation Chain is So Tight
Many beginners make a foundation chain that is much tighter than the stitches they eventually crochet into it.
This happens because it is tempting to pull each new chain snug against the hook.
Snug feels neat. Neat feels correct.
Then you try to insert your hook into that chain and discover that you have crocheted a tiny decorative rope that no hook may enter.
When practicing your foundation chain, allow each new loop to form around the full shaft of the crochet hook. Try not to pull the chain tight after every stitch.
Your chain should feel flexible rather than stiff.
You should be able to see the individual V shapes, and you should be able to gently stretch the chain between your hands.
If you consistently make a very tight foundation chain when beginning a project, you may eventually choose to make the chain using a slightly larger hook and then switch to the recommended hook for the rest of the pattern.
For now, though, it is helpful to practice loosening the chain itself. This gives your hands a chance to begin developing better control.
What If Your Crochet Tension Keeps Changing?
It probably will.
At least for a while.
Your first few stitches may be loose because you are still arranging your hands. Then your stitches may become tighter as you concentrate. After several minutes, you might relax and begin making larger stitches again.
Your tension can also change depending on:
- Your mood
- How tired you are
- How quickly you are crocheting
- The type of yarn you are using
- The material or shape of your crochet hook
- Whether you are sitting comfortably
- How familiar you are with the stitch
- Whether you are watching television
- Whether someone speaks to you while you are counting
This is one reason practice matters so much.
Consistency develops when the movements become familiar enough that you no longer have to consciously direct every finger.
Think about learning to write your name. At first, every line and curve required concentration. Eventually, your hand learned the movement and could do it almost automatically.
Crochet tension develops in much the same way.
For now, focus on making smooth, comfortable movements rather than trying to make every stitch exactly the same size.
FAQs
Crochet tension is the amount of control or resistance you place on the yarn as it moves through your hand. It affects the size, appearance, and consistency of your crochet stitches.
Your crochet tension should be firm enough to control the yarn but loose enough that the yarn moves smoothly through your fingers. Your working loop should rest comfortably around the shaft of the hook without being pulled tight.
You may be gripping the yarn or crochet hook too firmly, pulling each completed stitch tight, or keeping the working loop near the narrow throat of the hook. Concentrating intensely can also cause beginners to tense their hands without realizing it.
Relax your grip, allow the working loop to rest around the shaft of the hook, and reduce the number of times the yarn is wrapped around your fingers. You can also practice with a slightly larger crochet hook.
Your yarn may not be making enough contact with your guiding hand. Try wrapping the yarn around your pinky, weaving it between your fingers, or gently holding it against your palm to add a little more resistance.
Changing tension is normal when you are learning. Your hands are still developing muscle memory, and your grip may change as you concentrate, relax, become tired, or reposition your yarn.
You may be pulling each chain snug after forming it or making the loops around the narrow throat of your crochet hook. Allow every loop to form around the wider shaft and avoid tightening the chain after each stitch.
A larger hook can help you create larger loops, but it is also important to practice relaxing your grip and allowing your working loop to sit correctly on the hook. When following a pattern, you can later adjust your hook size to help match the required gauge.
Neither is automatically better. The most important thing is consistency and whether your finished fabric has the size, appearance, and flexibility needed for your project.
Yes. Crochet tension usually becomes more consistent as your hands become familiar with holding the yarn, moving the hook, and forming stitches. Relaxed, regular practice is much more helpful than trying to force every stitch to be perfect.
No. There are many ways to hold and tension crochet yarn. Some crocheters wrap it around one or more fingers, while others weave it between their fingers. Choose the position that gives you comfortable control without causing pain or strain.
You may be gripping the hook or yarn too tightly, crocheting for too long without a break, or holding your hands in an uncomfortable position. Stop if you feel pain, relax and stretch your hands, and adjust your grip before continuing.
Absolutely. Your hands, grip, yarn, and natural crochet style may all be different. You do not need to copy another crocheter’s movements exactly to create beautiful, consistent stitches.
Your Crochet Tension Practice Challenge
Before moving on to the next lesson, spend a few minutes practicing your foundation chain.
Make a slip knot and place it on your hook.
Crochet 15 to 20 chain stitches using your normal tension.
As you practice, pay attention to:
- How tightly you are holding the crochet hook
- How the yarn moves through your fingers
- The size of your working loop
- Whether each chain forms around the shaft of the hook
- Whether your hands and shoulders feel relaxed
- Whether your individual chains are becoming more consistent
Then stop and relax your hands.
Pause and take a look at it.
Ask yourself:
- Are the chains fairly similar in size?
- Is one section much tighter than another?
- Can I clearly see each V shape?
- Does the chain feel flexible?
- Did my grip become tighter as I continued?
Then make another chain.
Try adjusting the way the yarn travels through your fingers. Notice what happens when you raise your index finger. Notice what happens when you lower it or wrap the yarn around another finger.
This is not a test, and your chains do not need to be perfect.
You are experimenting and learning how your hands affect the yarn.
For the next several chains, intentionally crochet very tightly.
Pull those loops snug and notice what happens. Pay attention to how difficult it becomes to move the yarn and hook.
Next, intentionally make several chains very loosely. Allow the working loops to become much larger than usual. Notice how floppy and unstable the chain begins to feel.
Finally, return to a comfortable place somewhere between those two extremes.
This exercise allows you to physically feel the difference between tension that is too tight, tension that is too loose, and tension that feels balanced. You are allowed to crochet something whose only purpose is to help you learn.
Sometimes comfortable tension is easier to recognize after you have experienced what definitely does not feel comfortable.
Congrats, you finished module 1!
Learning crochet tension is not about creating flawless stitches immediately. It is about beginning to understand how the yarn feels in your hands.
With every chain and every stitch, you are developing more control, coordination, and confidence.
Give yourself permission to be a beginner. Let your stitches be a little uneven while your hands learn something entirely new.
Your crochet tension will not improve because you stare sternly at your stitches and demand that they behave. It will improve because you keep crocheting.
So take a breath, relax your hands, and keep going.
You are doing beautifully.
Take a moment to celebrate—you have officially completed Module 1: Foundations First.
You have learned what to expect as a beginner, gathered your essential crochet supplies, explored crochet hooks and yarn, practiced holding your hook and yarn, made a slip knot and foundation chain, and now understand how crochet tension affects your stitches.
That is a lot.
Even if your chain is still a little uneven or your hands occasionally forget what they are supposed to be doing, you have built the foundation you need to keep moving forward.
And now the really exciting part begins.
In Module 2: Core Crochet Stitches, you will start turning everything you have learned into actual crochet fabric. Your next lesson is all about the single crochet stitch—one of the most useful and beginner-friendly stitches in crochet.
So relax your shoulders, give your hands a little shake, and bring all that beautiful new tension practice with you.
You are ready to crochet your first real stitch.
← Previous Lesson: How to Hold a Crochet Hook & Yarn
SOCIAL MEDIA YOUR THING?
Connect with me on your favorite social network!
Pin This Lesson for Later
Leave a Reply